
Strawberry Cheesecake Protein Balls are a delightful treat that perfectly combines the rich, creamy flavor of cheesecake with the refreshing taste of strawberries, all while packing a nutritious punch. As someone who has always been passionate about healthy snacking, I can confidently say that these protein balls are not only delicious but also incredibly convenient for those busy days when you need a quick energy boost. The history of cheesecake dates back to ancient Greece, but this modern twist on the classic dessert brings a fun and healthy spin that everyone can enjoy.
People love Strawberry Cheesecake Protein Balls for their irresistible taste and satisfying texture. Each bite offers a burst of strawberry flavor, complemented by the creamy essence of cheesecake, making them a perfect guilt-free indulgence. Plus, they are easy to make and can be stored for a quick snack anytime. Whether you’re hitting the gym or simply craving something sweet, these protein balls are a fantastic way to enjoy a beloved dessert in a healthier form. Join me in exploring this delightful recipe that will surely become a favorite in your household!

Ingredients:
- 1 cup rolled oats
- 1 cup vanilla protein powder
- 1/2 cup almond butter (or any nut butter of your choice)
- 1/4 cup honey or maple syrup
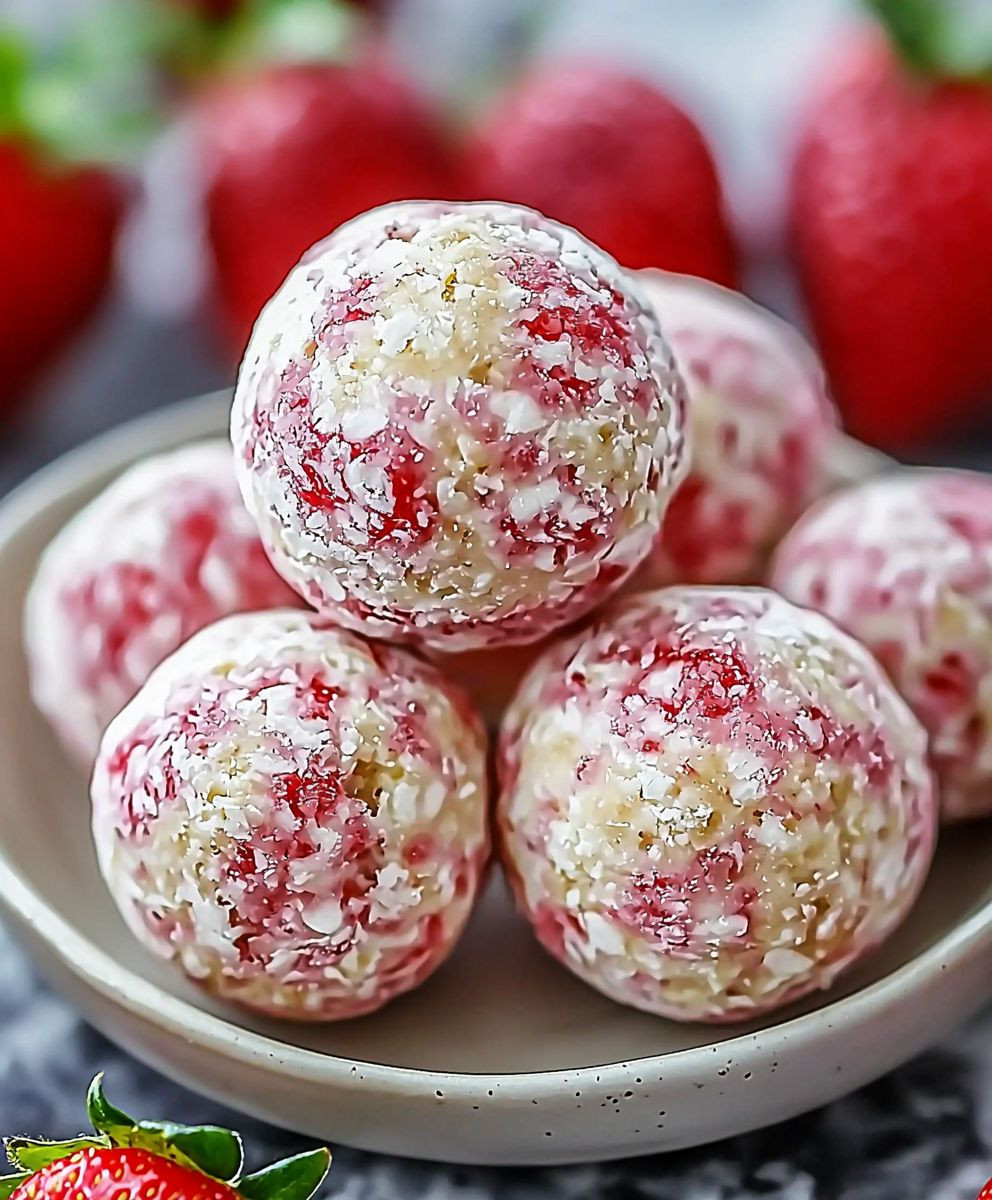
- 1/2 cup crushed freeze-dried strawberries
- 1/4 cup cream cheese, softened
- 1 teaspoon vanilla extract
- 1/4 teaspoon salt
- 1/4 cup mini chocolate chips (optional)
Preparing the Mixture
Let’s get started on these delicious Strawberry Cheesecake Protein Balls! First, gather all your ingredients and find a large mixing bowl. I love to have everything laid out so I can easily grab what I need as I go along.
- In the large mixing bowl, combine the rolled oats and vanilla protein powder. Stir them together until they are well mixed. This will be the base of our protein balls.
- Add the almond butter and honey (or maple syrup) to the bowl. I usually find it easier to measure the almond butter if I warm it slightly in the microwave for about 10 seconds. This makes it easier to mix in.
- Next, add the softened cream cheese. Make sure it’s at room temperature so it blends smoothly. If you forgot to take it out of the fridge, you can microwave it for about 10-15 seconds as well.
- Now, pour in the vanilla extract and sprinkle in the salt. These ingredients will enhance the flavor of our protein balls.
- Using a spatula or your hands, mix everything together until it forms a sticky dough. It might take a little effort, but keep mixing until all the ingredients are well incorporated.
Incorporating the Strawberries
Now that we have our base mixture ready, it’s time to add the star ingredient: the strawberries!
- Take your crushed freeze-dried strawberries and gently fold them into the mixture. I love the vibrant color and flavor they bring to the protein balls.
- If you’re using mini chocolate chips, now is the time to add them in as well. They add a delightful sweetness and a little crunch!
- Once everything is combined, the mixture should be slightly sticky but hold together well. If it feels too dry, you can add a splash of almond milk or a little more nut butter to help it bind.
Forming the Protein Balls
Now comes the fun part—shaping our mixture into protein balls!
- Using your hands, take about a tablespoon of the mixture and roll it into a ball. I like to make them about the size of a golf ball, but you can make them smaller or larger depending on your preference.
- Place the rolled balls on a baking sheet lined with parchment paper. This will prevent them from sticking and make cleanup a breeze.
- Continue rolling the mixture until all of it is shaped into balls. You should end up with about 15-20 protein balls, depending on the size you choose.
Chilling the Protein Balls
After shaping the protein balls, it’s important to chill them to help them firm up.
- Cover the baking sheet with plastic wrap or place it in the refrigerator for at least 30 minutes. This will help the protein balls hold their shape and make them easier to eat.
- If you’re in a hurry, you can also place them in the freezer for about 15-20 minutes. Just keep an eye on them so they don’t freeze solid!
Storing and Enjoying
Once your protein balls are chilled and firm, they’re ready to enjoy!
- Transfer the protein balls to an airtight container. They can be stored in the refrigerator for up to a week, or you can freeze them for longer storage. Just make sure to separate layers with parchment paper if you’re stacking them.
- Whenever you need a quick snack or a post-workout treat, grab a protein ball from the fridge or freezer. They’re perfect for on-the-go energy!
- Feel free to get creative! You can swap

Conclusion:
In summary, these Strawberry Cheesecake Protein Balls are an absolute must-try for anyone looking to indulge in a delicious yet healthy snack. With their creamy texture and delightful strawberry flavor, they perfectly capture the essence of a classic cheesecake while packing a protein punch that keeps you energized throughout the day. Whether you’re enjoying them as a post-workout treat, a midday snack, or a sweet addition to your breakfast, these protein balls are versatile enough to fit into any part of your day. For serving suggestions, consider pairing these protein balls with a dollop of Greek yogurt or a sprinkle of crushed nuts for added texture. You can also experiment with variations by swapping out the strawberries for other fruits like blueberries or raspberries, or even adding a hint of chocolate for a richer flavor. The possibilities are endless, and I encourage you to get creative! I can’t wait for you to try this recipe and experience the joy of these Strawberry Cheesecake Protein Balls for yourself. Once you do, please share your thoughts and any variations you come up with! Your feedback not only inspires me but also helps others discover this delightful treat. So grab your ingredients, roll up your sleeves, and let’s make some delicious memories together! Print
Strawberry Cheesecake Protein Balls: A Delicious and Healthy Snack Recipe
- Total Time: 45 minutes
- Yield: 15–20 protein balls 1x
Description
These Strawberry Cheesecake Protein Balls are a tasty and healthy snack, combining protein, healthy fats, and the sweet flavor of strawberries. Ideal for a quick energy boost or a post-workout treat, they are easy to make and customizable with your favorite mix-ins.
Ingredients
Scale- 1 cup rolled oats
- 1 cup vanilla protein powder
- 1/2 cup almond butter (or any nut butter of your choice)
- 1/4 cup honey or maple syrup
- 1/2 cup crushed freeze-dried strawberries
- 1/4 cup cream cheese, softened
- 1 teaspoon vanilla extract
- 1/4 teaspoon salt
- 1/4 cup mini chocolate chips (optional)
Instructions
- In a large mixing bowl, combine the rolled oats and vanilla protein powder. Stir until well mixed.
- Add the almond butter and honey (or maple syrup) to the bowl. Warm the almond butter slightly in the microwave for about 10 seconds for easier mixing.
- Add the softened cream cheese, ensuring it’s at room temperature for smooth blending. If needed, microwave for 10-15 seconds.
- Pour in the vanilla extract and sprinkle in the salt. Mix to enhance the flavor.
- Using a spatula or your hands, mix everything until it forms a sticky dough. Ensure all ingredients are well incorporated.
- Gently fold in the crushed freeze-dried strawberries.
- If using, add the mini chocolate chips for added sweetness and crunch.
- Ensure the mixture is slightly sticky but holds together well. If too dry, add a splash of almond milk or more nut butter.
- Take about a tablespoon of the mixture and roll it into a ball, about the size of a golf ball.
- Place the rolled balls on a baking sheet lined with parchment paper.
- Continue rolling until all the mixture is shaped into balls, yielding about 15-20 protein balls.
- Cover the baking sheet with plastic wrap or refrigerate for at least 30 minutes to firm up.
- Alternatively, freeze for 15-20 minutes, watching to prevent them from freezing solid.
- Transfer the chilled protein balls to an airtight container. Store in the refrigerator for up to a week or freeze for longer storage, separating layers with parchment paper.
- Enjoy as a quick snack or post-workout treat! Feel free to get creative with mix-ins or flavors!
Notes
- You can substitute almond butter with any nut or seed butter of your choice.
- For a vegan option, use plant-based cream cheese and maple syrup.
- Customize the flavor by adding different freeze-dried fruits or nuts.
- Prep Time: 15 minutes
- Cook Time: 0 minutes


Leave a Comment