
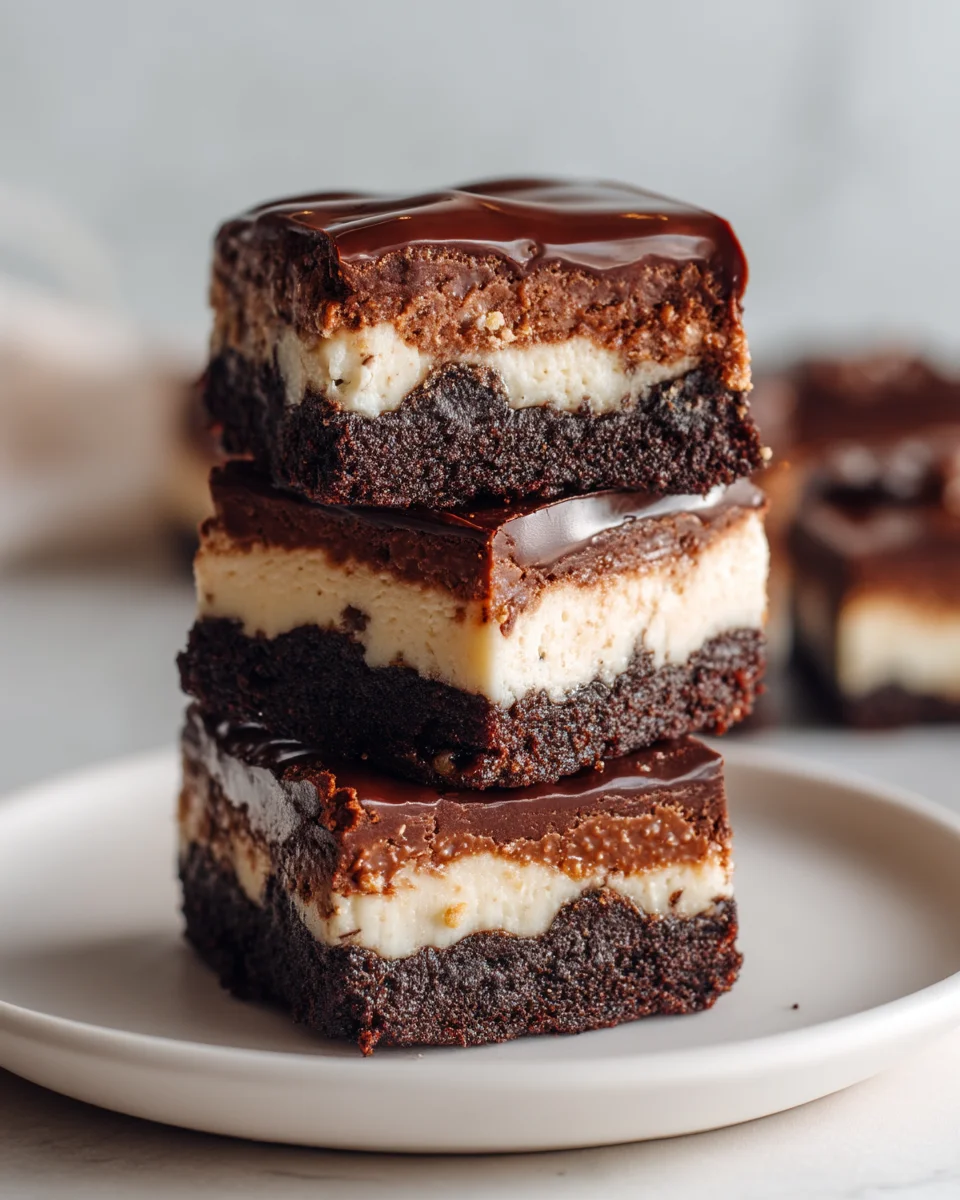
Brownie Cheesecake Bars – what an absolutely irresistible fusion of two beloved dessert classics! I don’t know about you, but the very thought of marrying the decadent, fudgy richness of a perfect chocolate brownie with the creamy, tangy allure of a smooth cheesecake is enough to make my heart skip a beat. This isn’t just any dessert; it’s a culinary masterpiece that addresses every sweet craving in one glorious bite. While brownies trace their delicious origins to a happy accident in the late 19th century, and cheesecake boasts an ancient, venerable history dating back to ancient Greece, their brilliant combination into a convenient bar form is a relatively modern phenomenon, celebrating our endless creativity in the kitchen and our desire for the ultimate indulgence.
People absolutely adore this dish for its incredible balance of textures and flavors. You get that satisfying chew from the dense, chocolatey brownie base, followed by the luxurious, melt-in-your-mouth smoothness of the cheesecake layer, often with a beautiful ripple of chocolate or plain cheesecake swirls. It’s the ultimate crowd-pleaser, perfect for potlucks, sophisticated dinner parties, or simply a special treat for your family on a cozy evening. I assure you, once you taste these incredible Brownie Cheesecake Bars, they will become a cherished addition to your recipe repertoire, offering convenience without sacrificing an ounce of spectacular, show-stopping flavor.

Ingredients:
-
For the Decadent Brownie Layer:
- 1 cup (2 sticks or 226g) unsalted butter, cut into pieces. I prefer unsalted so I can control the salt content myself.
- 4 ounces (113g) unsweetened chocolate, high quality for the best flavor, roughly chopped.
- 2 cups (400g) granulated sugar. This gives the brownies their signature sweetness and helps with chewiness.
- 4 large eggs, at room temperature. Room temperature eggs emulsify better with other ingredients, leading to a smoother batter.
- 2 teaspoons pure vanilla extract. Don’t skimp on the vanilla; it truly enhances the chocolate flavor.
- 1 cup (125g) all-purpose flour, spooned and leveled. Proper measuring of flour is key to the right texture.
- 1/2 teaspoon salt. A little salt balances the sweetness and brings out the chocolate flavor.
- 1/2 cup (60g) semi-sweet chocolate chips or chunks (optional, but I love the extra chocolatey pockets!).
-
For the Creamy Cheesecake Layer:
- 3 (8-ounce/226g each) packages cream cheese, full-fat, softened to room temperature. This is crucial for a smooth, lump-free cheesecake batter.
- 1 cup (200g) granulated sugar. Just the right amount to sweeten the tangy cream cheese.
- 1/4 cup (60ml) heavy cream or sour cream, at room temperature. This adds a lovely richness and creamy texture to the cheesecake.
- 1 tablespoon pure vanilla extract. Again, a good quality vanilla makes all the difference here.
- 2 large eggs, at room temperature. Like with the brownie layer, room temperature eggs are best for integration.
Equipment You’ll Need:
- 9×13 inch baking pan: I find a light-colored metal pan works best for even baking.
- Parchment paper: Essential for easy lifting and clean slices of your Brownie Cheesecake Bars.
- Large microwave-safe bowl or double boiler: For melting chocolate and butter.
- Large mixing bowls (2-3): For preparing the brownie and cheesecake batters separately.
- Whisk: For dry ingredients and for combining wet ingredients.
- Electric mixer (stand or hand-held): Highly recommended for achieving a super smooth and airy cheesecake batter.
- Rubber spatula: For scraping bowls and folding ingredients.
- Measuring cups and spoons: Accurate measurements are your friends!
- Oven mitts: Safety first when handling hot pans.
- Wire cooling rack: For allowing the bars to cool completely.
Preparing the Rich Brownie Layer for Your Brownie Cheesecake Bars:
- Preheat and Prepare Your Pan: First things first, let’s get that oven ready. Preheat your oven to 350°F (175°C). Then, take your 9×13 inch baking pan and line it with parchment paper, leaving an overhang on the longer sides. This overhang acts as “handles,” making it incredibly easy to lift your finished Brownie Cheesecake Bars out of the pan later. Lightly grease the exposed sides of the pan or the parchment paper itself with a little butter or non-stick spray. This small step ensures nothing sticks!
- Melt the Chocolate and Butter: In a large, microwave-safe bowl, combine your unsalted butter pieces and the chopped unsweetened chocolate. Melt them together gently. You can do this in the microwave in 30-second intervals, stirring well after each, until smooth and completely melted. Alternatively, you can use a double boiler over simmering water for a more controlled melting process. Make sure the mixture is completely smooth and glossy, with no lumps of chocolate remaining. Once melted, set it aside to cool slightly for about 5-10 minutes. This prevents the eggs from scrambling when added.
- Whisk Wet Ingredients: In a separate large bowl, whisk together the granulated sugar, room temperature eggs, and pure vanilla extract until they are well combined and slightly lightened in color. This mixture will be the backbone of your chewy brownie.
- Combine Wet Mixtures: Once your melted chocolate and butter mixture has cooled down a bit (it should still be warm but not hot to the touch), gradually pour it into the egg and sugar mixture, whisking constantly until everything is thoroughly combined. You should have a glossy, dark, and smooth base for your brownies.
- Add Dry Ingredients: Now, it’s time for the flour and salt. Add the all-purpose flour and salt to the wet mixture. Using a rubber spatula, gently fold these dry ingredients into the wet mixture until just combined. The key here is not to overmix! Overmixing develops the gluten in the flour, which can lead to tough, dry brownies instead of the fudgy, chewy texture we’re aiming for in these Brownie Cheesecake Bars. Just mix until no streaks of flour remain. If you’re using them, fold in your optional semi-sweet chocolate chips or chunks now for an extra burst of chocolate.
- Spread the Brownie Batter: Pour the rich brownie batter into your prepared 9×13 inch baking pan. Use your spatula to spread it evenly into a flat layer. This forms the delicious foundation of your Brownie Cheesecake Bars. Set this aside while we prepare the cheesecake layer.
Crafting the Velvety Cheesecake Layer for Your Brownie Cheesecake Bars:
- Prepare the Cream Cheese: In a large mixing bowl, using an electric mixer (either a stand mixer with the paddle attachment or a hand-held mixer), beat the softened, full-fat cream cheese on medium speed for about 2-3 minutes until it is completely smooth and free of any lumps. This step is absolutely critical for a silky-smooth cheesecake layer. If your cream cheese isn’t soft enough, you’ll end up with lumps, and no one wants lumpy cheesecake!
- Add Sugar and Cream: Gradually add the granulated sugar to the cream cheese, beating on medium speed until well combined and light and fluffy, about 2 more minutes. Scrape down the sides of the bowl as needed to ensure everything is incorporated. Then, pour in the heavy cream (or sour cream) and vanilla extract, beating again until just combined.
- Incorporate Eggs Gently: Finally, add the eggs one at a time, beating on low speed only until each egg is just incorporated. Do not overmix at this stage! Overmixing eggs introduces too much air into the cheesecake batter, which can lead to cracks in your finished cheesecake. We want that smooth, dense, and creamy texture for our Brownie Cheesecake Bars.
- Achieve the Perfect Consistency: Your cheesecake batter should be thick, smooth, and lump-free. Give it a final scrape down with your rubber spatula to ensure no unmixed bits are hiding at the bottom of the bowl.
Assembling Your Irresistible Brownie Cheesecake Bars:
- Layer the Cheesecake: Carefully pour the creamy cheesecake batter directly over the brownie batter layer in the prepared pan. Use your rubber spatula to gently spread the cheesecake batter evenly over the brownie layer, reaching all the way to the edges. Be gentle so you don’t disturb the brownie layer too much underneath.
- Create the Iconic Swirl (Optional but Highly Recommended!): This is where the “bars” get their beautiful marbled look! Take a butter knife or a skewer and gently run it through the cheesecake and brownie layers in a swirling motion. You can make figure-eights or just random swirls. Don’t overdo it! A few gentle swirls are all you need to create a stunning marbled effect for your Brownie Cheesecake Bars without completely mixing the layers. This step is purely for aesthetics but adds so much visual appeal.
Baking and Cooling Your Perfect Brownie Cheesecake Bars:
- Bake to Perfection: Place your pan into the preheated 350°F (175°C) oven. Bake for approximately 45-55 minutes. The exact baking time can vary depending on your oven, so keep an eye on it. You’re looking for the cheesecake layer to be mostly set around the edges, but the very center might still have a slight jiggle to it when gently shaken. The brownie edges should look cooked through. Avoid overbaking, as this can dry out the brownie and cause the cheesecake to crack.
- Initial Cooling Phase: Once baked, carefully remove the pan from the oven. Place it on a wire cooling rack and let your Brownie Cheesecake Bars cool at room temperature for at least 1 to 2 hours. During this phase, the residual heat will continue to set the cheesecake, and it will slowly come down to a safe temperature before chilling.
- The Crucial Chilling Period: This step is non-negotiable for perfectly sliceable and firm Brownie Cheesecake Bars. Once cooled to room temperature, cover the pan loosely with plastic wrap (try not to let the plastic wrap touch the cheesecake surface if possible, or tent it slightly). Transfer the pan to the refrigerator and chill for a minimum of 4 hours, or preferably overnight. This long chilling period allows the cheesecake to fully set and firm up, making for clean, beautiful slices. Patience is truly a virtue here!
Serving and Storing Your Delicious Brownie Cheesecake Bars:
- Slice and Serve: Once thoroughly chilled, use the parchment paper overhangs to carefully lift the entire slab of Brownie Cheesecake Bars out of the pan and onto a cutting board. For the cleanest cuts, I always recommend using a large, sharp knife. Heat the knife under hot water, wipe it dry, and then make your cut. Repeat this process for each slice. This keeps the cheesecake from sticking and dragging, giving you perfect edges. You can cut them into 12 generous bars, 16 medium bars, or even smaller bite-sized squares, depending on your preference.
- Enjoy! Serve your beautiful Brownie Cheesecake Bars as is, or with a dusting of cocoa powder, a dollop of whipped cream, or a fresh berry compote. They are absolutely delightful on their own.
- Storage: Store any leftover Brownie Cheesecake Bars in an airtight container in the refrigerator for up to 5-7 days. They tend to get even more fudgy and delicious the next day as the flavors meld together. You can also freeze individual bars wrapped tightly in plastic wrap and then foil for up to 1-2 months. Thaw them in the refrigerator overnight before serving.
Tips for the Best Brownie Cheesecake Bars:
-
Room Temperature Ingredients are Key:
I cannot stress this enough for both the brownie and cheesecake layers. Cold ingredients don’t emulsify properly, leading to a lumpy cheesecake or a dense brownie. Plan ahead and take your eggs, butter, and cream cheese out of the fridge at least an hour or two before you start baking.
-
Don’t Overmix:
For the brownie layer, overmixing can lead to tough brownies. For the cheesecake layer, overmixing introduces too much air, which can cause cracks during baking and cooling. Mix just until combined for both.
-
Quality Chocolate Matters:
Since chocolate is a prominent flavor in these Brownie Cheesecake Bars, using good quality unsweetened and semi-sweet chocolate will make a noticeable difference in the final taste.
-
Clean Slices Every Time:
For those picture-perfect slices, always use a sharp knife and clean it between each cut. Running the knife under hot water and wiping it dry before each slice prevents the cheesecake from sticking and tearing.
-
Patience with Chilling:
While it’s tempting to dig in as soon as they’re cool, the chilling time is essential. It allows the cheesecake to set completely, ensuring a firm texture and easy, clean slicing. Trust me, it’s worth the wait for these amazing Brownie Cheesecake Bars!
-
Prevent Cracks:
Besides not overmixing the cheesecake batter, avoiding extreme temperature changes can help prevent cracks. Let the bars cool slowly at room temperature on a wire rack before transferring them to the fridge. Some people even bake cheesecakes in a water bath, but for bars, gentle cooling is usually sufficient.
-
Adjust Sweetness to Your Liking:
If you prefer your desserts less sweet, you can slightly reduce the sugar in both layers, perhaps by a quarter cup each. However, keep in mind that sugar also contributes to the texture of both the brownie and cheesecake.
-
Get Creative with Toppings:
While they are fantastic on their own, don’t hesitate to get creative! A drizzle of ganache, a sprinkle of flaky sea salt, a dusting of cocoa, fresh berries, or even a dollop of caramel sauce can elevate your Brownie Cheesecake Bars even further.
Conclusion:
And there you have it, my friends! We’ve journeyed through the creation of what I truly believe is one of the most irresistible desserts you’ll ever bake. This isn’t just another sweet treat; it’s an experience, a symphony of textures and flavors that will undoubtedly leave a lasting impression on anyone lucky enough to take a bite. The decadent richness of the fudgy brownie base, perfectly contrasted by the creamy, tangy cheesecake layer, creates a harmonious balance that is simply divine. It’s the kind of dessert that looks incredibly impressive, making it ideal for special occasions, yet is surprisingly straightforward to prepare, proving that you don’t need to be a pastry chef to whip up something truly spectacular. I’ve poured my heart into perfecting this recipe, ensuring every step leads you to a creation that’s not just good, but absolutely unforgettable. Trust me when I say, once you’ve tasted these, your dessert repertoire will never be the same. They effortlessly combine two beloved classics into one magnificent creation, making them an instant crowd-pleaser and a guaranteed showstopper at any gathering. This recipe for Brownie Cheesecake Bars is genuinely a must-try for any dessert enthusiast.
Now, let’s talk about taking these already phenomenal bars to the next level, or simply presenting them in ways that highlight their deliciousness. While they are utterly perfect on their own, especially when served chilled straight from the fridge, a few simple additions can elevate them even further. Imagine a dollop of freshly whipped cream, ever so lightly sweetened, gracing the top of each square – it adds an airy lightness that complements the dense brownie and creamy cheesecake beautifully. For a burst of freshness and color, a scattering of vibrant red raspberries or sliced strawberries can provide a lovely tangy counterpoint to the sweetness. You could also drizzle a little warm caramel sauce or a rich chocolate ganache over the top just before serving for an extra layer of indulgence. Want to get creative? Try sprinkling some flaky sea salt over the finished bars to enhance the chocolate notes, or perhaps a dusting of cocoa powder for an elegant touch. For a seasonal twist during the holidays, a touch of peppermint extract in the brownie layer or a sprinkle of crushed candy canes on top could transform them into a festive treat. Think about incorporating some toasted chopped nuts, like pecans or walnuts, into the brownie batter for an added textural crunch. Or, for a more intense cheesecake flavor, a tiny bit of lemon zest mixed into the cheesecake batter can brighten the whole dessert. These bars also make fantastic individual desserts; simply cut them into smaller squares or even rectangular “fingers” for an elegant presentation at a party. They are also absolutely perfect alongside a steaming cup of coffee or a tall glass of cold milk for a cozy afternoon treat.
I sincerely hope you feel inspired to dive into your kitchen and give this incredible recipe a try. There’s a special kind of joy that comes from baking something truly delicious from scratch, and even more joy in sharing it with loved ones. I promise you, the effort is minimal compared to the incredible reward of biting into these perfect Brownie Cheesecake Bars. Don’t be shy, bake a batch for your next potluck, family dinner, or simply as a well-deserved treat for yourself. I am genuinely excited for you to experience the magic of this dessert firsthand. Once you’ve baked them, please, please come back and share your experience with me! What did you think? Did you try any of the suggested variations, or perhaps invent your own? I absolutely adore hearing about your kitchen adventures and seeing your beautiful creations. Leave a comment below, or better yet, snap a photo and share it on your favorite social media platform. Let’s spread the love for these amazing bars far and wide! Happy baking, and I can’t wait to hear all about your delicious results!
Brownie Cheesecake Bars: Ultimate Fudgy & Creamy Treat!
An absolutely irresistible fusion of two beloved dessert classics, these Brownie Cheesecake Bars combine the decadent, fudgy richness of brownies with the creamy, tangy allure of smooth cheesecake. This culinary masterpiece addresses every sweet craving in one glorious bite.
Ingredients
-
1 box brownie mix for 9×13 pan
-
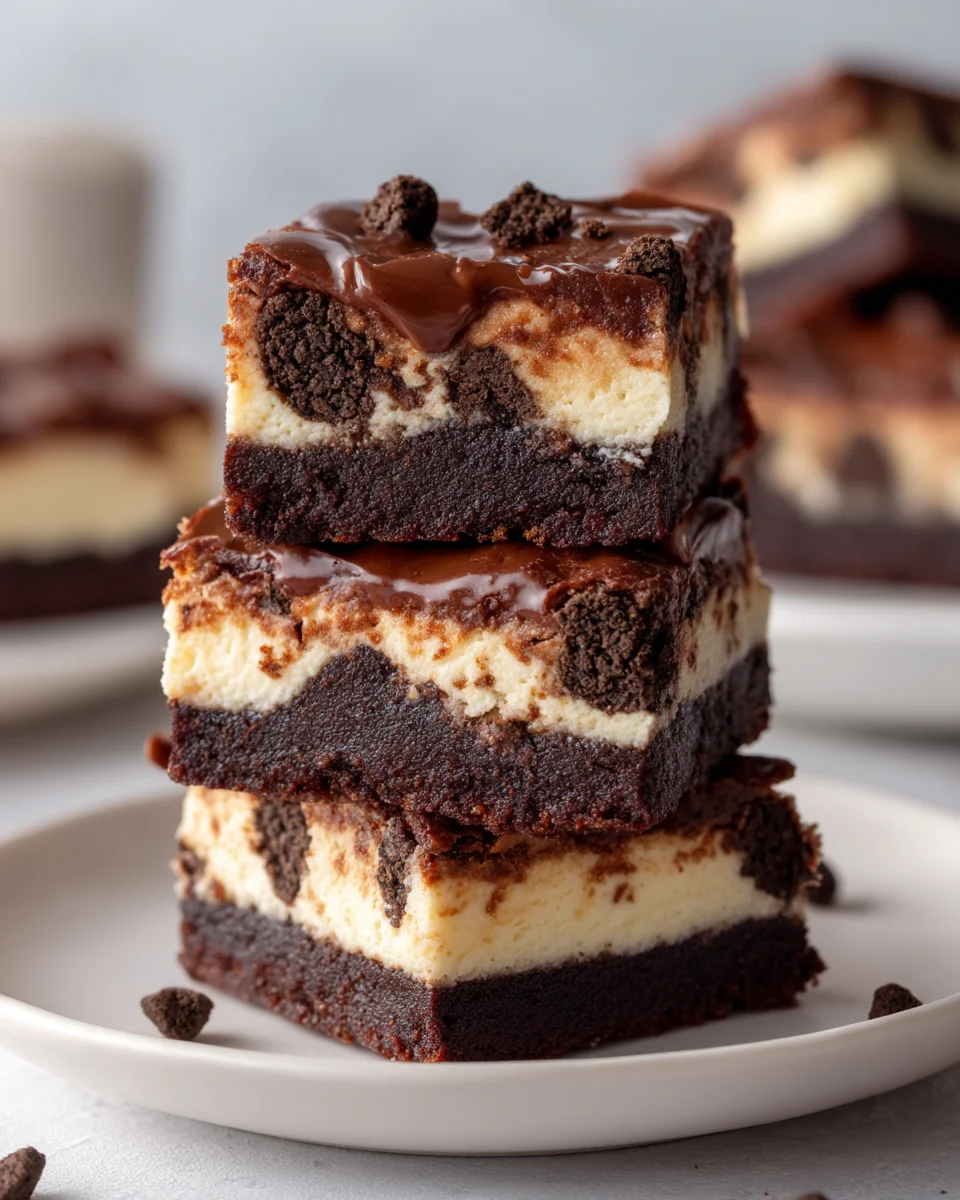
22 Oreos, divided
-
8 ounces cream cheese, softened
-
1 large egg
-
1 teaspoon vanilla extract
-
1/4 cup granulated sugar
-
2 Tablespoons sour cream
-
1/4 cup chocolate chips
-
1/4 cup heavy whipping cream
Instructions
-
Step 1
Preheat oven to 350°F (175°C). Line a 9×13 inch baking pan with parchment paper, leaving an overhang on the longer sides. -
Step 2
Crush 10-12 Oreos and press firmly into the bottom of the prepared pan to form a crust. -
Step 3
Prepare the brownie mix according to package directions. Pour the brownie batter evenly over the Oreo crust in the pan. -
Step 4
In a separate large mixing bowl, beat the softened cream cheese, granulated sugar, 1 large egg, vanilla extract, and sour cream on medium speed until completely smooth. Stir in the heavy whipping cream. -
Step 5
Carefully pour the creamy cheesecake batter over the brownie layer, spreading it evenly. Chop the remaining 10-12 Oreos and sprinkle them over the cheesecake along with the chocolate chips, or gently swirl a few in. -
Step 6
Bake for approximately 45-55 minutes, or until the cheesecake edges are set and the very center still has a slight jiggle when gently shaken. -
Step 7
Remove from oven and let cool completely at room temperature on a wire rack for 1-2 hours. Then, cover loosely and transfer to the refrigerator to chill for a minimum of 4 hours, or preferably overnight, to allow the cheesecake to set fully. -
Step 8
Once thoroughly chilled, use the parchment paper overhangs to lift the entire slab of bars out of the pan. Place on a cutting board and slice into bars using a large, sharp knife (cleaning the knife between each cut for best results). Store any leftover bars in an airtight container in the refrigerator for up to 5-7 days.
Important Information
Nutrition Facts (Per Serving)
It is important to consider this information as approximate and not to use it as definitive health advice.
Allergy Information
Please check ingredients for potential allergens and consult a health professional if in doubt.