
When summer rolls around, nothing says backyard BBQ or family cookout like fresh corn on the cob. But why settle for plain when you can take your corn to the next level? Enter Cheesy Garlic Butter Corn on the Cob—a rich, melty, flavor-packed side dish that’s guaranteed to be the first thing gone from the table.
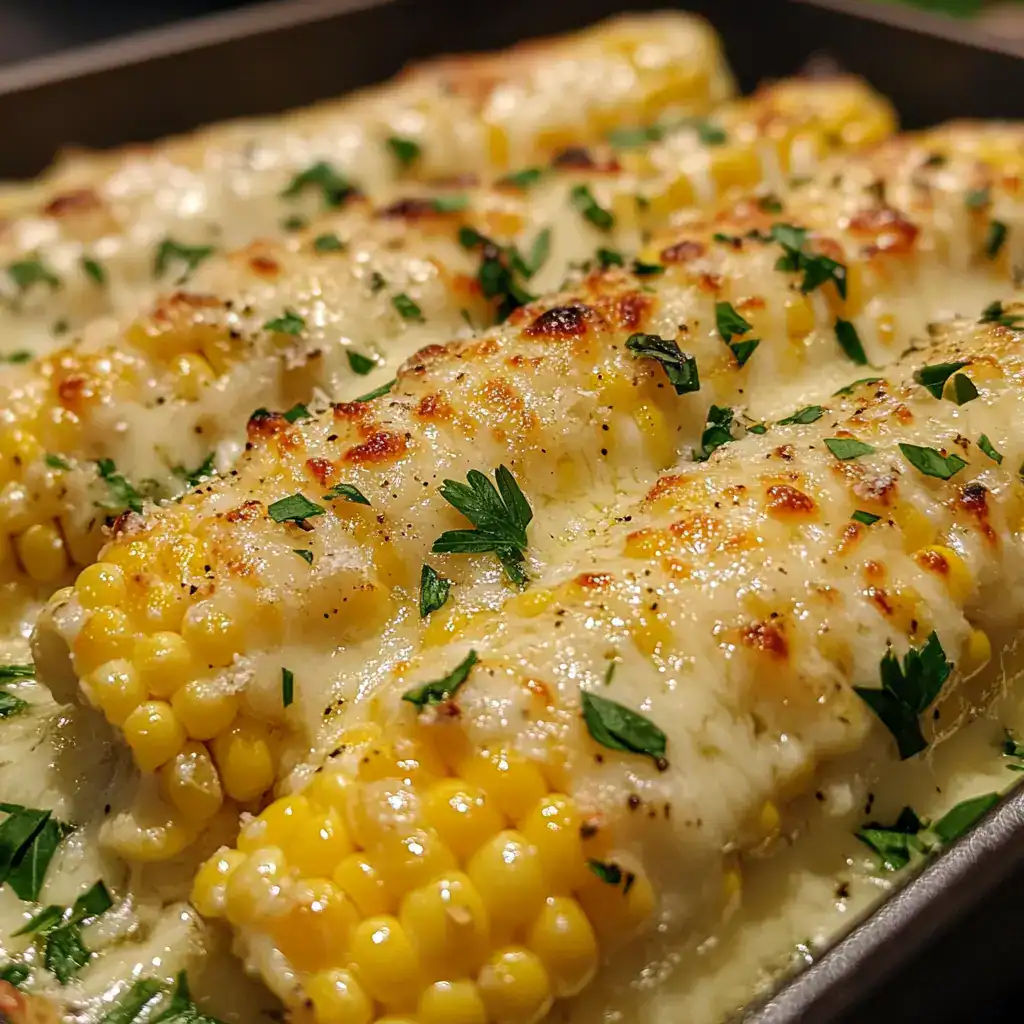
This recipe is all about turning simple sweet corn into something special. Imagine golden, juicy ears of corn smothered in garlicky butter, sprinkled with gooey melted cheese, and finished with a hint of fresh parsley. It’s a mashup of classic corn on the cob and cheesy garlic bread—and honestly, it’s hard to beat.
Whether you’re serving this at a cookout, alongside burgers, or as part of a weeknight dinner, this corn is about to become your new favorite side.

What Is Cheesy Garlic Butter Corn on the Cob?
Cheesy Garlic Butter Corn on the Cob is exactly what it sounds like—corn brushed with homemade garlic butter, baked or grilled until tender, then topped with a generous layer of melted cheese. It’s like comfort food meets summer grilling, combining buttery richness with cheesy indulgence.
The corn stays sweet and juicy while the cheese melts into the buttery garlic sauce, giving you a side dish that’s anything but ordinary.
Why You’ll Love This Recipe
- Cheesy, buttery perfection – It’s like garlic bread, but on corn!
- Quick and easy – Ready in about 20 minutes.
- Crowd favorite – Perfect for BBQs, picnics, or potlucks.
- Kid-friendly – Even picky eaters love this one.
- Customizable – Use different cheeses or spices to mix it up.
What Does Cheesy Garlic Butter Corn Taste Like?
Each bite of this dish is:
- Juicy and sweet – Thanks to fresh summer corn.
- Rich and buttery – Garlic butter soaks into every kernel.
- Cheesy and melty – The cheese creates a gooey topping with a golden crust.
- Slightly garlicky – Just enough to make your taste buds pop.
- Fresh and bright – Thanks to the parsley or herbs sprinkled on top.
It’s the perfect combination of salty, sweet, and savory, all in one bite.
Benefits of Making Cheesy Garlic Butter Corn
- Fast side dish – Done in under 30 minutes.
- No grill required – You can bake it in the oven.
- Flexible – Use mozzarella, Parmesan, cheddar, or a mix.
- Pairs with everything – From steaks to burgers to BBQ chicken.
- Low effort, high reward – Impress your guests without breaking a sweat.
Ingredients You’ll Need
- 4–6 ears of fresh corn, husked
- 4 tbsp unsalted butter, melted
- 3 cloves garlic, minced
- 1/2 tsp salt
- 1/4 tsp black pepper
- 1 cup shredded mozzarella cheese (or cheese of choice)
- 1/4 cup grated Parmesan cheese (optional for extra flavor)
- 2 tbsp fresh parsley, chopped
Tools You’ll Need
- Baking sheet or grill
- Pastry brush or spoon (for spreading butter)
- Knife and cutting board
- Small bowl for garlic butter
Ingredient Swaps & Additions
- Try different cheeses – Cheddar, provolone, or pepper jack all work great.
- Add spice – Sprinkle with red pepper flakes or smoked paprika.
- Make it Mexican-style – Use cotija cheese and cilantro for a street corn vibe.
- Use frozen corn – If fresh corn isn’t in season, frozen cobs work too.
How to Make Cheesy Garlic Butter Corn on the Cob
Step 1: Preheat and Prep
Preheat your oven to 400°F (200°C) or heat your grill to medium-high.
Place the husked corn on a baking sheet or grill pan.
Step 2: Make Garlic Butter
In a small bowl, mix the melted butter with minced garlic, salt, and pepper.
Brush the garlic butter over all sides of each ear of corn.
Step 3: Bake or Grill
Bake the corn in the oven for 12–15 minutes, turning once halfway through.
If grilling, grill the corn for about 10–12 minutes, turning every few minutes.
Step 4: Add the Cheese
Remove the corn from the oven or grill.
Sprinkle shredded mozzarella and Parmesan over each ear of corn.
Return to the oven (or close the grill lid) for 2–3 minutes until the cheese is melted and bubbly.
Step 5: Garnish and Serve
Sprinkle chopped parsley over the top.
Serve immediately with lime wedges if desired.
What to Serve with Cheesy Garlic Butter Corn
- Grilled steaks or burgers
- BBQ chicken or ribs
- Pulled pork sandwiches
- Fresh summer salads
- Iced tea or lemonade
Tips for Success
- Use fresh corn – It’s juicier and sweeter.
- Melt the cheese well – Watch closely to prevent burning.
- Brush evenly – Make sure each kernel gets some garlic butter.
- Serve hot – This dish is best right out of the oven.
Storage Instructions
- Fridge: Store leftovers in an airtight container for up to 2 days.
- Reheat: Warm in the oven at 350°F for 5–7 minutes until cheese is melted.
Nutritional Information (Per Serving, Approximate)
- Calories: 250
- Protein: 7g
- Fat: 17g
- Carbohydrates: 18g
- Sugar: 5g
- Sodium: 290mg
Frequently Asked Questions
Can I make this in advance?
It’s best fresh, but you can prep the butter and cheese mix ahead.
Can I use frozen corn?
Yes! Thaw frozen corn cobs before cooking.
What cheese melts best?
Mozzarella and cheddar both work well for that perfect cheese pull.
Can I make this on the grill?
Absolutely! Use indirect heat after buttering the corn.
Conclusion
If you’re looking for a crowd-pleasing summer side, Cheesy Garlic Butter Corn on the Cob is the answer. It’s buttery, cheesy, and full of flavor—a true upgrade from plain corn. Serve it at your next BBQ or family dinner, and watch it disappear fast.
Print
Cheesy Garlic Butter Corn on the Cob
- Total Time: 25 minutes
- Yield: 4–6 servings
Description
Fresh corn on the cob baked or grilled with melted garlic butter and cheese for the ultimate summer side dish.
Ingredients
– 4–6 ears of fresh corn, husked
– 4 tbsp unsalted butter, melted
– 3 cloves garlic, minced
– 1/2 tsp salt
– 1/4 tsp black pepper
– 1 cup shredded mozzarella cheese
– 1/4 cup grated Parmesan cheese (optional)
– 2 tbsp fresh parsley, chopped
Instructions
1. Preheat oven to 400°F (or heat grill to medium-high).
2. Place husked corn on a baking sheet.
3. In a bowl, mix melted butter, garlic, salt, and pepper.
4. Brush garlic butter over all sides of the corn.
5. Bake for 12–15 minutes (or grill for 10–12 minutes), turning halfway.
6. Sprinkle mozzarella and Parmesan over each cob.
7. Return to oven for 2–3 minutes until cheese is melted.
8. Garnish with parsley and serve hot.
Notes
– Use cheddar, pepper jack, or cotija for different flavors.
– Add smoked paprika or red pepper flakes for a kick.
– Serve with lime wedges for extra brightness.
- Prep Time: 10 minutes
- Cook Time: 15 minutes
- Category: Dinner
- Method: Oven-Baked or Grilled
Keywords: cheesy garlic corn, baked corn on the cob, summer side dish, BBQ corn recipe, grilled corn with cheese