
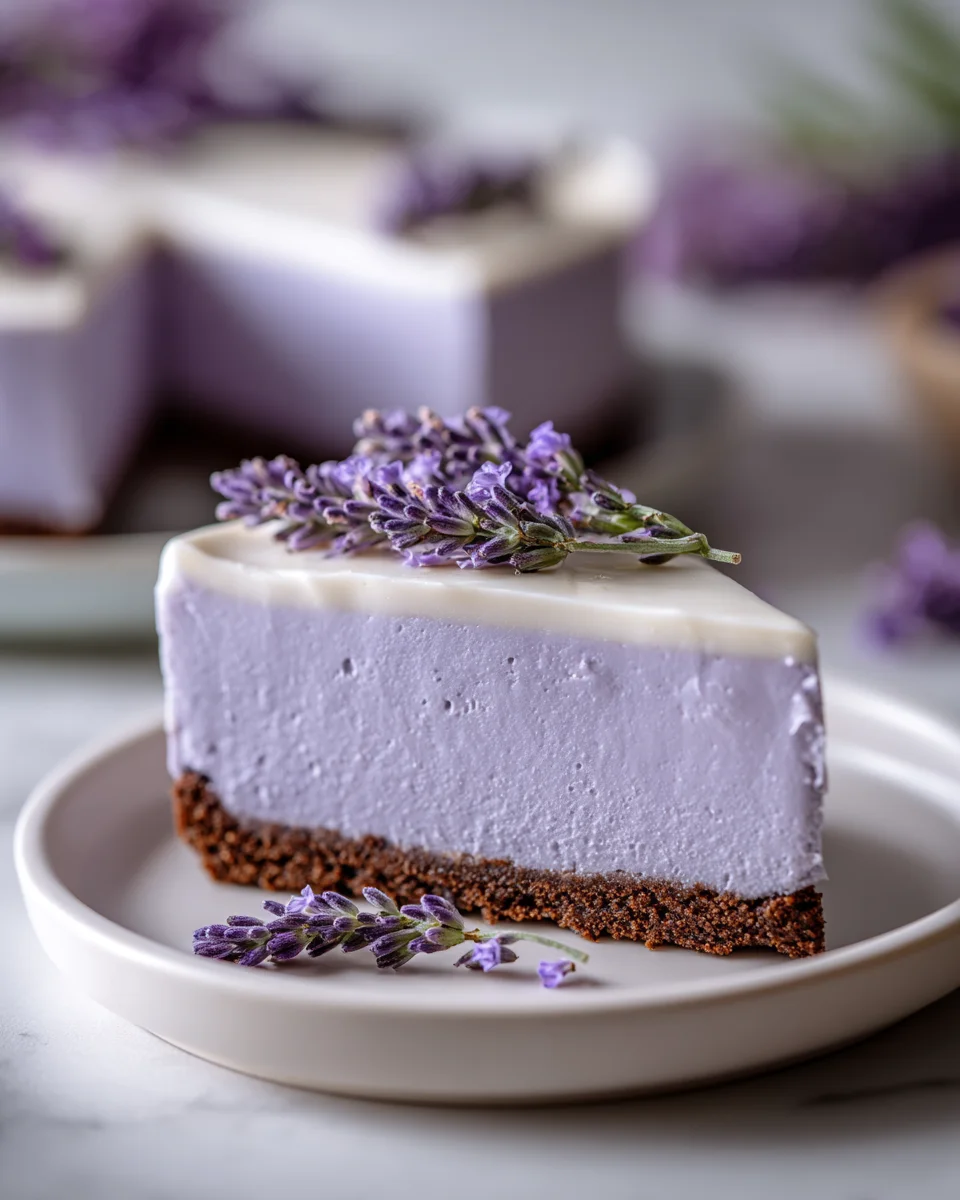
No Bake Honey Lavender Cheesecake is the dessert revelation you’ve been waiting for! Imagine a treat so exquisitely elegant, so bursting with unique, fragrant flavor, yet requires absolutely no oven time. I’ve discovered that this recipe offers the perfect escape from the ordinary, promising a sophisticated delight that will impress anyone lucky enough to take a bite.
Why This Cheesecake is a Must-Try
I find myself reaching for this recipe again and again because of its unbelievably creamy texture, which simply melts in your mouth, perfectly balanced by the delicate, aromatic floral notes of lavender and the comforting, golden sweetness of honey. It’s a true symphony for your taste buds! While the concept of cheesecake has roots stretching back to ancient Greece, this modern interpretation offers a contemporary, aromatic twist. Lavender, long cherished for its calming properties and elegant fragrance, adds an unexpected sophistication when paired with the timeless, natural appeal of honey.
The sheer convenience of a no-bake dessert makes this No Bake Honey Lavender Cheesecake even more appealing, especially during warmer months when turning on the oven feels like a monumental task. No fuss, no stress – just pure, chilled dessert bliss waiting to be enjoyed. Get ready to create a show-stopping dessert that’s as effortless as it is unforgettable!

Ingredients:
Okay, let’s gather everything we need for our dreamy No Bake Honey Lavender Cheesecake. I always find that having all my ingredients prepped and ready to go makes the baking (or in this case, no-baking) process so much smoother and more enjoyable!
For the Graham Cracker Crust:
- 1 ½ cups (approximately 180g) Graham cracker crumbs: You can buy pre-crushed crumbs, which are super convenient, or crush your own from about 10-12 full sheets of graham crackers. I often prefer to crush my own using a food processor for a finer, more consistent crumb, but a sturdy Ziploc bag and a rolling pin work wonderfully too for a more rustic texture!
- ½ cup (113g) unsalted butter, melted: Make sure it’s fully melted but not boiling hot. This butter is absolutely essential for binding our crust together, creating that perfect sturdy base.
- ¼ cup (50g) granulated sugar: Just a touch of sweetness to complement the natural flavor of the graham crackers and balance the richness.
- ¼ teaspoon fine sea salt: A pinch of fine sea salt really enhances the flavor of the butter and graham crackers, cutting through the sweetness and bringing all the flavors into harmony. Don’t skip this little detail!
For the Honey Lavender Cheesecake Filling:
- 24 ounces (680g) full-fat cream cheese, softened: This is the undeniable star of our No Bake Honey Lavender Cheesecake! It’s absolutely crucial that your cream cheese is at room temperature. I usually take mine out of the fridge at least an hour or two before I plan to start, sometimes even longer if my kitchen is cool. This ensures a super smooth, lump-free filling – a truly non-negotiable step for creamy perfection.
- 1 cup (240ml) heavy cream (cold): We’ll be whipping this to stiff peaks, so make sure it’s nice and cold to achieve the best volume and stability for our light and airy cheesecake.
- ½ cup (170g) honey: Choose a good quality, mild-flavored honey here. A strong, dark honey might overpower the delicate lavender, so I recommend something like a wildflower or clover honey. I love using a local honey for this, as it often has unique floral notes of its own.
- 2 teaspoons culinary lavender buds: Make sure these are specifically culinary grade. Lavender from a craft store or garden center might have pesticides or an overly strong, perfumey flavor that isn’t pleasant to eat. Seek out a reputable source for these fragrant little gems.
- ¼ cup (50g) granulated sugar: For additional sweetness and to help provide structure to the filling.
- 2 teaspoons fresh lemon juice: A little acidity brightens up all the flavors and helps cut through the richness of the cream cheese, creating a perfectly balanced taste. Don’t skip this – it makes a huge difference!
- 1 teaspoon vanilla extract: Pure vanilla extract always adds that lovely warmth, depth, and comforting aroma that enhances almost any sweet treat.
- Pinch of fine sea salt: To balance and enhance all the sweet, creamy, and floral flavors. It truly rounds out the profile.
For the Honey Lavender Drizzle (Optional, but highly recommended!):
- ¼ cup (85g) honey: Again, a good quality, mild honey works best here to let the lavender shine.
- 1 tablespoon hot water: To help thin the honey slightly for a beautiful, smooth drizzling consistency.
- ¼ teaspoon culinary lavender buds: For an extra aromatic touch and visual appeal in your drizzle.
For Garnish (Optional):
- Fresh lavender sprigs: For a beautiful and aromatic presentation that truly signals the star flavor of your No Bake Honey Lavender Cheesecake.
- Fresh berries: Raspberries, blueberries, or even blackberries pair wonderfully with lavender and honey, adding a burst of freshness and color.
- A light dusting of powdered sugar: Just for a delicate and elegant finishing touch.
Part 1: Preparing the Lavender Infusion – Unlocking the Floral Magic
Before we dive into the crust or the filling, let’s create our very own lavender essence. This step is key to getting that beautiful, subtle floral note in your No Bake Honey Lavender Cheesecake without it tasting like soap (a common fear with lavender, but one we’ll easily avoid!).
- Gently Infuse the Lavender: In a small, microwave-safe bowl or a very small saucepan, combine your ½ cup of honey (this is the honey designated for the cheesecake filling, not the drizzle) with the 2 teaspoons of culinary lavender buds. I like to give it a little stir to make sure the lavender is fully submerged in the honey. This ensures maximum contact and flavor extraction.
- Heat and Steep: If using a microwave, heat the mixture on high for about 15-20 seconds. You want it warm enough for the honey to become more fluid and for the lavender to gently release its aromatic oils, but absolutely not boiling. If using a saucepan, gently heat over low heat for 1-2 minutes, stirring occasionally with a spoon. You’ll notice the aroma will start to become quite lovely and fragrant in your kitchen – that’s how you know it’s working its magic!
- Allow to Cool and Steep Further: Once warmed, remove the honey and lavender mixture from the heat. Now, here’s where the patience comes in: let it sit and steep for at least 30 minutes, or even longer if you have the time. I often let mine sit for an hour or so while I prepare the rest of my mise en place. The longer it steeps, the more pronounced and complex the lavender flavor will be, so adjust to your personal preference. Just be mindful not to let it steep for too long (multiple hours without refrigeration) if your kitchen is very warm, as honey can ferment.
- Strain the Lavender Buds: After steeping, grab a fine-mesh sieve and carefully strain the lavender-infused honey into a clean bowl. Press down on the lavender buds with the back of a spoon to extract every last drop of that precious, fragrant honey. This step is important to prevent a gritty texture in your final cheesecake. Discard the spent lavender buds. You now have a gorgeous, subtly floral honey that will be the delicate heart of our No Bake Honey Lavender Cheesecake!
- Set Aside: Keep this infused honey at room temperature for now, ready to be incorporated into our cheesecake filling. The aroma alone is truly intoxicating and hints at the delightful flavors to come!
Part 2: Crafting the Crust – The Perfect Foundation
Every great cheesecake starts with a fantastic crust, and our No Bake Honey Lavender Cheesecake is no exception. This graham cracker crust is buttery, slightly sweet, and provides the perfect textural contrast to the creamy filling – a delightful crunch to complement the smooth.
- Prepare Your Pan: First things first, let’s get our springform pan ready. I recommend using a 9-inch springform pan for this recipe, as it’s the ideal size for the amount of filling we’re making. Lightly grease the bottom and sides with a little butter or non-stick cooking spray. For extra easy removal and to prevent any potential leaks (though less common with no-bake, it’s a good habit!), I often line the bottom with a circle of parchment paper. Just trace the bottom of the pan onto parchment paper, cut it out, and place it in. Then, secure the springform ring over it. This little trick makes transferring your finished cheesecake onto a serving platter an absolute breeze!
- Crush the Graham Crackers: If you’re using whole graham crackers, now’s the time to crush them. I find a food processor is the quickest and most efficient way to get fine, even crumbs. Pulse until no large pieces remain and you have a consistent texture, similar to fine sand. If you don’t have a food processor, place the crackers in a sturdy Ziploc bag, seal it tightly, and use a rolling pin to crush them. Aim for fine crumbs, not a powder, but definitely no big chunks that will make your crust uneven. You should have approximately 1 ½ cups of crumbs.
- Combine Dry Ingredients: In a medium-sized mixing bowl, combine the graham cracker crumbs, the ¼ cup granulated sugar, and the ¼ teaspoon fine sea salt. Give these a good whisk or stir with a fork until they are thoroughly mixed. This ensures the sweetness and salt are evenly distributed throughout the crust, so every bite has balanced flavor.
- Add Melted Butter: Pour the ½ cup of melted unsalted butter over the dry crumb mixture. Stir with a spoon or spatula until all the crumbs are moistened. It should resemble wet sand – every single crumb should look coated and slightly clump together when you press it between your fingers. If it looks dry or crumbly, add another tablespoon or two of melted butter, stirring well after each addition, until it reaches the right consistency. Do not skip this step! Proper butter saturation is precisely what makes a no-bake crust hold together beautifully and prevents it from falling apart when sliced.
- Press into the Pan: Carefully transfer the moistened graham cracker mixture into your prepared 9-inch springform pan. Use the bottom of a flat-bottomed glass, a measuring cup, or your clean fingers to firmly and evenly press the crumbs across the bottom of the pan. I personally like to push them slightly up the sides, just creating a little lip about half an inch high, as this gives a nice edge, but a completely flat bottom crust is perfectly fine too. The key here is to press firmly and compactly to create a sturdy crust that won’t crumble when you slice into your exquisite No Bake Honey Lavender Cheesecake.
- Chill the Crust: Once pressed, place the springform pan with the crust into the refrigerator for at least 15-20 minutes while you prepare the filling. This crucial chilling time helps the butter solidify and further sets the crust, making it even more stable and less prone to crumbling. It’s a small but important step for a successful, beautiful no-bake cheesecake!
Part 3: Mixing the Cheesecake Filling – The Creamy Heart of Our Dessert
Now for the star of the show! This No Bake Honey Lavender Cheesecake filling is incredibly smooth, decadently rich, and infused with that delicate floral note we prepared earlier. Remember, room temperature cream cheese is your absolute best friend here!
- Whip the Heavy Cream: In a large, very clean mixing bowl (preferably chilled, along with your whisk attachments for best results), pour in the 1 cup of cold heavy cream. Using an electric mixer (either a stand mixer with a whisk attachment or a hand mixer), begin whipping the cream on medium-high speed. Watch it very carefully! It will go from liquid to soft peaks, then to firm, stiff peaks. This usually takes about 3-5 minutes, depending on your mixer and the temperature of your cream. You want it firm enough to hold its shape beautifully when you lift the whisk, but not so firm that it looks curdled or grainy. Over-whipping can lead to a slightly grainy texture in your final cheesecake, so be vigilant and stop when it’s just right! Once stiff peaks are formed, gently transfer the whipped cream to a separate bowl and place it in the refrigerator. We’ll fold it in later, and keeping it cold helps maintain its structure.
- Beat the Cream Cheese: In the same large mixing bowl (no need to wash if you whipped the cream first, as any residual cream won’t harm the cream cheese), add the 24 ounces of softened full-fat cream cheese. Start beating it on low speed with your electric mixer, gradually increasing to medium speed. You want to beat it until it’s completely smooth, wonderfully creamy, and entirely free of any lumps. This might take 2-3 minutes of consistent beating. Scrape down the sides of the bowl frequently with your spatula to ensure everything gets evenly incorporated and no sneaky lumps remain. Lumps here mean lumps in your final cheesecake, so be thorough and patient!
- Add Sweeteners and Flavorings: To the now gloriously smooth cream cheese, add the ¼ cup of granulated sugar, the 2 teaspoons of fresh lemon juice, the 1 teaspoon of vanilla extract, and a pinch of fine sea salt. Continue beating on medium speed until everything is well combined and the mixture looks light and fluffy, usually another 1-2 minutes. Again, remember to scrape down the sides of the bowl to ensure a homogenous mixture.
- Incorporate the Honey Lavender Infusion: Now, add your beautifully strained honey lavender infusion to the cream cheese mixture. Beat on low speed until just combined. You don’t want to overmix at this stage; just enough to fully incorporate that wonderful floral honey throughout the creamy base. Take a moment to appreciate the subtle aroma blending with the tangy cream cheese – it’s truly delightful and a signature scent of our No Bake Honey Lavender Cheesecake!
- Fold in the Whipped Cream: Retrieve your chilled whipped cream from the refrigerator. Add about one-third of the whipped cream to the cream cheese mixture and gently fold it in using a rubber spatula. Use a circular motion, scraping the bottom and sides of the bowl and folding the mixture over the top. This initial amount helps to lighten the denser cream cheese mixture, making it easier to incorporate the rest of the whipped cream without deflating it.
- Continue Folding: Add the remaining whipped cream in two more additions, folding gently after each addition until just combined. The key here is gentle folding! You want to maintain as much of the air you whipped into the cream as possible, as this is precisely what gives our No Bake Honey Lavender Cheesecake its light, airy, and ethereal texture. Stop folding as soon as you see no more streaks of white cream. Over-folding will deflate the mixture and result in a denser, less appealing cheesecake. The final filling should be light, airy, and beautifully smooth, ready for its next step.
Part 4: Assembling and Chilling – The Grand Finale (Before the Chill!)
We’re almost there! Now it’s time to bring all our hard work together and prepare our No Bake Honey Lavender Cheesecake for its transformative chill time. This is where the magic really happens, turning our creamy mixture into a firm, sliceable dessert.
- Retrieve the Chilled Crust: Take your springform pan with the firmly chilled graham cracker crust out of the refrigerator. The crust should feel solid, stable, and ready to support the delicious filling.
- Fill the Pan: Carefully spoon the entire cheesecake filling mixture onto the chilled crust in the springform pan. Use your rubber spatula or an offset spatula to gently spread the filling evenly across the top, smoothing it out so it’s flat and level. I like to gently tap the pan on the counter a few times to help release any trapped air bubbles and ensure a perfectly even and smooth surface. This also helps the filling settle nicely into the crust.
- Prepare for Chilling: Cover the springform pan loosely with plastic wrap. You don’t want the plastic wrap directly touching the surface of the cheesecake, as it can stick and ruin that beautiful smooth top when you remove it. I often place a few toothpicks into the cheesecake around the edges, then drape the plastic wrap over them, creating a little tent. This ingenious little trick protects your pristine cheesecake surface.
- The Essential Chill: Now, the most crucial step for any no-bake cheesecake: chilling! Place the covered cheesecake into the refrigerator. It needs to chill for a minimum of 6-8 hours, but honestly, overnight is always best. This extended chilling time allows the cheesecake to firm up completely, allowing all the wonderful flavors to meld and deepen, and ensures clean, beautiful slices. Resist the temptation to cut into it too early – patience truly pays off here! During this time, the texture will transform from a soft, mousse-like consistency to a firm, sliceable cheesecake that holds its shape perfectly.
Part 5: Making the Honey Lavender Drizzle – An Optional, Elegant Touch
While your No Bake Honey Lavender Cheesecake is chilling, you might want to prepare this optional (but highly recommended!) drizzle. It adds another layer of honey-lavender flavor and a lovely glossy finish that elevates the entire dessert.
- Combine Drizzle Ingredients: In a small, microwave-safe bowl or a very small saucepan, combine the ¼ cup of honey (this is the honey specifically for the drizzle) with the 1 tablespoon of hot water and the ¼ teaspoon of culinary lavender buds. Give it a good stir to combine everything.
- Gently Heat: If using a microwave, heat for 10-15 seconds, just until the honey is warmed and easily mixable with the water. If using a saucepan, heat gently over low heat for about 1 minute, stirring constantly. You don’t want to boil it, just warm it enough to thin the honey slightly and release a bit more lavender essence into the mixture.
- Steep (Optional, but recommended): Let the mixture sit for about 5-10 minutes off the heat to allow the lavender to infuse a little more into the thinned honey. This extra steeping time deepens the floral notes without making them overpowering.
- Strain (Again!): Once steeped, strain the honey drizzle through a fine-mesh sieve to remove the lavender buds. You’ll be left with a beautifully aromatic, thin honey syrup perfect for drizzling that will have a lovely smooth texture.
- Cool and Store: Let the drizzle cool completely to room temperature before using. You can make this several hours ahead or even the day before and store it in an airtight container at room temperature. It will be ready whenever your cheesecake is!
Part 6: Serving and Garnish – The Grand Reveal!
The moment we’ve all been waiting for! Your No Bake Honey Lavender Cheesecake is perfectly chilled, firm, and ready to impress. Get ready for applause!
- Unmold the Cheesecake: Once the cheesecake is thoroughly chilled (remember, 6-8 hours minimum, overnight is truly ideal for the best texture!), carefully remove it from the refrigerator. Run a thin knife or a small offset spatula around the inside edge of the springform pan to gently loosen the cheesecake from the sides. Then, unclip and very carefully remove the springform ring. If you used parchment paper on the bottom, you can leave the cheesecake on the bottom of the pan for serving, or carefully slide it onto a serving plate using a large, flat spatula.
- Slice with Precision: For clean, professional-looking slices, use a sharp knife that has been run under hot water and then wiped completely dry. Re-warm and wipe the knife thoroughly between each slice. This creates those beautiful, crisp edges that make your No Bake Honey Lavender Cheesecake look like it came straight from a gourmet bakery!
- Drizzle and Garnish: Now for the artistic touch! Just before serving, drizzle your cooled honey lavender syrup generously over individual slices or, if you prefer, over the entire top of the cheesecake for a dramatic presentation. Garnish with fresh lavender sprigs for visual appeal and an extra burst of aroma, and some vibrant fresh berries. Raspberries or blueberries add a lovely pop of color, a delightful texture, and a tart counterpoint to the sweetness of the cheesecake.
- Serve and Enjoy: Serve immediately and bask in the glory of your homemade, elegant, and utterly delicious No Bake Honey Lavender Cheesecake! Each bite is a harmonious blend of creamy, sweet, tangy, and subtly floral notes, making it a truly unique and memorable dessert. It’s a showstopper that requires no oven, making it perfect for any occasion, especially when you want a beautiful dessert without heating up your kitchen.
- Storing Leftovers: Any leftover cheesecake should be covered loosely with plastic wrap or stored in an airtight container and kept in the refrigerator. It will remain fresh and absolutely delicious for 3-4 days, though I doubt it will last that long!
And there you have it! A spectacular No Bake Honey Lavender Cheesecake that is as delightful to make as it is to eat. Enjoy every single creamy, floral, honey-kissed bite – you’ve earned it!

Conclusion:
Well, my friends, we’ve reached the sweet end of our journey, and I genuinely hope you’re as excited as I am about what you’ve just learned! If you take away one thing from this entire article, let it be this: you absolutely have to try making this incredible dessert. Seriously, this isn’t just another cheesecake recipe; it’s a game-changer. Imagine a dessert that’s effortlessly elegant, bursting with sophisticated flavor, and surprisingly simple to create without ever turning on your oven. That’s precisely what we’ve discovered with the No Bake Honey Lavender Cheesecake. Its delicate floral notes, perfectly balanced with the natural sweetness of honey, create a symphony of taste that is both refreshing and comforting. It’s the kind of dessert that makes people pause, close their eyes, and savor every single bite, wondering what secret ingredient creates such magic. The creamy, dreamy texture, combined with a crisp, buttery crust, makes for an unparalleled sensory experience. It’s truly a showstopper, guaranteeing gasps of delight and requests for the recipe from everyone who tries it.
But the experience doesn’t end with the first forkful. Part of the joy of this dessert is how versatile it is in presentation and pairing. For an elevated afternoon tea, serve individual slices alongside a delicate herbal infusion or a classic Earl Grey. Planning a sophisticated dinner party? This cheesecake shines when presented on a beautiful dessert platter, perhaps with a side of lightly sweetened fresh berries—think raspberries or blueberries, their tartness providing a wonderful contrast to the cheesecake’s richness. A light dusting of powdered sugar, a few fresh lavender sprigs, or even a drizzle of extra honey can transform it into a work of art. For a truly indulgent experience, consider a small glass of dessert wine, like a Moscato d’Asti, whose effervescence and sweetness complement the floral and honey notes beautifully. Even a simple cup of good quality coffee after a meal becomes a special occasion when accompanied by a slice of this heavenly creation. It’s perfect for summer picnics, spring brunches, or even a cozy evening treat.
And here’s where the fun truly begins: feel empowered to make this recipe your own! While the classic graham cracker crust is always a winner, don’t be afraid to experiment. Imagine a crust made from crushed shortbread cookies for an even richer, more buttery base, or perhaps some finely ground pistachios mixed with your graham crackers for a subtle nutty counterpoint. For those seeking a gluten-free option, simply swap out the graham crackers for your favorite gluten-free digestive biscuits. You could even play with the flavor profile of the filling itself; a tiny hint of lemon zest could brighten the lavender, or a touch of vanilla bean paste could deepen the overall aroma. If you’re feeling adventurous, try infusing the cream cheese mixture with a different floral essence—rosewater, for example, for a completely different but equally enchanting experience. You could also swirl in a bit of raspberry purée just before chilling for a stunning visual effect and an added fruity tang. The possibilities are truly endless, allowing you to tailor this dessert perfectly to your taste buds or the occasion. Don’t be shy about experimenting; that’s where some of the most delightful culinary discoveries are made!
So, what are you waiting for? Now that you have all the tips, tricks, and inspiration at your fingertips, it’s time to roll up your sleeves and bring this magic to life in your own kitchen. I promise you, the joy of creating something so beautiful and delicious, with relatively little effort, is incredibly rewarding. There’s a special kind of satisfaction that comes from watching friends and family enjoy a dessert you’ve made with love, especially one as unique and memorable as this one. I truly believe this No Bake Honey Lavender Cheesecake will become a cherished recipe in your repertoire. Once you’ve whipped up your masterpiece, I would absolutely love to hear all about your experience. Did you try a unique variation? What was your favorite part of making it? How did your guests react? Please, share your stories, your photos, and your triumphs! Your insights not only inspire me but also help build a wonderful community of home bakers who are passionate about creating delicious memories. Happy baking (or rather, happy chilling!), and I can’t wait to see what you create!
No Bake Honey Lavender Cheesecake
No Bake Honey Lavender Cheesecake is the dessert revelation you’ve been waiting for! Imagine a treat so exquisitely elegant, so bursting with unique, fragrant flavor, yet requires absolutely no oven time.
Ingredients
-
1 ½ cups Graham cracker crumbs
-
½ cup unsalted butter, melted
-
2 cups full-fat cream cheese, softened
-
1 cup cold heavy cream
-
¾ cup honey (divided)
-
½ cup granulated sugar (divided)
-
2 ¼ teaspoons culinary lavender buds (divided)
-
2 teaspoons fresh lemon juice
-
1 teaspoon vanilla extract
-
½ teaspoon fine sea salt (divided)
-
1 tablespoon hot water (for drizzle)
-
Fresh lavender sprigs (for garnish, optional)
-
Fresh berries (for garnish, optional)
-
Powdered sugar (for garnish, optional)
Instructions
- Step 1
In a small bowl or saucepan, combine ½ cup honey (for filling) with 2 tsp culinary lavender buds. Stir to submerge. - Step 2
Gently warm mixture in microwave (15-20 sec) or saucepan over low heat (1-2 min) until honey is fluid and fragrant. Do not boil. - Step 3
Remove from heat and let steep for at least 30 minutes, or longer for a stronger flavor, ensuring it doesn’t ferment in a warm kitchen. - Step 4
Strain the infused honey through a fine-mesh sieve into a clean bowl, pressing buds to extract all liquid. Discard buds. - Step 5
Keep the lavender-infused honey at room temperature, ready for the cheesecake filling. - Step 6
Lightly grease a 9-inch springform pan. Line the bottom with parchment paper for easy removal. - Step 7
Crush graham crackers in a food processor or Ziploc bag with a rolling pin until fine crumbs are formed (approx. 1 ½ cups). - Step 8
In a medium bowl, combine graham cracker crumbs, ¼ cup granulated sugar, and ¼ tsp fine sea salt. Whisk well. - Step 9
Pour ½ cup melted unsalted butter over the dry crumb mixture. Stir until all crumbs are moistened and resemble wet sand. - Step 10
Transfer mixture to the prepared springform pan. Press firmly and evenly across the bottom, optionally creating a small lip up the sides. - Step 11
Refrigerate the crust for at least 15-20 minutes while preparing the filling to allow the butter to solidify. - Step 12
In a large, chilled bowl with cold heavy cream, whip with an electric mixer on medium-high speed until stiff peaks form (3-5 minutes). Transfer to a separate bowl and refrigerate. - Step 13
In the same bowl, beat 2 cups softened full-fat cream cheese on low to medium speed until completely smooth, creamy, and lump-free (2-3 minutes). Scrape down sides frequently. - Step 14
Add ¼ cup granulated sugar (for filling), 2 tsp fresh lemon juice, 1 tsp vanilla extract, and a pinch of fine sea salt to the cream cheese. Beat until light and fluffy (1-2 minutes). - Step 15
Add the strained honey lavender infusion to the cream cheese mixture. Beat on low speed until just combined, ensuring full incorporation. - Step 16
Add about one-third of the chilled whipped cream to the cream cheese mixture. Gently fold it in with a rubber spatula to lighten the mixture. - Step 17
Add the remaining whipped cream in two more additions, folding gently after each until just combined, avoiding over-mixing to maintain airiness. - Step 18
Take the springform pan with the chilled crust from the refrigerator. - Step 19
Carefully spoon the entire cheesecake filling onto the chilled crust. Gently spread and smooth the top evenly with a spatula. Tap pan to release air bubbles. - Step 20
Loosely cover the springform pan with plastic wrap, ensuring it doesn’t touch the cheesecake surface (e.g., using toothpicks to create a tent). - Step 21
Refrigerate for a minimum of 6-8 hours, or preferably overnight, for the cheesecake to firm up completely and for flavors to meld. - Step 22
In a small bowl, combine ¼ cup honey (for drizzle) with 1 tbsp hot water and ¼ tsp culinary lavender buds. Stir well. - Step 23
Warm mixture in microwave (10-15 sec) or saucepan over low heat (1 min) until honey thins and mixes easily with water. Do not boil. - Step 24
Let the drizzle mixture sit off the heat for 5-10 minutes for deeper lavender infusion. - Step 25
Strain the honey drizzle through a fine-mesh sieve to remove lavender buds, ensuring a smooth syrup. - Step 26
Allow the drizzle to cool completely to room temperature. Store in an airtight container if made ahead. - Step 27
After chilling, run a thin knife around the pan’s edge. Unclip and carefully remove the springform ring. Slide onto a serving plate if desired. - Step 28
Use a sharp knife, run under hot water and wiped dry between each slice, for clean, crisp edges. - Step 29
Just before serving, drizzle the cooled honey lavender syrup over individual slices or the entire cheesecake. Garnish with fresh lavender sprigs and fresh berries. - Step 30
Serve immediately and savor the creamy, sweet, tangy, and subtly floral flavors. - Step 31
Cover any leftover cheesecake loosely with plastic wrap or store in an airtight container in the refrigerator for 3-4 days.
Important Information
Nutrition Facts (Per Serving)
It is important to consider this information as approximate and not to use it as definitive health advice.
Allergy Information
Please check ingredients for potential allergens and consult a health professional if in doubt.