
Strawberry Cheesecake Protein Balls No Bake Minutes—just the sound of it conjures up images of deliciousness and ease, doesn’t it? As someone who constantly seeks out treats that satisfy both my sweet tooth and my commitment to healthy eating, I can tell you this recipe is an absolute game-changer. Imagine sinking your teeth into the creamy, tangy sweetness of a classic strawberry cheesecake, but in a bite-sized form that’s packed with protein and requires absolutely no baking whatsoever. It’s truly the best of both worlds!
While the concept of protein balls might be a modern innovation tailored for our busy lives and fitness goals, the inspiration clearly harks back to the timeless allure of cheesecake, a dessert enjoyed across cultures for centuries. From ancient Greek honey cakes to the rich, creamy versions we adore today, cheesecake has always been synonymous with indulgence. My take brings that beloved flavor profile into the 21st century, making it accessible, guilt-free, and incredibly quick to prepare.
People absolutely adore these delightful treats not only for their uncanny resemblance to their namesake dessert in flavor and satisfying texture but also for their unparalleled convenience. You’ll find yourself reaching for these delicious bites throughout the day because they’re so easy to make – truly Strawberry Cheesecake Protein Balls No Bake Minutes is an accurate description of the speed and simplicity involved. Whether you need a quick breakfast on the go, a post-workout refuel, or a healthy snack to curb those afternoon cravings, these balls deliver. They’re chewy, bursting with strawberry flavor, and offer a protein boost that will keep you feeling full and energized without the sugar crash. Get ready to fall in love with your new favorite healthy indulgence!

Ingredients:
Creating these delightful Strawberry Cheesecake Protein Balls No Bake Minutes is an absolute joy! Here’s everything you’ll need to whip up a batch of these irresistible, healthy treats:
- 1 cup (approximately 80g) vanilla protein powder: I find that a good quality whey or casein protein powder works best for texture and flavor here. If you prefer a plant-based option, ensure it’s one that blends smoothly and doesn’t have a strong aftertaste. A vanilla flavor complements the strawberry and cheesecake notes beautifully, but if you have a strawberry protein powder on hand, that would be an amazing choice too for an extra berry boost!
- 4 oz (approximately 1/2 cup) reduced-fat cream cheese, softened: Make sure your cream cheese is at room temperature. This is crucial for achieving a smooth, lump-free mixture. Trust me, trying to mix cold cream cheese is a battle you don’t want to fight! I opt for reduced-fat to keep these a bit lighter, but full-fat will also work wonderfully if that’s what you have.
- 1/2 cup (approximately 40g) freeze-dried strawberries: These are the secret weapon for intense strawberry flavor and a lovely pink hue without adding excess moisture. You’ll want to crush them into a fine powder. A food processor or even a sturdy zip-top bag and a rolling pin will do the trick. If you can’t find freeze-dried, you can very sparingly use a tiny bit of strawberry extract, but the freeze-dried truly make these special.
- 1/4 cup (approximately 30g) oat flour: You can buy oat flour or simply blend regular rolled oats in a food processor or blender until they form a fine powder. This helps bind everything together and provides a nice, wholesome base. If you’re gluten-sensitive, ensure you use certified gluten-free oats.
- 2-3 tablespoons maple syrup or honey (to taste): This adds a touch of natural sweetness to balance the tartness of the cream cheese and strawberries. Adjust this based on the sweetness of your protein powder and your personal preference. You could also use a sugar-free alternative like erythritol or stevia drops if you’re watching your sugar intake.
- 1 teaspoon vanilla extract: A good quality vanilla extract enhances all the other flavors and really brings out that classic cheesecake taste.
- Pinch of salt: Just a tiny pinch makes a huge difference in brightening and balancing all the flavors. Don’t skip it!
- Optional for coating: Extra crushed freeze-dried strawberries, shredded unsweetened coconut, or a light dusting of powdered sugar substitute.
Getting Ready: Gather Your Ingredients and Tools
Before we dive into mixing, let’s make sure we have everything prepped and ready to go. This step is all about setting yourself up for success and making the entire process of creating your Strawberry Cheesecake Protein Balls No Bake Minutes as smooth and enjoyable as possible. I always find that having my ingredients measured out and my equipment at hand makes the cooking experience so much more relaxing.
- Soften Your Cream Cheese: If you haven’t already, take your reduced-fat cream cheese out of the refrigerator. It absolutely needs to be at room temperature to ensure a smooth, creamy base for our protein balls. Cold cream cheese will result in a lumpy mixture that’s hard to work with, and nobody wants that! You can let it sit on the counter for about 30-60 minutes, or if you’re in a hurry, you can carefully soften it in the microwave in 10-second intervals, stirring in between, until it’s just soft but not melted.
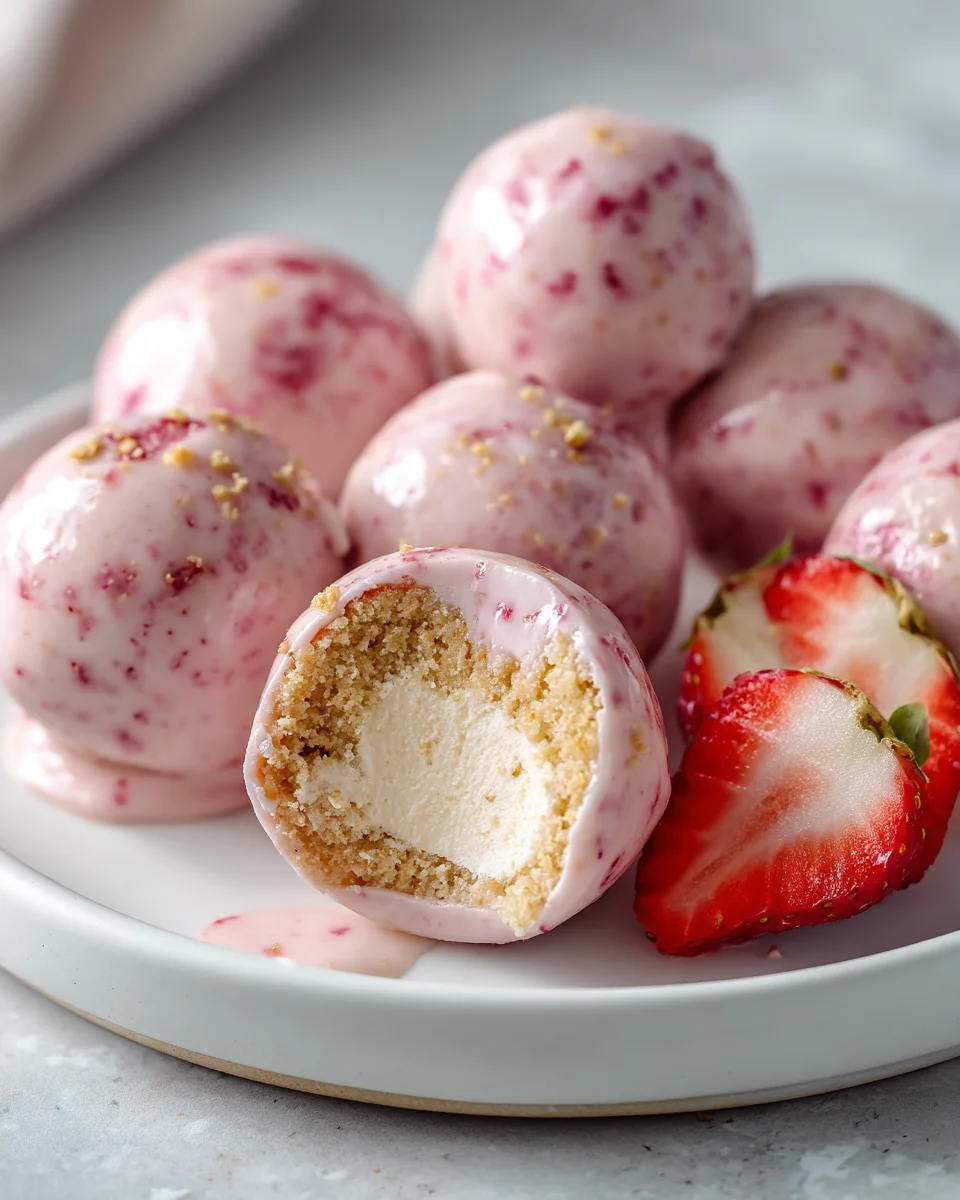
- Prepare Your Freeze-Dried Strawberries: Measure out your 1/2 cup of freeze-dried strawberries. If they aren’t already powdered, now is the time to turn them into a fine dust. I usually toss them into a small food processor and pulse until they become a beautiful, vibrant pink powder. If you don’t have a food processor, you can place them in a sturdy zip-top bag, seal it, and crush them with a rolling pin or the bottom of a heavy glass. The finer the powder, the better it will incorporate into the mixture, giving you an even color and flavor distribution. This step is key for that intense strawberry flavor that makes these Strawberry Cheesecake Protein Balls No Bake Minutes truly pop!
- Measure Dry Ingredients: Accurately measure your vanilla protein powder and oat flour. I like to have these in separate small bowls, ready to be added when the time is right. Precision with dry ingredients, especially protein powder, can significantly impact the final texture of your protein balls.
- Measure Wet Ingredients: Get your maple syrup (or honey) and vanilla extract measured out. Having these ready prevents sticky measuring mishaps in the middle of mixing.
- Line a Baking Sheet: Grab a baking sheet or a large plate and line it with parchment paper or wax paper. This will be where our beautiful protein balls will rest and chill, preventing them from sticking. It’s a small step that makes a big difference when it comes to easy cleanup and handling.
- Grab Your Mixing Bowl and Utensils: You’ll need a medium-sized mixing bowl and a sturdy spatula or spoon for mixing. If you have a stand mixer with a paddle attachment, that can make the initial cream cheese mixing even easier, but it’s absolutely not necessary; arm power works just as well!
- Final Check: Take a quick look over your measured ingredients and confirm you have everything. This ensures a seamless process and no last-minute scrambling.
Crafting the Strawberry Cheesecake Base
Now for the fun part – bringing all these wonderful ingredients together to form the perfect base for our Strawberry Cheesecake Protein Balls No Bake Minutes! This is where the magic happens, transforming simple components into a cohesive, flavorful dough that’s just begging to be rolled.
- Cream the Cream Cheese: In your medium-sized mixing bowl, add the softened cream cheese. Using your spatula, or a stand mixer if you’re using one, beat the cream cheese for about 1-2 minutes until it’s super smooth and creamy, with no lumps whatsoever. This initial creaming ensures a luxurious texture in your protein balls. If you see any small lumps, keep mixing until they’re gone. This step is foundational for the “cheesecake” aspect of our treat.
- Sweeten and Flavor the Base: To the smooth cream cheese, add the measured maple syrup (or honey), vanilla extract, and that tiny but mighty pinch of salt. Mix well until all these ingredients are fully combined and the mixture is uniformly smooth and slightly glossy. Take a moment to scrape down the sides of the bowl to ensure everything is incorporated. You should already be smelling the delightful creamy vanilla notes!
- Introduce the Strawberry Power: Now, add the finely crushed freeze-dried strawberry powder to the cream cheese mixture. Mix thoroughly. You’ll immediately notice the mixture transforming into a beautiful, vibrant pink color. Keep mixing until the strawberry powder is completely integrated, leaving no streaks. The aroma will become wonderfully fruity at this stage, hinting at the delicious Strawberry Cheesecake Protein Balls No Bake Minutes to come.
- Incorporate the Dry Binders: Next, add the vanilla protein powder and the oat flour to the bowl. This is where the mixture will start to thicken considerably. Begin mixing with your spatula. It might seem a little crumbly at first, but keep going! Use the back of your spoon or spatula to press the ingredients together, folding and pressing until a thick, uniform dough starts to form.
- Check for Consistency: The goal is a dough that is firm enough to roll into balls but still pliable and not too sticky. It should pull away from the sides of the bowl. If your mixture seems too dry and crumbly, you can add a tiny splash (1/2 teaspoon at a time) of milk (dairy or non-dairy) or a bit more maple syrup until it reaches the right consistency. If, on the other hand, it feels too wet or sticky, you can add another tablespoon of oat flour or even a tiny bit more protein powder, mixing until it firms up. Different protein powders absorb liquid differently, so this small adjustment is sometimes necessary to achieve the perfect moldable dough for our Strawberry Cheesecake Protein Balls No Bake Minutes.
- A Quick Taste Test (Optional but Recommended!): Once the dough is well combined, take a tiny pinch and taste it. This is your chance to adjust the sweetness if needed. If you want it sweeter, mix in another teaspoon of maple syrup or a few drops of liquid sweetener. If the strawberry flavor isn’t quite strong enough for your liking, and you happen to have a little more freeze-dried strawberry powder, feel free to add another tiny sprinkle.
Forming Your Delicious Protein Balls
With our beautifully colored and perfectly textured strawberry cheesecake dough ready, it’s time to transform it into the individual, bite-sized delights that are our Strawberry Cheesecake Protein Balls No Bake Minutes! This step is therapeutic and brings us closer to enjoying our healthy snack.
- Prepare Your Hands (Optional but Helpful): Some people find it helpful to slightly dampen their hands with a tiny bit of water or lightly coat them with a neutral oil (like coconut oil or avocado oil) to prevent the dough from sticking. I usually find that if the dough consistency is correct from the previous step, this isn’t strictly necessary, but it can make the rolling process even smoother.
- Scoop the Dough: I highly recommend using a small cookie scoop (about 1-tablespoon size) to portion out your dough. This ensures that all your protein balls are uniform in size, which makes them look more professional and ensures they chill evenly. If you don’t have a scoop, simply use a spoon to measure out roughly equal portions. Consistency is key for presentation and for a consistent snack experience.
- Roll into Balls: Take each portion of dough and roll it gently between the palms of your hands to form a smooth, compact ball. Apply just enough pressure to make them firm and round, but don’t overwork the dough. Aim for balls that are about 1 to 1.5 inches in diameter. As you roll, you’ll notice how pliable and easy to handle the dough is – a testament to our careful mixing!
- Optional Coating Fun: This is where you can add an extra layer of flavor and visual appeal to your Strawberry Cheesecake Protein Balls No Bake Minutes. Roll the freshly formed balls into your chosen coating:
- Extra Crushed Freeze-Dried Strawberries: For an even more intense strawberry punch and a lovely textured exterior.
- Shredded Unsweetened Coconut: Adds a tropical twist and a delightful chewy texture.
- Powdered Sugar Substitute: Gives them that classic “cheesecake” look with a hint of sweetness.
- Graham Cracker Crumbs: If you’re really leaning into the cheesecake vibe, a light coating of finely crushed graham cracker crumbs is absolutely divine!
Gently roll each ball in the coating until it’s evenly covered, then place it on your parchment-lined baking sheet.
- Arrange on Baking Sheet: As you finish rolling and coating each protein ball, place them onto the prepared baking sheet, ensuring they have a little space between them. This prevents them from sticking together during the chilling process and allows air to circulate for even firming.
- Admiration Time: Take a moment to admire your beautifully crafted, perfectly rounded Strawberry Cheesecake Protein Balls No Bake Minutes! They already look fantastic, but they’re about to get even better.
The Final Touches and Chilling Time
We’re almost there! The final step is crucial for allowing the flavors to meld and the protein balls to firm up, giving them that delightful, chewy, and truly satisfying texture. This brief chilling period is what takes these from delicious dough to irresistible, ready-to-eat Strawberry Cheesecake Protein Balls No Bake Minutes.
- Time to Chill: Once all your protein balls are rolled and coated (if you chose to do so) and arranged on the baking sheet, carefully place the entire sheet into your refrigerator. Chilling is not just about making them firm; it’s also about letting the flavors deepen and mingle, transforming them into a true strawberry cheesecake experience.
- Minimum Chilling Time: Allow the protein balls to chill for at least 30-60 minutes. During this time, the cream cheese and other ingredients will firm up, making the balls much easier to handle and giving them that lovely, dense, yet soft texture we’re aiming for. If you’re in a hurry and need those Strawberry Cheesecake Protein Balls No Bake Minutes sooner, you can pop them into the freezer for about 15-20 minutes, but be careful not to freeze them solid if you want them chewy.
- The Longer, The Better (Within Reason): For the absolute best flavor and texture, I often find that chilling them for 2-3 hours, or even overnight, yields the most satisfying results. This extended chilling time allows the protein powder to fully hydrate and the cheesecake and strawberry notes to really shine.
- Serving Your Delights: Once thoroughly chilled, your Strawberry Cheesecake Protein Balls No Bake Minutes are ready to be enjoyed! They are perfect as a quick breakfast on the go, a post-workout snack, a healthy dessert, or just a little something sweet to get you through the afternoon slump. I love grabbing one or two straight from the fridge when I need a little pick-me-up.
- Storage Instructions: To keep your protein balls fresh and delicious, store them in an airtight container in the refrigerator. They will last wonderfully for up to one week. If you’ve made a larger batch, you can also freeze them for longer storage (up to 1-2 months). Just make sure to place them in a freezer-safe bag or container, separating layers with parchment paper if needed. When you’re ready to enjoy a frozen one, simply let it thaw in the refrigerator for a few hours or on the counter for about 15-20 minutes.
- Enjoy! And there you have it! A batch of incredibly delicious, nutritious, and incredibly easy-to-make Strawberry Cheesecake Protein Balls No Bake Minutes. These truly are a game-changer for satisfying those sweet cravings in a healthy way. I hope you love them as much as I do!

Conclusion:
As we wrap up our journey through this incredibly simple yet profoundly satisfying recipe, I genuinely hope you’re feeling as excited as I am about what you’ve learned. I truly believe that once you try these, they will become an indispensable part of your snack rotation. They perfectly encapsulate everything I look for in a treat: deliciousness, ease, and a fantastic nutritional profile. The convenience factor alone is a game-changer for anyone with a busy lifestyle, and the vibrant flavor just seals the deal.
What truly sets this recipe apart is its ability to deliver an indulgent taste sensation without any of the guilt or the lengthy preparation time often associated with such delights. Imagine craving something sweet and satisfying, something that feels like a decadent dessert but actually supports your health and fitness goals. That’s precisely what these offer. They are the ideal solution for those moments when you need a quick energy boost, a post-workout recovery snack, or simply a delightful treat to curb those afternoon cravings without derailing your progress. The creamy, tangy notes of strawberry cheesecake combined with the satisfying texture make for an irresistible bite every single time.
Endless Possibilities for Enjoyment and Customization
Now, let’s talk about making these little wonders truly your own. While they are utterly delightful straight from the fridge, perfectly chilled and ready to enjoy, there are so many ways to elevate your experience. I love to grab one with my morning coffee for a protein-packed start to the day, or pack a couple in a small container to enjoy during a mid-afternoon slump. They also make a fantastic, light dessert after a wholesome meal, offering that sweet finish without feeling heavy. Don’t hesitate to share them with friends and family too; they’re always a hit at gatherings, disappearing almost as quickly as you can make them!
The beauty of this recipe extends beyond just how you serve them; it’s also in the incredible flexibility it offers for variations. If you’re feeling adventurous, consider swapping out some of the freeze-dried strawberries for other fruits like raspberries or blueberries to create a different berry cheesecake experience. A sprinkle of lemon zest added to the mixture can brighten the flavor profile beautifully, adding a zesty counterpoint to the sweetness. For chocolate lovers, a handful of mini dark chocolate chips mixed in can be an absolute game-changer, transforming them into a strawberry chocolate cheesecake dream. You could also roll the finished balls in a light dusting of cocoa powder or finely chopped pistachios for an extra layer of flavor and visual appeal.
Thinking about texture? Try adding a tablespoon or two of quick oats to the mixture for a chewier bite, or incorporate a different nut butter like cashew or almond butter for a slightly altered nutty undertone. And don’t forget the power of different protein powders! While a vanilla protein works wonderfully, a strawberry-flavored protein powder would amplify the berry notes, or a plain unsweetened one would allow the fruit to truly shine. These aren’t just snacks; they’re a canvas for your culinary creativity.
Your Turn: Make, Enjoy, and Share!
So, what are you waiting for? I wholeheartedly encourage you to dive into your kitchen and give this recipe a try. You’ll be amazed at how effortlessly you can create something so delicious and beneficial. The promise of these incredible Strawberry Cheesecake Protein Balls No Bake Minutes really does deliver. They are a testament to the fact that healthy eating doesn’t have to be bland or complicated; it can be vibrant, exciting, and incredibly satisfying. You’ll literally have a batch ready in mere minutes, making them the ultimate convenience food for a healthy lifestyle.
Once you’ve whipped up your first batch, I would absolutely love to hear about your experience. Did you stick to the original recipe, or did you venture into some exciting variations? How did you enjoy serving them? Please don’t keep your successes to yourself! Share your thoughts, your photos, and your tips in the comments below. Your insights not only inspire me but also help other readers discover new ways to enjoy these fantastic treats. Let’s build a community around delicious, easy, and healthy eating!
Thank you for following along with me. I’m confident that these delightful protein balls will soon become a staple in your home, providing you with a guilt-free pleasure that’s always just a few steps away.
Strawberry Cheesecake Protein Balls No Bake Minutes
These dreamy no-bake strawberry cheesecake protein balls are a game-changer for satisfying sweet cravings healthily. Packed with protein and bursting with the creamy, tangy sweetness of classic strawberry cheesecake, these bite-sized treats require absolutely no baking and are incredibly quick to prepare, making them perfect for a quick breakfast, post-workout refuel, or healthy snack.
Ingredients
-
1 cup (approximately 80g) vanilla protein powder (whey or casein recommended)
-
4 oz (approximately 1/2 cup) reduced-fat cream cheese, softened
-
1/2 cup (approximately 40g) freeze-dried strawberries, crushed into fine powder
-
1/4 cup (approximately 30g) oat flour (certified gluten-free if needed)
-
2-3 tablespoons maple syrup or honey (to taste)
-
1 teaspoon vanilla extract
-
Pinch of salt
-
Optional coatings: extra crushed freeze-dried strawberries, shredded unsweetened coconut, powdered sugar substitute, or graham cracker crumbs
Instructions
-
Step 1
Ensure cream cheese is at room temperature. Crush freeze-dried strawberries into a fine powder using a food processor or rolling pin. Measure all other dry and wet ingredients accurately. Line a baking sheet or plate with parchment paper for chilling. -
Step 2
In a medium mixing bowl, beat the softened cream cheese for 1-2 minutes until super smooth and lump-free. Add the maple syrup (or honey), vanilla extract, and pinch of salt; mix well until fully combined and slightly glossy. Scrape down the sides of the bowl. -
Step 3
Add the finely crushed freeze-dried strawberry powder to the cream cheese mixture. Mix thoroughly until the powder is completely integrated and the mixture transforms into a vibrant pink color, with a wonderful fruity aroma. -
Step 4
Add the vanilla protein powder and oat flour to the bowl. Mix with a spatula, pressing and folding, until a thick, uniform dough begins to form. If the dough is too dry, add a tiny splash (1/2 tsp at a time) of milk. If too wet, add a tablespoon of oat flour or a tiny bit more protein powder until it reaches a pliable, moldable consistency. Taste and adjust sweetness if desired. -
Step 5
Using a small cookie scoop (about 1-tablespoon size) or a spoon, portion out the dough. Roll each portion gently between your palms to form smooth, compact balls about 1 to 1.5 inches in diameter. Apply just enough pressure to make them firm and round. -
Step 6
For added flavor and visual appeal, roll the freshly formed balls in your chosen coating: extra crushed freeze-dried strawberries, shredded unsweetened coconut, powdered sugar substitute, or finely crushed graham cracker crumbs. Place coated balls on the parchment-lined baking sheet, leaving some space between them. -
Step 7
Carefully place the baking sheet with the protein balls into the refrigerator. Chill for at least 30-60 minutes to allow them to firm up. For the best flavor and texture, chilling for 2-3 hours or even overnight is recommended. For quicker firming, freeze for 15-20 minutes, being careful not to freeze solid. -
Step 8
Once thoroughly chilled, your Strawberry Cheesecake Protein Balls are ready to enjoy! Store leftovers in an airtight container in the refrigerator for up to one week. For longer storage, freeze in a freezer-safe bag or container (up to 1-2 months), thawing in the refrigerator or at room temperature before serving.
Important Information
Nutrition Facts (Per Serving)
It is important to consider this information as approximate and not to use it as definitive health advice.
Allergy Information
Please check ingredients for potential allergens and consult a health professional if in doubt.