
Mint Chocolate Chip Snowball Cookies are an enchanting twist on a beloved classic, promising a delightful culinary experience that will captivate your senses from the very first glance. Traditionally known as Mexican Wedding Cookies or Russian Tea Cakes, these delicate, powdered-sugar-dusted treats have graced tables for generations, particularly during festive seasons and special gatherings. There’s a certain timeless charm to their simplicity and elegance, often symbolizing warmth, joy, and the spirit of celebration.
My recipe, however, introduces a modern, refreshing dimension, infusing that timeless appeal with the vibrant coolness of mint and the irresistible richness of chocolate. What makes these cookies truly irresistible is their exquisite balance of flavors and textures. Each bite offers a melt-in-your-mouth tender crumb, a refreshing burst of cool mint, and delightful pockets of decadent chocolate chips. Their elegant, snow-dusted appearance makes them not only a joy to eat but also a beautiful addition to any holiday spread or a thoughtful homemade gift. I am absolutely confident that these Mint Chocolate Chip Snowball Cookies will quickly become a cherished favorite in your repertoire, offering a unique blend of nostalgia and contemporary flavor that guests will adore.

Ingredients:
- 1 cup (2 sticks or 226g) Unsalted Butter, softened: I always make sure my butter is at a true room temperature, not melted, but soft enough to easily indent with my finger. This is crucial for achieving that wonderfully creamy texture in our Mint Chocolate Chip Snowball Cookies.
- 1/2 cup (100g) Granulated Sugar: This adds just the right amount of sweetness to balance the mint and chocolate.
- 1 teaspoon Pure Vanilla Extract: A staple in almost all my cookie recipes, vanilla really enhances the overall flavor profile.
- 1 teaspoon Peppermint Extract: This is where the magic happens for our mint flavor! Be careful not to overdo it, as peppermint extract can be quite potent. A little goes a long way to give our Mint Chocolate Chip Snowball Cookies that refreshing zing.
- 2 1/4 cups (270g) All-Purpose Flour: I always measure my flour using the spoon-and-level method to prevent packing too much into the cup, which can lead to dry cookies.
- 1/4 teaspoon Salt: Don’t skip the salt! It balances the sweetness and brings out all the lovely flavors.
- 1 cup (170g) Mini Chocolate Chips: I find mini chips work best for snowball cookies because they distribute more evenly in the small dough balls without making them too chunky. You can use regular chocolate chips, but you might get a slightly different texture.
- 1 1/2 cups (180g) Powdered Sugar (Confectioners’ Sugar), divided: This is for our signature snowball coating. We’ll use some for the initial roll and more for a second, more substantial coating.
- Optional: Green Food Coloring: Just a few drops can give your Mint Chocolate Chip Snowball Cookies a lovely, festive green hue, making them even more visually appealing. I prefer gel food coloring for concentrated color without adding too much liquid.
Equipment You’ll Need:
- Large Mixing Bowl: Essential for combining our dry and wet ingredients.
- Electric Mixer (Stand or Handheld): While you can do this by hand, an electric mixer will make creaming the butter and sugar much easier and more effective, ensuring a light and airy dough for our Mint Chocolate Chip Snowball Cookies.
- Rubber Spatula: Great for scraping down the sides of the bowl and folding in ingredients.
- Measuring Cups and Spoons: For accurate ingredient measurements.
- Sifter or Whisk: To combine and aerate the dry ingredients.
- Plastic Wrap: For chilling the cookie dough.
- Small Cookie Scoop (approx. 1-inch diameter or 1 tablespoon): This helps ensure uniform cookie sizes, which means they’ll bake evenly. Consistency is key for beautiful Mint Chocolate Chip Snowball Cookies.
- Baking Sheets: I usually use two or three so I can have one batch baking while I prepare the next.
- Parchment Paper or Silicone Baking Mats: To prevent sticking and ensure easy cleanup. These are my secret weapons for perfect cookie bottoms.
- Wire Cooling Rack: For cooling the cookies after they come out of the oven.
- Shallow Bowls: Two distinct shallow bowls will be needed for the powdered sugar coating process.
Preparing for Mint Chocolate Chip Snowball Cookie Perfection:
- Preheat Your Oven and Prepare Baking Sheets: Before I even start mixing, I always preheat my oven to 350°F (175°C). This ensures the oven is at a consistent temperature when the cookies go in, which is vital for even baking. Next, I line two or three large baking sheets with parchment paper or silicone baking mats. Trust me, this small step makes a huge difference in preventing sticking and making cleanup a breeze. We want every single one of our precious Mint Chocolate Chip Snowball Cookies to come off the sheet perfectly.
- Measure and Sift Dry Ingredients: In a medium bowl, I whisk together my all-purpose flour and salt. If I’m feeling particularly meticulous, I’ll sift them together to ensure there are no lumps and that they’re perfectly aerated. This step contributes to a tender texture in your finished cookies. Set this bowl aside for now.
- Gather and Prepare Wet Ingredients: I always make sure my unsalted butter is properly softened to room temperature. This means it’s soft enough to leave an indentation when gently pressed but not at all greasy or melted. If your butter is too cold, it won’t cream properly, and if it’s too warm, your dough might be greasy. Have your granulated sugar, vanilla extract, and peppermint extract ready to go. If I’m using green food coloring, I’ll have that tiny bottle ready too! This mise en place approach makes the whole baking process so much smoother and more enjoyable.
Crafting the Dough for Your Mint Chocolate Chip Snowball Cookies:
- Cream the Butter and Sugar: In your large mixing bowl, using an electric mixer, I start by beating the softened unsalted butter on medium speed until it’s light and creamy, usually about 1-2 minutes. Then, I gradually add the granulated sugar, beating for another 2-3 minutes until the mixture is truly light in color and fluffy in texture. This creaming process is incredibly important; it incorporates air into the butter, which will give our Mint Chocolate Chip Snowball Cookies their tender, melt-in-your-mouth crumb. Scrape down the sides of the bowl occasionally to ensure everything is well combined.
- Incorporate Extracts and Optional Food Coloring: Once the butter and sugar are perfectly creamed, I beat in the pure vanilla extract and, of course, our star player, the peppermint extract. I beat them until they are just combined, ensuring the flavors are evenly distributed. If I’m going for that festive green look, this is when I add a few drops of green food coloring. I start with 2-3 drops of gel food coloring, mix it in, and then add more if needed until I achieve my desired shade of green for my Mint Chocolate Chip Snowball Cookies. Remember, the color will be slightly more vibrant after baking.
- Gradually Add Dry Ingredients: With the mixer on low speed, I gradually add the flour and salt mixture to the wet ingredients. I add it in about three additions, mixing just until combined after each addition. The key here is to avoid overmixing the dough once the flour is added. Overmixing can develop the gluten in the flour too much, leading to tough cookies, and we definitely want soft, delicate Mint Chocolate Chip Snowball Cookies.
- Fold in the Mini Chocolate Chips: Once the flour is mostly incorporated and there are just a few streaks of flour remaining, I remove the bowl from the mixer and grab my trusty rubber spatula. I gently fold in the mini chocolate chips until they are evenly distributed throughout the dough. I prefer to do this by hand to prevent crushing the delicate chips and to ensure I don’t overmix the dough. The dough will be thick and somewhat crumbly, but it should hold together when pressed.
Chilling and Shaping Your Delicious Mint Chocolate Chip Snowball Cookies:
- Chill the Cookie Dough: This step is often overlooked, but it’s absolutely critical for snowball cookies, especially our Mint Chocolate Chip Snowball Cookies. I cover the bowl tightly with plastic wrap and refrigerate the dough for at least 30 minutes to 1 hour. Chilling the dough helps solidify the butter, which prevents the cookies from spreading too much during baking and helps them maintain their round snowball shape. It also makes the dough much easier to handle and roll. If I’m in a hurry, I sometimes pop it in the freezer for about 15-20 minutes, but I watch it carefully so it doesn’t freeze solid.
- Prepare for Shaping: While the dough is chilling, I get my cookie scoop ready. A small cookie scoop (about 1 tablespoon or a 1-inch diameter) is ideal for these cookies. It ensures uniformity in size, which in turn leads to even baking. I also ensure my prepared baking sheets are within easy reach.
- Shape the Snowball Cookies: Once the dough is adequately chilled, I take it out of the refrigerator. Using my cookie scoop, I scoop out portions of dough. Then, I gently roll each portion between my palms to form smooth, compact balls, approximately 1 inch in diameter. It’s important to make them fairly uniform in size so they bake consistently. As I roll each ball, I place them about 1 to 1 1/2 inches apart on the prepared baking sheets. Don’t worry if they don’t look perfectly round at this stage; they will firm up and retain their shape beautifully as they bake into perfect little Mint Chocolate Chip Snowball Cookies.
Baking Your Irresistible Mint Chocolate Chip Snowball Cookies:
- Bake Until Just Set: I carefully place the baking sheets into my preheated 350°F (175°C) oven. I bake the Mint Chocolate Chip Snowball Cookies for about 10-12 minutes. The exact baking time can vary slightly depending on your oven, so I always keep a close eye on them. The cookies are ready when the edges are lightly golden and the centers appear set, but they should still be quite pale. They might look a little soft, but they will firm up as they cool. You absolutely do not want to overbake these cookies, as they can quickly become dry. We are aiming for a tender, melt-in-your-mouth texture.
- Cool on Baking Sheets: Once baked, I carefully remove the baking sheets from the oven. This is a crucial step for snowball cookies: I let the cookies cool on the baking sheets for about 5-10 minutes. This initial cooling period allows the cookies to set up and become firm enough to handle without crumbling. If you try to move them too soon, they are likely to break apart. While they are cooling on the sheet, I prepare my powdered sugar coating station.
- Transfer to Wire Rack: After the initial cooling on the baking sheet, I gently transfer the Mint Chocolate Chip Snowball Cookies to a wire cooling rack to finish cooling completely. This ensures air circulates around them, preventing condensation and keeping their bottoms from becoming soggy. However, for the first coating, we actually want them to be slightly warm!
The Grand Finale: Coating Your Mint Chocolate Chip Snowball Cookies:
- Prepare Powdered Sugar Coating Stations: While the cookies are still warm (but not hot to the touch), I get two shallow bowls ready. In the first shallow bowl, I place about 1/2 cup of powdered sugar. In the second, larger shallow bowl, I place the remaining 1 cup of powdered sugar. Having two distinct bowls makes the double-coating process much cleaner and more efficient.
- First Coating (Warm Cookies): This is the initial “snow” layer! Working with a few Mint Chocolate Chip Snowball Cookies at a time, I gently roll each warm cookie in the first shallow bowl of powdered sugar. The warmth of the cookies helps the sugar stick beautifully. I make sure they are fully coated, then I carefully place them back on the wire cooling rack to finish cooling completely. This step gives them that characteristic soft, sweet crust.
- Cool Completely: It’s absolutely essential that the cookies cool down to room temperature before the second coating. If they are still warm, the powdered sugar will melt and absorb into the cookie, rather than creating that lovely, distinct white coating that makes them “snowballs.” I usually give them at least 30-60 minutes, or even longer, until they are entirely cool to the touch. Patience is a virtue when it comes to the perfect finish for your Mint Chocolate Chip Snowball Cookies.
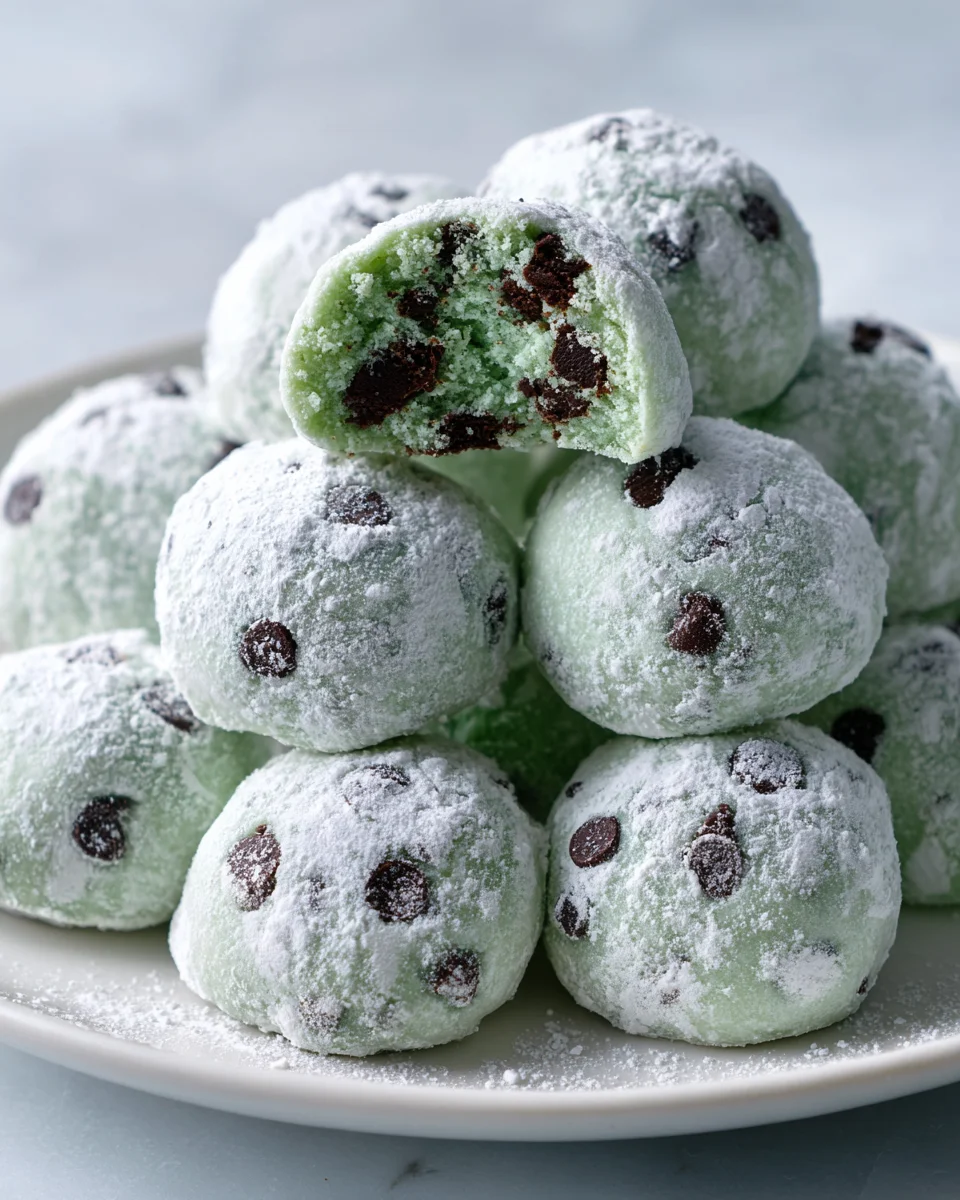
- Second Coating (Cool Cookies): Once the cookies are completely cool, it’s time for the final, more generous dusting! I take the completely cooled cookies, one by one, and roll them thoroughly in the second, larger bowl of powdered sugar. This time, I really make sure they are thickly coated, almost like little snowdrifts. This second coating ensures a beautiful, pure white “snowball” appearance and adds an extra layer of sweetness that is just divine. The contrast of the sweet powdered sugar with the refreshing mint and chocolate inside is what makes these Mint Chocolate Chip Snowball Cookies so utterly irresistible.
- Serve and Enjoy: Once all the cookies are double-coated, they are ready to be admired and devoured! I love arranging them on a platter for a festive display. They truly are a delightful treat.
Storage and Enjoyment Tips for Your Mint Chocolate Chip Snowball Cookies:
- Airtight Storage: To maintain their freshness and that delicate texture, I store these delightful Mint Chocolate Chip Snowball Cookies in an airtight container at room temperature. They will stay wonderfully fresh for up to 1 week. If you layer them, I recommend placing a piece of parchment paper between the layers to prevent the powdered sugar from transferring too much or the cookies sticking together.
- Freezing for Later: These cookies are fantastic for making ahead! Once they are completely cooled and coated, you can freeze them. I arrange them in a single layer on a baking sheet and freeze them until solid. Then, I transfer the frozen cookies to a freezer-safe airtight container or bag, again, with parchment paper between layers to protect the coating. They will keep well in the freezer for up to 2-3 months.
- Thawing Frozen Cookies: When you’re ready to enjoy your frozen Mint Chocolate Chip Snowball Cookies, simply take them out of the freezer and let them thaw at room temperature for about an hour or two. I find that they taste just as fresh as the day they were baked! Sometimes, I even give them a light dusting of fresh powdered sugar after thawing, just to refresh their snowy appearance.
- Serving Suggestions: These Mint Chocolate Chip Snowball Cookies are perfect on their own with a cup of coffee or tea, but they also make a wonderful addition to any holiday cookie platter. Their unique flavor and festive appearance always stand out! I find they are especially charming during winter gatherings or as a refreshing treat on a warm day.

Conclusion:
Well, my fellow bakers and sweet-toothed friends, we’ve reached the sweet finale of our delicious journey! I truly hope you’re feeling inspired and ready to dive into your kitchen to create what I believe are some of the most enchanting and utterly irresistible treats you’ll ever bake. This recipe isn’t just about making cookies; it’s about crafting a moment of pure joy, a little sphere of culinary magic that truly stands out from the usual dessert crowd. What makes these cookies an absolute must-try, you ask? It’s that perfect harmony of refreshing mint and rich, decadent chocolate, all encapsulated within a tender, buttery, melt-in-your-mouth crumb. Each bite is a delightful surprise, offering a cool, invigorating burst from the mint alongside the comforting familiarity of chocolate chips, all veiled beneath a delicate dusting of powdered sugar that feels like a gentle kiss of winter.
They possess a unique charm, an elegance that belies their simple preparation. Unlike many fussy cookie recipes, this one is wonderfully forgiving and incredibly rewarding, making it a fantastic choice for bakers of all skill levels. From the moment you mix the dough, you’ll sense the promise of something special. The texture is divine – a delicate crumb that practically dissolves on the tongue, leaving behind the lingering, delightful flavors of mint and chocolate. They’re not overly sweet, which allows the nuanced flavors to shine through beautifully, making them addictive in the best possible way. Trust me when I say, these are the cookies that disappear fastest from any holiday platter or gathering, sparking conversations and earning rave reviews from everyone who tries them. They just have that “something extra” that makes them unforgettable.
Serving Up Sweetness: Creative Ideas for Your Snowball Cookies
Once your batch of these delightful snowball cookies is ready, the fun doesn’t have to stop there! While they are absolutely perfect enjoyed on their own, perhaps with a cup of hot coffee or a soothing mug of tea, their versatility offers so many exciting possibilities. Imagine serving them alongside a steaming mug of hot cocoa topped with whipped cream – the minty coolness of the cookie against the warmth of the chocolate drink is an exquisite pairing that truly elevates the experience. They’re also an elegant addition to any dessert spread, perhaps arranged artfully on a platter with other small treats, where their pristine white appearance provides a beautiful contrast. Consider crumbling a few over a scoop of vanilla bean ice cream for an instant upgrade to a simple dessert, creating a textural and flavor wonderland. For a truly decadent experience, you could even make a simple chocolate ganache for dipping, though they are certainly not lacking in flavor without it.
Thinking beyond the immediate enjoyment, these cookies also make incredible gifts. Package them in a beautiful tin or a clear cellophane bag tied with a festive ribbon, and you’ve got a thoughtful, homemade present that will be deeply appreciated by friends, family, or colleagues. Who wouldn’t love a hand-baked treat during the holiday season or just as a pick-me-up on a regular Tuesday?
Variations to Keep Things Exciting
And if you’re feeling adventurous, don’t hesitate to play around with the recipe! While the classic rendition is perfection, a few tweaks can make them uniquely yours. You could experiment with different types of chocolate chips – maybe a blend of dark and milk chocolate for an even richer profile, or even white chocolate chips for a lighter, creamier contrast. For an intensified mint flavor, you could add a tiny dash more mint extract, but be cautious, as a little goes a long way! Some people enjoy rolling them in a mixture of powdered sugar and a touch of cocoa powder for a slightly different finish, creating a ‘chocolate’ snowball effect. Or, for a truly festive touch, you could crush some candy canes and gently press them onto the warm cookies after they come out of the oven, before rolling them in powdered sugar, for an extra crunch and a bolder peppermint kick. The possibilities are truly endless, allowing you to tailor these treats to your exact preferences or to suit any occasion. Ultimately, these Mint Chocolate Chip Snowball Cookies are more than just a dessert; they are a blank canvas for your culinary creativity.
So, my friends, what are you waiting for? I wholeheartedly encourage you to carve out some time in your schedule, gather your ingredients, and embark on this wonderful baking adventure. Trust me, the aroma alone that will fill your kitchen as these bake is worth the effort, and the first bite? Pure bliss! Don’t just read about it; experience the joy of creating these delightful morsels for yourself and your loved ones. Once you’ve whipped up a batch of these incredibly satisfying and crowd-pleasing treats, please, please, please come back and share your experience with me! Did you try a variation? What was your favorite part? I absolutely love hearing your stories and seeing your creations. Happy baking, and may your kitchen be filled with the sweet scent of success!
Mint Chocolate Chip Snowball Cookies
Mint Chocolate Chip Snowball Cookies are an enchanting twist on a beloved classic. These delicate, melt-in-your-mouth, powdered-sugar-dusted treats combine the timeless appeal of traditional snowball cookies with the vibrant coolness of mint and the irresistible richness of chocolate chips. Their elegant, snow-dusted appearance makes them a beautiful addition to any holiday spread or a thoughtful homemade gift.
Ingredients
-
1 cup (2 sticks or 226g) Unsalted Butter, softened
-
1/2 cup (100g) Granulated Sugar
-
1 teaspoon Pure Vanilla Extract
-
1 teaspoon Peppermint Extract
-
2 1/4 cups (270g) All-Purpose Flour
-
1/4 teaspoon Salt
-
1 cup (170g) Mini Chocolate Chips
-
1 1/2 cups (180g) Powdered Sugar (Confectioners’ Sugar), divided
-
Optional: Green Food Coloring
Instructions
-
Step 1
Preheat oven to 350°F (175°C). Line two or three large baking sheets with parchment paper or silicone baking mats. -
Step 2
In a medium bowl, whisk together the all-purpose flour and salt. Set aside. -
Step 3
In a large mixing bowl, using an electric mixer, beat the softened unsalted butter on medium speed for 1-2 minutes until light and creamy. Gradually add the granulated sugar, beating for another 2-3 minutes until the mixture is light in color and fluffy. Scrape down the sides of the bowl occasionally. -
Step 4
Beat in the pure vanilla extract and peppermint extract until just combined. If desired, add a few drops of green food coloring and mix until your desired shade of green is achieved. -
Step 5
With the mixer on low speed, gradually add the flour and salt mixture in about three additions, mixing just until combined after each. Avoid overmixing to ensure delicate cookies. -
Step 6
Remove the bowl from the mixer. Gently fold in the mini chocolate chips with a rubber spatula until evenly distributed. The dough will be thick. -
Step 7
Cover the bowl tightly with plastic wrap and refrigerate the dough for at least 30 minutes to 1 hour. This helps solidify the butter and makes the dough easier to handle. -
Step 8
Once chilled, scoop out portions of dough using a small cookie scoop (approx. 1 tablespoon). Roll each portion between your palms to form smooth, compact balls, approximately 1 inch in diameter. Place them about 1 to 1 1/2 inches apart on the prepared baking sheets. -
Step 9
Bake in the preheated oven for about 10-12 minutes, or until the edges are lightly golden and the centers appear set but are still quite pale. Do not overbake. -
Step 10
Carefully remove the baking sheets from the oven and let the cookies cool on the sheets for about 5-10 minutes. This allows them to set up and become firm enough to handle. -
Step 11
While the cookies are still warm (but not hot to the touch), prepare two shallow bowls. Place about 1/2 cup of powdered sugar in the first bowl and the remaining 1 cup in the second, larger bowl. -
Step 12
Working with a few cookies at a time, gently roll each warm cookie in the first shallow bowl of powdered sugar until fully coated. Place them back on a wire cooling rack to finish cooling completely. -
Step 13
It is essential that the cookies cool down to room temperature before the second coating. Give them at least 30-60 minutes. -
Step 14
Once the cookies are completely cool, take them one by one and roll them thoroughly in the second, larger bowl of powdered sugar, ensuring a thick, snowy coating. Serve and enjoy!
Important Information
Nutrition Facts (Per Serving)
It is important to consider this information as approximate and not to use it as definitive health advice.
Allergy Information
Please check ingredients for potential allergens and consult a health professional if in doubt.