
Pumpkin Patch Deviled Eggs Perfect for ushering in the cozy spirit of autumn, these unique appetizers are poised to become the star of your next fall gathering. Imagine the quintessential creamy, savory delight of a classic deviled egg, now artfully infused with the warm, earthy essence of pumpkin and a whisper of autumnal spices. This isn’t merely a seasonal variation; it’s a culinary celebration that brings an unexpected yet harmonious twist to a beloved staple.
While the humble deviled egg boasts an impressive lineage, with its origins tracing back to ancient Roman times and evolving through centuries to become the universally adored party food we know today, our recipe introduces a delightfully festive chapter to its storied history. People have always gravitated towards deviled eggs for their irresistible blend of rich texture and balanced flavors, their convenience as a make-ahead dish, and their undeniable ability to please every palate.
What makes this version truly special? The addition of pumpkin not only imparts a visually stunning, inviting golden hue but also introduces a subtle sweetness and depth that beautifully complements the traditional tangy and savory notes. The result is a sophisticated yet approachable appetizer that is incredibly easy to prepare, visually captivating on any autumn spread, and utterly delicious—making these Pumpkin Patch Deviled Eggs Perfect for everything from Halloween parties to elegant Thanksgiving feasts. I am absolutely thrilled to share this unique and unforgettable recipe with you.

Ingredients:
- 12 large eggs, preferably a few days old (they peel more easily)
- ½ cup mayonnaise, high-quality for best flavor and creaminess
- 1 tablespoon Dijon mustard, or more to taste for a tangier bite
- 1 teaspoon white vinegar or apple cider vinegar, essential for brightness
- ¼ teaspoon fine sea salt, plus more to taste
- ⅛ teaspoon freshly ground black pepper, plus more to taste
- ¼ teaspoon smoked paprika, for a beautiful hue and subtle smoky depth, plus extra for dusting
- Optional: 2-3 drops orange food coloring (gel or liquid), or a combination of red and yellow for a custom shade
- Optional: Small pretzel sticks, thin chives, or tiny pieces of green bell pepper for pumpkin “stems”
- Optional: A tiny pinch of ground cloves or cinnamon for a subtle autumnal spice note (use sparingly!)
Preparing the Eggs for Our Perfect Pumpkin Patch Deviled Eggs
1. Boiling the Eggs Just Right
To begin our journey to create the most incredible Pumpkin Patch Deviled Eggs Perfect for any gathering, we first need to hard-boil our eggs. I find that a perfect hard-boiled egg starts in a pot where the eggs are placed in a single layer. Cover them with about an inch of cold water. Add a pinch of salt to the water – this sometimes helps prevent cracking and makes peeling a tiny bit easier, though it’s not a guaranteed trick. Bring the water to a rolling boil over high heat. Once it reaches a full boil, immediately turn off the heat, cover the pot tightly with a lid, and let the eggs sit in the hot water for exactly 10-12 minutes. For larger eggs, I lean towards 12 minutes to ensure a fully set yolk without any gray-green ring, which indicates overcooking.
2. The Art of Peeling for a Smooth Canvas
Once the 10-12 minutes are up, carefully drain the hot water from the pot. Immediately transfer the eggs to an ice bath – a bowl filled with ice and cold water. This sudden temperature change halts the cooking process, preventing that unsightly green ring around the yolk, and more importantly, it helps the egg whites contract, making the eggs significantly easier to peel. Let them cool in the ice bath for at least 10-15 minutes, or until they are completely cool to the touch. When ready to peel, I gently tap each egg on a hard surface, rolling it to create tiny cracks all over the shell. Then, starting from the larger end where the air pocket usually resides, I carefully peel away the shell under a slow stream of cold water. The running water helps to wash away any small shell fragments and slides between the membrane and the egg white, making for a much smoother peel. A perfectly peeled egg is crucial for the aesthetic appeal of our Pumpkin Patch Deviled Eggs Perfect.
3. Halving and Separating Yolks with Precision
With our beautifully peeled eggs, it’s time to prepare them for their transformation. Using a sharp knife, carefully slice each egg in half lengthwise. You want a clean cut down the middle to ensure two even halves. Once halved, gently scoop out the bright yellow yolks into a medium-sized mixing bowl. Be mindful not to tear the egg whites, as these will be our “pumpkin” vessels. Arrange the empty egg white halves, cavity-side up, on a serving platter or a large plate. At this stage, some people like to trim a very thin slice from the bottom of each egg white half to create a flat base, ensuring they sit perfectly upright without wobbling. This is a small detail that contributes greatly to the professional look of your Pumpkin Patch Deviled Eggs Perfect.
Crafting the Creamy, Flavorful Filling
4. Mashing the Yolks to a Fine Consistency
Now for the heart of our deviled eggs – the creamy filling! Take the bowl with the separated egg yolks. Using a fork, a potato masher, or even a specialized pastry blender, thoroughly mash the yolks until they are completely smooth and free of any lumps. I personally love to push the mashed yolks through a fine-mesh sieve or a small strainer using the back of a spoon. This extra step, while a little more effort, creates an incredibly smooth, airy, and luscious filling texture that truly elevates the experience of these Pumpkin Patch Deviled Eggs Perfect. It’s a small detail that makes a big difference in the final product’s creaminess.
5. The Ultimate Flavor Blend
Once the yolks are perfectly smooth, it’s time to build our flavor profile. Add the mayonnaise, Dijon mustard, white or apple cider vinegar, sea salt, freshly ground black pepper, and the smoked paprika to the mashed yolks. If you’re experimenting with a subtle autumnal spice, add a tiny pinch of ground cloves or cinnamon here – remember, a little goes a long way to avoid overpowering the classic deviled egg flavor. Mix all the ingredients together thoroughly until they are well combined and the mixture is uniformly creamy. I like to use a small spatula or a spoon to really work the ingredients together, ensuring every part of the yolk mixture is infused with these delicious flavors. The consistency should be smooth and spreadable, but firm enough to hold its shape when piped.
6. Taste and Adjust for Your Ideal Profile
This is arguably one of the most important steps for any chef: tasting! Take a small spoonful of the filling and taste it. This is your chance to customize the flavor to your personal preference. Does it need a little more tang? Add another tiny splash of vinegar or a touch more Dijon. Does it need more salt or pepper? Go for it! Perhaps a little more smoked paprika for extra color and depth? Feel free to adjust. I often find that a tiny pinch of cayenne pepper or a dash of hot sauce can add a fantastic, subtle kick without being overly spicy, enhancing the overall complexity. Achieving the perfect balance of flavors will make your Pumpkin Patch Deviled Eggs Perfect truly unforgettable.
Achieving the Iconic Pumpkin Aesthetic for Your Deviled Eggs
7. Coloring the Yolks: Bringing the Pumpkin Patch to Life
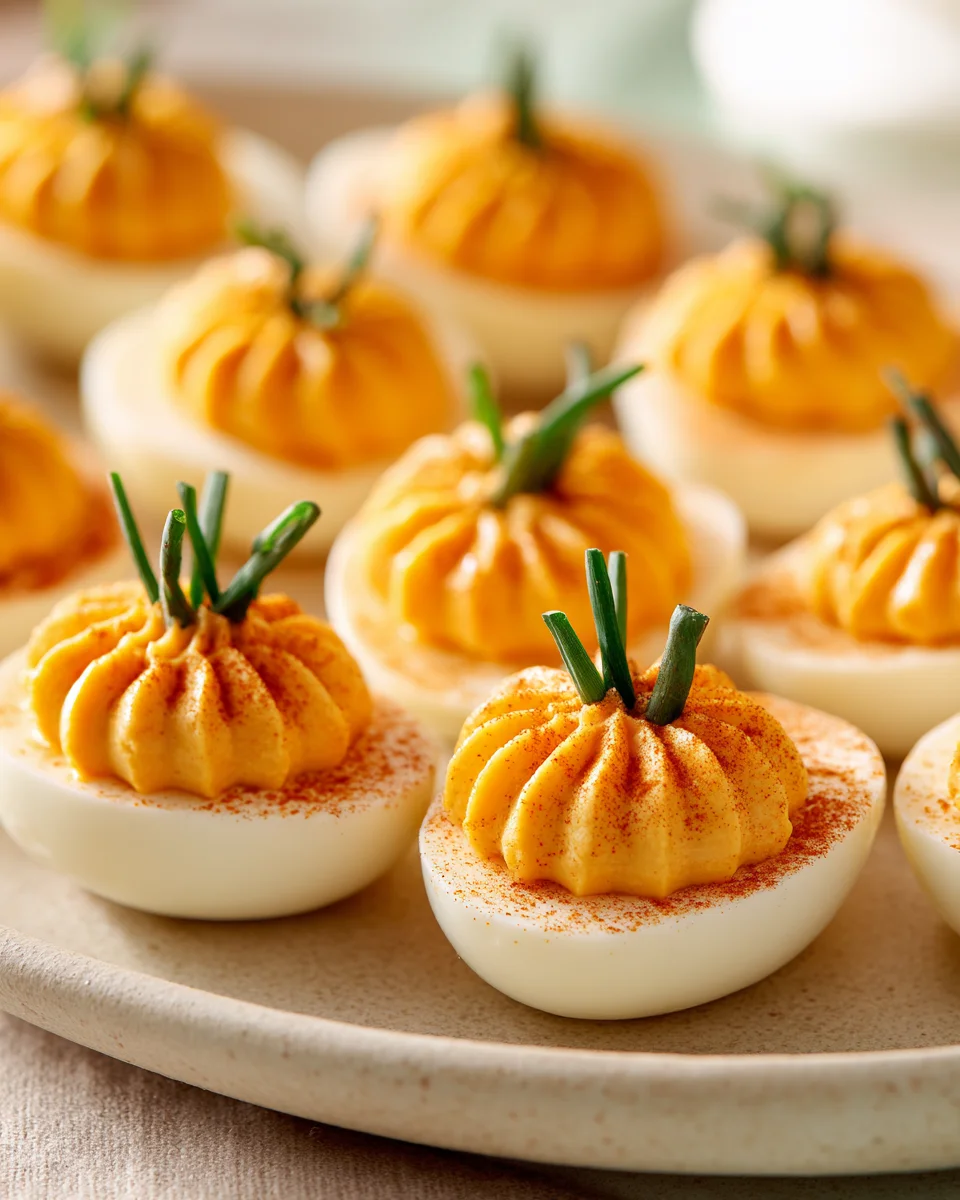
Here’s where the “pumpkin patch” part of our Pumpkin Patch Deviled Eggs Perfect really comes to life! If you’re opting for the distinct pumpkin look, this is the moment to add your food coloring. Add 2-3 drops of orange gel food coloring (gel coloring provides a more vibrant hue with less liquid than liquid food coloring) to your deviled egg mixture. Mix thoroughly. If you don’t have orange, you can achieve a similar effect by combining a drop of red and a drop or two of yellow. Continue adding drops and mixing until you achieve a rich, vibrant orange color that resembles a beautiful pumpkin. I often find that aiming for a slightly deeper orange ensures that the color pops against the white of the egg, especially after chilling. Don’t be afraid to add a bit more if you want a bolder pumpkin shade.
8. Preparing Your Piping Bag
For a truly professional and clean presentation of your Pumpkin Patch Deviled Eggs Perfect, I highly recommend using a piping bag. If you don’t have one, a sturdy plastic freezer bag with one corner snipped off will work just as well. Fit your piping bag with a star tip (a Wilton 1M or similar open star tip works beautifully for a classic deviled egg swirl, but a simple round tip is also perfectly fine for a smoother pumpkin look). Alternatively, for a more rustic, hand-shaped pumpkin, you can skip the piping bag entirely and spoon the mixture into the egg whites, shaping it with a spoon or your fingers. Once your bag is ready, carefully spoon all of your vibrant orange deviled egg filling into the prepared piping bag, pushing it down towards the tip to remove any air bubbles. This ensures a smooth, consistent flow when you start piping.
Assembling and Garnish: The Finishing Touches
9. Piping the Filling Back into the Whites
Now for the fun part – filling our egg white shells! Hold each egg white half gently in one hand. With the other hand, hold the piping bag vertically over the egg white and pipe the orange filling back into the cavities, creating a beautiful, swirled mound that resembles a mini pumpkin. For a traditional deviled egg look, pipe a high swirl. For a more distinct pumpkin shape, you can try to create a slightly more rounded, domed mound. The star tip will give it texture, while a round tip will give it a smoother, more cartoon-like pumpkin appearance. Take your time to fill each egg evenly and attractively. This step is where your Pumpkin Patch Deviled Eggs Perfect really start to take their final, festive form.
10. Adding the “Stem” and Decorative Details
To truly complete the pumpkin illusion, we need stems! This is where those optional ingredients come in. Immediately after piping the filling into each egg white, gently insert a small pretzel stick into the top center of the orange filling. You can also use a small piece of chive or a tiny, thin sliver of green bell pepper to mimic a fresh pumpkin stem. For an even more whimsical touch, I sometimes use a very thin piece of carrot, cut into a small ‘T’ shape, for an edible stem. Arrange these “stems” thoughtfully on each deviled egg. This small detail is what transforms a simple orange deviled egg into an undeniable, adorable pumpkin. It’s the kind of touch that makes these Pumpkin Patch Deviled Eggs Perfect stand out on any seasonal platter.
11. The Final Flourish: A Dusting of Paprika
As a final, elegant touch that also enhances the flavor, lightly dust each finished deviled egg with a sprinkle of smoked paprika. You can use a small fine-mesh sieve or simply pinch a little paprika between your fingers and sprinkle it over. The smoked paprika not only adds another layer of subtle smoky flavor but also provides a beautiful contrasting red-orange hue against the vibrant orange filling, further enhancing the pumpkin-like appearance. For those who want to add a subtle “vine” detail, a tiny sprig of fresh dill or a thin chive laid gently beside the “stem” can create a charming visual. This careful attention to detail ensures your Pumpkin Patch Deviled Eggs Perfect are not just delicious, but also visually stunning.
Chilling and Serving Your Stunning Pumpkin Patch Deviled Eggs
12. Chilling for Optimal Flavor and Firmness
Once all your Pumpkin Patch Deviled Eggs Perfect are assembled and garnished, it’s crucial to chill them. Arrange them carefully on your serving platter or in an airtight container. Cover them loosely with plastic wrap or a lid, ensuring the wrap doesn’t touch the delicate piped filling. Place them in the refrigerator for at least 30 minutes to an hour. Chilling allows the flavors to meld beautifully, deepen, and fully develop, resulting in a richer, more cohesive taste. It also helps the filling firm up slightly, making the eggs easier and cleaner to handle and serve. I find that chilling for a couple of hours or even overnight (if prepping ahead) yields the absolute best flavor and texture. This resting period is just as important as the preparation steps themselves.
13. Presenting Your Culinary Masterpiece
When you’re ready to serve, carefully remove your chilled Pumpkin Patch Deviled Eggs Perfect from the refrigerator. Arrange them attractively on a platter. You can place them on a bed of fresh mixed greens, a scattering of parsley, or even some edible fall leaves for an extra touch of seasonal charm. These festive deviled eggs are always a hit at holiday gatherings, autumn potlucks, or simply as a fun, themed snack. Their vibrant color and adorable “pumpkin” appearance make them an instant conversation starter and a joyful addition to any table. Enjoy the smiles and compliments as your guests savor these delightful and perfectly crafted autumnal treats!

Conclusion:
Well, my friends, we’ve reached the grand finale, and I truly hope you’re as excited as I am about what we’ve just explored. This isn’t just another recipe; it’s an invitation to elevate your autumnal entertaining and delight your taste buds in the most unexpected yet utterly satisfying way. I’ve poured my heart into perfecting this one, and I genuinely believe that once you try it, you’ll understand why it has become a staple in my kitchen, especially during the coziest months of the year. The unique combination of creamy yolks, subtle autumnal spices, and that delightful hint of pumpkin creates a symphony of flavors that is both familiar and excitingly new. It’s an appetizer that genuinely stands out, turning heads and prompting appreciative murmurs at any gathering.
What makes these deviled eggs a must-try, you ask? It’s their sheer versatility combined with an unforgettable flavor profile. Imagine a dish that brings together the comforting essence of fall with the timeless appeal of a classic appetizer. That’s precisely what we’ve achieved here. They’re visually stunning, too, with their vibrant color and elegant presentation, making them an instant showstopper on any platter. But beyond their good looks, it’s the taste that truly captivates – a creamy, savory experience with just the right touch of warmth and spice that encapsulates everything wonderful about the season. They’re surprisingly easy to make, yet they taste like something you’d find at a gourmet bistro. This is why I can confidently say that these
Pumpkin Patch Deviled Eggs Perfect
an ideal choice for anyone looking to add a touch of autumnal magic to their culinary repertoire. They are the epitome of sophisticated comfort food, simple enough for a weeknight but impressive enough for a holiday feast. Trust me when I say, your guests will be begging for the recipe.
Now, let’s talk about how to make these delightful bites even more spectacular, or how to adapt them to your specific needs and whims. When it comes to serving, these deviled eggs are incredibly versatile. They are, of course, the quintessential appetizer for any fall-themed party, Thanksgiving dinner, or even a cozy brunch. Arrange them artfully on a large platter, perhaps nestled among some fresh sage leaves or a sprinkle of finely chopped chives for an extra pop of color. For a truly elegant touch, consider placing each egg half in a small, individual serving spoon. They pair beautifully with other classic fall dishes, acting as a refreshing, creamy counterpoint to richer, heartier fare. Think about serving them alongside a charcuterie board featuring spiced nuts, crisp apple slices, and various cheeses – a true autumnal spread. For a more casual affair, they’re perfect on a picnic blanket, adding a touch of seasonal charm to an outdoor lunch.
And the variations? Oh, the possibilities are endless! If you’re feeling adventurous, try adding a tiny pinch of smoked paprika to the filling for a deeper, more robust flavor, or a whisper of cayenne pepper if you prefer a little kick. For an herbal twist, finely chop some fresh thyme or rosemary and fold it into the yolk mixture. Want to make them a bit heartier? Crumble some crispy bacon bits over the top right before serving, or even a sprinkle of toasted pumpkin seeds for added texture and a nutty crunch. For a vegetarian option, simply stick to the recipe as written. If you’re looking for a vegan alternative, you could adapt the concept using a firm tofu or chickpea-based “egg” substitute, though the texture would obviously be different and the overall profile would need significant adjustments. For those watching their carbs, these are already quite low-carb friendly, but you could enhance the fat content by adding a tiny bit more high-quality olive oil or avocado if desired, without compromising the flavor. Don’t be afraid to experiment with different garnishes; a tiny sprig of fresh dill, a small piece of roasted red pepper, or even a dusting of cinnamon can truly elevate the visual appeal and add another layer of flavor. The beauty of this recipe lies in its adaptability, allowing you to tailor it perfectly to your taste and your guests’ preferences, making each batch uniquely yours.
So, my dear readers, I implore you: don’t just read about these amazing deviled eggs – make them! Clear your schedule, gather your ingredients, and set aside some time this week to bring this recipe to life in your own kitchen. I promise you won’t regret it. The joy of creating something so delicious, so visually appealing, and so utterly unique is an incredibly rewarding experience. And once you’ve had the pleasure of tasting these autumnal gems, I would absolutely love to hear about your experience! Did you stick to the recipe, or did you put your own creative spin on it? What did your friends and family think? Please share your thoughts, your photos, and your triumphs in the comments below or on social media. Your feedback truly brightens my day and helps our wonderful community of home cooks grow. Let’s make this fall the most delicious one yet, one perfect deviled egg at a time!
Pumpkin Patch Deviled Eggs Perfect
Usher in the cozy spirit of autumn with these unique Pumpkin Patch Deviled Eggs. This culinary celebration artfully infuses the classic creamy, savory delight of deviled eggs with the warm, earthy essence of pumpkin and autumnal spices, offering an unexpected yet harmonious twist to a beloved staple.
Ingredients
-
6 large eggs
-
3 tablespoons mayonnaise
-
1 teaspoon Dijon mustard
-
1/4 teaspoon paprika, plus more for garnish
-
Salt to taste
-
Pepper to taste
-
Orange food coloring, gel or liquid
-
Fresh chives, finely chopped
-
Pretzel sticks, broken into small pieces (optional)
Instructions
-
Step 1
Place eggs in a single layer in a pot, cover with cold water. Bring to a rolling boil, then turn off heat, cover, and let sit for 10-12 minutes. Immediately transfer to an ice bath for 10-15 minutes. Peel gently under cold running water. -
Step 2
Slice each peeled egg in half lengthwise. Gently scoop out yolks into a mixing bowl, carefully preserving the egg white halves. Arrange the empty egg whites, cavity-side up, on a serving platter. -
Step 3
Mash yolks until completely smooth. Add mayonnaise, Dijon mustard, 1/4 teaspoon paprika, salt, and pepper. Mix thoroughly until creamy. Taste and adjust seasonings as desired. Add orange food coloring, mixing until a vibrant pumpkin orange color is achieved. -
Step 4
Transfer the orange filling to a piping bag fitted with a star tip (or a sturdy plastic bag with a snipped corner). Pipe the filling back into each egg white cavity, creating a decorative, swirled mound that resembles a mini pumpkin. -
Step 5
Immediately insert a small piece of a pretzel stick or a tiny piece of fresh chive into the top center of each piped filling for a ‘stem’. Lightly dust each deviled egg with additional paprika for color and flavor. Chill for at least 30 minutes to allow flavors to meld and the filling to firm up. Serve chilled and enjoy your festive Pumpkin Patch Deviled Eggs!
Important Information
Nutrition Facts (Per Serving)
It is important to consider this information as approximate and not to use it as definitive health advice.
Allergy Information
Please check ingredients for potential allergens and consult a health professional if in doubt.