
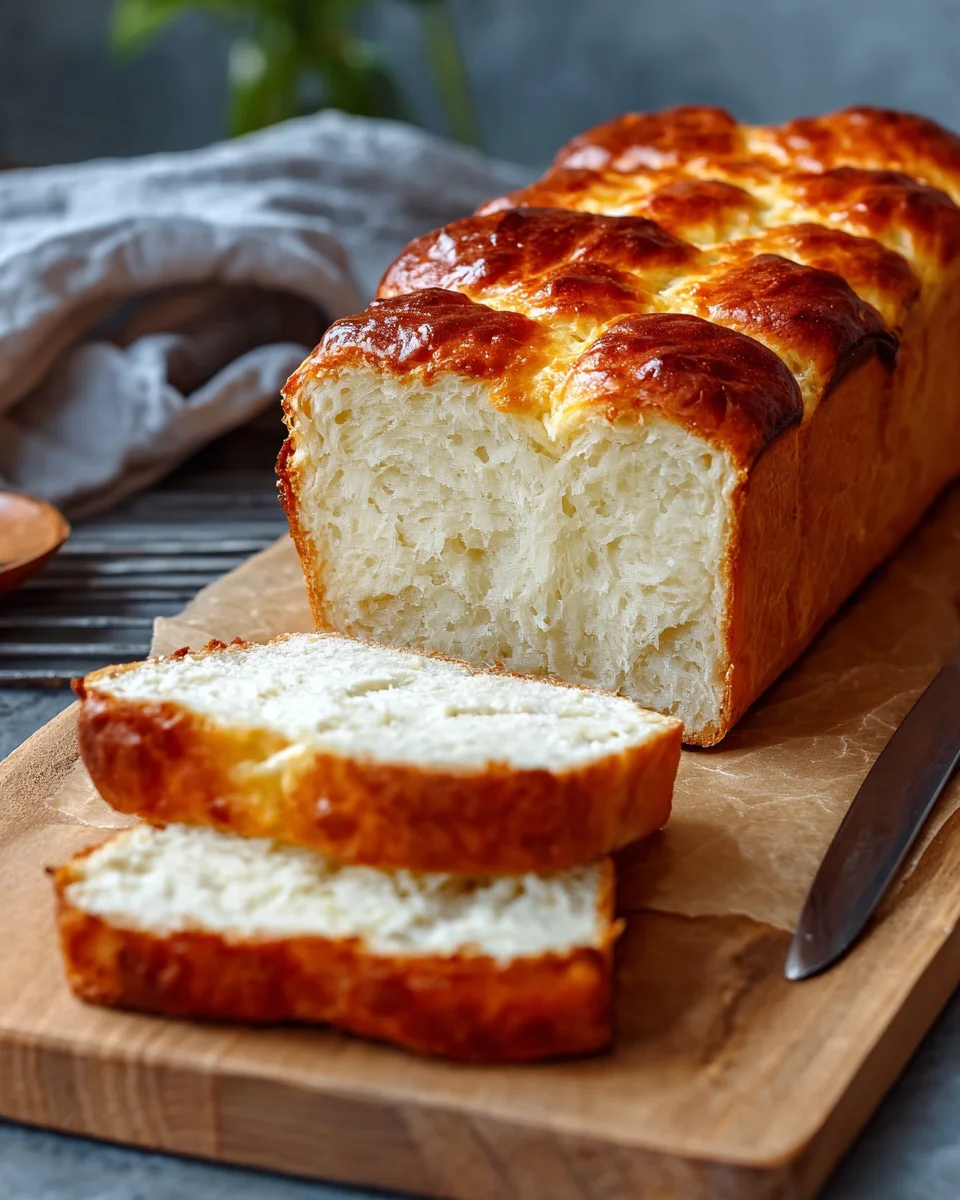
Zero Carb Yogurt Bread is not just a recipe; it is a culinary revelation, a comforting embrace for anyone who has felt the void of traditional bread while navigating a low-carb lifestyle. I understand the universal yearning for that soft, yeasty goodness, and I am absolutely thrilled to share a solution that truly delivers without compromise.
Rediscover the Joy of Bread, Guilt-Free
This innovative creation addresses a common challenge in healthy eating: how to enjoy the simple pleasure of bread without the usual carbohydrate load. While it doesn’t boast ancient origins in the typical sense, its significance lies in its ingenious approach to modern dietary needs, representing a triumph of resourceful, health-conscious cooking. People adore this Zero Carb Yogurt Bread precisely because it defies expectations. Its texture is remarkably light and airy, its flavor subtly versatile, making it an ideal companion for everything from savory dips to a simple spread of butter. It is incredibly satisfying, delivering the warmth and comfort associated with freshly baked goods, all while remaining perfectly aligned with keto and low-carb principles.
I am confident that this recipe will transform your approach to carb-conscious eating, proving that deliciousness and dietary goals can coexist beautifully. Prepare to welcome back a beloved staple, reimagined and perfected for your well-being.

Ingredients:
- 12 large egg whites, preferably at room temperature
- 1/2 cup (120g) plain, full-fat Greek yogurt, unsweetened and preferably very thick (strained if possible for even lower moisture)
- 1/2 cup (60g) psyllium husk powder (not whole psyllium husks, the powder is crucial for texture)
- 2 tablespoons (30g) baking powder (ensure it’s fresh and active)
- 1 teaspoon cream of tartar (optional, but highly recommended for stabilizing egg whites)
- 1 teaspoon sea salt or kosher salt
- Optional savory additions:
- 1 tablespoon garlic powder
- 1 tablespoon onion powder
- 2 teaspoons dried Italian herbs (oregano, basil, thyme blend)
- 1/4 teaspoon freshly ground black pepper
Equipment You’ll Need:
- Stand mixer with whisk attachment, or a large bowl and a good quality electric hand mixer
- Large mixing bowl (if using hand mixer)
- Medium mixing bowl
- Fine-mesh sieve
- Rubber spatula
- Loaf pan (standard 9×5 inch / 23×13 cm)
- Parchment paper
- Oven mitts
- Wire cooling rack
- Measuring cups and spoons
Phase 1: Preparing Your Workspace and Pre-Bake Essentials
Before we dive into creating this marvelous Zero Carb Yogurt Bread, it’s absolutely essential to set ourselves up for success. Proper preparation is key to achieving that perfect texture and rise we’re aiming for. Taking a few moments now will save you a lot of hassle later!
- Preheat Your Oven: My first step is always to get the oven ready. Preheat your oven to 350°F (175°C). This ensures that when your beautiful Zero Carb Yogurt Bread batter is ready, it goes into an oven that’s already at the optimal temperature, promoting an even rise and bake. It’s a simple step, but it makes a world of difference for consistent results.
- Prepare Your Loaf Pan: Next, we need to get our loaf pan ready. Line a standard 9×5 inch (23×13 cm) loaf pan with parchment paper. Make sure the parchment paper extends up over the sides of the pan, creating a slight “sling.” This isn’t just for easy removal; it also helps prevent sticking and makes cleanup a breeze. If you don’t have parchment paper, you can grease and flour the pan (using a low-carb flour like coconut flour if you prefer, though parchment is really the superior choice here for a fragile bread like this). I find that using parchment paper is truly the best method for this particular Zero Carb Yogurt Bread, ensuring it slides out perfectly after baking.
- Gather and Measure All Ingredients: It might sound obvious, but having all your ingredients measured out and ready to go before you start mixing is incredibly helpful. This is often referred to as “mise en place.” For this Zero Carb Yogurt Bread, it’s especially important because once you start mixing the egg whites, you’ll want to move swiftly through the subsequent steps. Having everything within reach eliminates last-minute scrambling and ensures accuracy, which is vital in baking, especially with specific low-carb recipes. Double-check your measurements, particularly for the psyllium husk powder and baking powder, as these are critical for the structure and rise of your Zero Carb Yogurt Bread.
- Ensure Egg Whites are at Room Temperature: This is a tip I cannot stress enough for any recipe involving whipped egg whites! If your egg whites are cold, they will take much longer to whip to volume and often won’t achieve the same stability or airy peaks that room temperature egg whites do. If you forgot to take them out ahead of time, a quick trick is to place the separated egg whites (in their bowl) into a larger bowl of warm (not hot!) water for about 10-15 minutes. This gentle warming will bring them up to temperature quickly, ensuring they’re ready to perform their best for our Zero Carb Yogurt Bread.
Phase 2: Crafting the Zero Carb Yogurt Bread Batter
This is where the magic truly happens, transforming simple ingredients into what will become a wonderfully airy and delicious Zero Carb Yogurt Bread. The technique here is crucial, so pay close attention to the details of mixing and folding. Every step builds upon the last to create the desired light and tender crumb.
- Combine Dry Ingredients: In a medium-sized bowl, combine the psyllium husk powder, baking powder, and salt. If you’re including any of the optional savory additions like garlic powder, onion powder, dried herbs, or black pepper, add them into this bowl now. I strongly recommend using a fine-mesh sieve to sift these dry ingredients together. Sifting isn’t just about removing lumps; it also thoroughly combines the ingredients and aerates them, which is especially beneficial for the psyllium husk powder. This ensures even distribution throughout your Zero Carb Yogurt Bread batter, preventing pockets of unmixed ingredients and helping with a consistent texture. Whisk them well to ensure everything is thoroughly integrated. Set this mixture aside.
- Whip the Egg Whites to Stiff Peaks: This step is, without exaggeration, the most critical part of making our Zero Carb Yogurt Bread. In a large, impeccably clean bowl (or the bowl of your stand mixer), add the 12 large egg whites. It is vital that there is no trace of fat or egg yolk in the bowl or on your whisk, as even a tiny amount can prevent the egg whites from whipping properly. Begin whisking on medium-low speed until the egg whites become frothy. Once they are frothy, add the cream of tartar (if using). The cream of tartar acts as a stabilizer, helping the egg whites achieve and maintain their volume and structure. Gradually increase the speed to medium-high. Continue whisking until the egg whites form stiff, glossy peaks. What does “stiff peaks” mean? When you lift the whisk, the peaks should stand upright and hold their shape firmly, with a slight curl at the very tip, without flopping over. This high volume of air incorporated into the egg whites is what will give our Zero Carb Yogurt Bread its incredible lightness and texture, making it almost cloud-like. This process might take anywhere from 5 to 10 minutes depending on your mixer and egg whites. Be patient; this stage is non-negotiable for success.
- Gently Fold in the Greek Yogurt: Once your egg whites have reached those beautiful stiff peaks, it’s time to incorporate the Greek yogurt. With your mixer on the lowest speed, or using a large rubber spatula if mixing by hand, add the 1/2 cup of plain, full-fat Greek yogurt to the whipped egg whites. Mix or fold very gently, just until combined. The key here is gentleness; we want to preserve as much of that precious air in the egg whites as possible. The yogurt adds moisture, a subtle tang, and helps to bind the ingredients, contributing to the unique texture of this Zero Carb Yogurt Bread without adding significant carbs. Overmixing at this stage will deflate your egg whites, leading to a dense, flat bread – the exact opposite of what we’re aiming for!
-
Incorporate the Dry Ingredients: Now, it’s time to bring in our psyllium husk powder mixture. Add the sifted dry ingredients (psyllium husk powder, baking powder, salt, and any savory additions) to the egg white and yogurt mixture. Again, the technique is crucial here. Use your rubber spatula to gently fold the dry ingredients into the wet mixture. Start by adding about a third of the dry mix, fold it in, then add the next third, and so on, until just combined.
Important Folding Technique for Zero Carb Yogurt Bread:
To fold correctly, cut down through the middle of the mixture with your spatula, then sweep across the bottom of the bowl and bring the mixture from the bottom up and over to the top. Rotate the bowl slightly after each fold. Continue this motion until no streaks of dry ingredients remain, but stop immediately once combined. Avoid vigorous stirring or beating at all costs. The psyllium husk powder will start to absorb moisture rapidly and thicken the batter, which is exactly what we want, but overworking it will deflate the egg whites and result in a heavy, gummy texture for your Zero Carb Yogurt Bread. The batter will be thick and somewhat sticky; this is perfectly normal for a psyllium-based Zero Carb Yogurt Bread.
Phase 3: Baking Your Zero Carb Yogurt Bread to Perfection
With the batter perfectly prepared, the next phase is to bake our Zero Carb Yogurt Bread until it’s golden, fragrant, and cooked through. Achieving the right bake temperature and duration is crucial for both texture and flavor. Let’s ensure your oven does its best work.
- Transfer Batter to Loaf Pan: Carefully spoon the thick, airy batter into your prepared loaf pan. Use your spatula to gently spread the batter evenly, making sure it fills the pan from corner to corner and the top is relatively level. You might notice the batter has a unique, almost mousse-like consistency due to the psyllium and whipped egg whites; this is exactly what we’re looking for in our Zero Carb Yogurt Bread. Don’t press down too firmly, as this can compress the air bubbles we worked so hard to incorporate. Just gently smooth the surface.
- Bake the Zero Carb Yogurt Bread: Place the loaf pan into your preheated 350°F (175°C) oven. We’re going to bake it for an initial 45 minutes. During this time, the Zero Carb Yogurt Bread will rise significantly, develop a beautiful golden-brown crust, and begin to set. It’s truly exciting to watch it transform!
- Lower the Oven Temperature for Final Bake: After the initial 45 minutes, without opening the oven door, reduce the oven temperature to 325°F (160°C). This lower temperature is critical for the final stage of baking. Continue to bake for an additional 20-30 minutes, or until the Zero Carb Yogurt Bread is deeply golden brown and sounds hollow when tapped on the top. I highly recommend checking for doneness with a wooden skewer or a thin knife inserted into the center of the loaf. If it comes out clean with no wet batter clinging to it, your Zero Carb Yogurt Bread is perfectly baked. The reason we drop the temperature is to prevent the crust from over-browning while allowing the interior to finish cooking thoroughly, ensuring a fully cooked and fluffy crumb throughout.
- Monitor for Sinking (Troubleshooting Tip): While baking, it’s natural for the bread to puff up wonderfully. However, if you notice your Zero Carb Yogurt Bread starts to sink significantly during the last 10-15 minutes of baking, it might indicate that it needs a little more time in the oven to fully set its structure. A slight dip is normal, but a dramatic collapse suggests underbaking. You can extend the baking time by another 5-10 minutes at the lower temperature, keeping a close eye on it.
Phase 4: Cooling and Enjoying Your Zero Carb Yogurt Bread
The journey isn’t quite over once the Zero Carb Yogurt Bread comes out of the oven. Proper cooling is just as important as proper baking to achieve the best possible texture and ensure it holds its shape. Patience at this stage will be richly rewarded!
- Initial Cooling in the Pan: Once your Zero Carb Yogurt Bread is baked to perfection, carefully remove the loaf pan from the oven. Resist the urge to immediately transfer it to a cooling rack. Instead, let the bread cool in the loaf pan for about 10-15 minutes. This brief resting period allows the structure of the bread to stabilize and firm up slightly as it begins to cool. It also helps prevent the delicate crust from tearing when you eventually remove it. This initial cooling is an important step to ensure the integrity of your Zero Carb Yogurt Bread.
- Transfer to a Wire Cooling Rack: After the initial cooling period in the pan, carefully lift the Zero Carb Yogurt Bread out of the loaf pan using the parchment paper sling. Transfer it to a wire cooling rack to cool completely. It is absolutely crucial that the bread cools fully on a wire rack before slicing. Why? Because the steam needs to escape from all sides. If the bread cools on a flat surface, moisture can get trapped underneath, making the bottom soggy. Cooling completely allows the internal structure to fully set, prevents the bread from becoming gummy, and ensures you get that desired light and airy texture when you finally cut into it. This might take 1-2 hours, or even longer depending on your kitchen’s temperature and humidity. I know it’s hard to wait, especially with the delicious aroma filling your kitchen, but trust me, it’s worth every minute for the ultimate Zero Carb Yogurt Bread experience.
-
Serving Suggestions for Your Zero Carb Yogurt Bread:
Once completely cooled, your Zero Carb Yogurt Bread is ready to be enjoyed! Slice it carefully with a serrated knife. This versatile bread is fantastic on its own, lightly toasted, or paired with a variety of toppings. Here are some of my favorite ways to enjoy this fantastic low-carb creation:
- Classic Toast: Simply toast a slice to golden perfection and spread with butter, cream cheese, or a sugar-free jam for a satisfying breakfast or snack.
- Savory Sandwiches: Use it as the base for open-faced sandwiches. Top with avocado and everything bagel seasoning, or some sliced turkey and a crisp lettuce leaf for a quick, low-carb lunch. Its sturdy yet light texture holds up beautifully.
- With Eggs: It’s absolutely delightful alongside scrambled eggs, poached eggs, or as a dipper for runny yolks. The savory versions are particularly good here!
- Garlic Bread Alternative: Brush slices with melted garlic butter, sprinkle with dried parsley, and toast until golden for a fantastic low-carb garlic bread that complements any Italian-inspired meal.
- With Soups and Stews: Enjoy a slice as an accompaniment to your favorite low-carb soups, chili, or stews. It’s perfect for soaking up all those delicious flavors without the carb count of traditional bread.
- As a Side: Simply serving it with a main meal provides a wonderful bread option for those following a low-carb lifestyle, making meals feel more complete and satisfying.
This Zero Carb Yogurt Bread offers so much flexibility and really opens up possibilities for enjoying bread again while sticking to your dietary goals!
-
Storage Instructions:
To keep your Zero Carb Yogurt Bread fresh and delicious for as long as possible, proper storage is important. Because of its unique composition, it benefits from specific storage methods:
- Room Temperature: For consumption within 1-2 days, store the cooled Zero Carb Yogurt Bread in an airtight container at room temperature. A bread box can also work well, ensuring it’s sealed to prevent drying out.
- Refrigeration: If you plan to keep it for a longer period, up to 5-7 days, I recommend storing it in an airtight container or a large zip-top bag in the refrigerator. The cooler temperature helps to maintain its freshness and prevents spoilage. Just be aware that refrigeration can sometimes alter the texture slightly, making it a bit firmer. A quick toast usually revives it beautifully.
- Freezing for Longevity: This Zero Carb Yogurt Bread freezes wonderfully! For longer-term storage, slice the cooled bread and then place the slices in a single layer on a baking sheet to flash freeze for about 30 minutes. Once firm, transfer the frozen slices to a freezer-safe bag or container. This prevents them from sticking together, allowing you to grab just a slice or two as needed. It can be stored in the freezer for up to 2-3 months. To enjoy, simply pop a frozen slice directly into the toaster, or let it thaw at room temperature before using. Freezing is an excellent way to always have this amazing Zero Carb Yogurt Bread on hand!
Enjoy your homemade Zero Carb Yogurt Bread!
Conclusion:
So, as we wrap up our journey with this incredible recipe, I truly hope you’re as excited as I am about what we’ve discovered. This isn’t just another recipe; it’s a game-changer, especially if you’re navigating a low-carb or keto lifestyle. Imagine sinking your teeth into warm, fluffy bread that perfectly satisfies those cravings without any of the guilt or carb overload. That’s precisely what this Zero Carb Yogurt Bread delivers. It’s truly a marvel – a testament to how delicious and satisfying healthy eating can be. I know from my own experience how challenging it can be to find bread alternatives that don’t compromise on texture or taste, and this recipe absolutely hits the mark. It’s surprisingly easy to make, uses simple ingredients, and the result is a soft, tender crumb with a delightful chew that truly elevates any meal. It’s the kind of recipe that makes you wonder how you ever lived without it, opening up a whole new world of culinary possibilities for those of us mindful of our carb intake.
Why This Recipe is a Must-Try:
Beyond its fantastic taste and texture, what makes this Zero Carb Yogurt Bread a true standout is its inherent health benefits for anyone watching their carbohydrate intake. It provides a guilt-free way to enjoy a staple food that often feels off-limits on a low-carb diet. Think about it: no more missing out on sandwiches, toast, or a simple slice of bread with your favorite spread. This recipe empowers you to enjoy these simple pleasures again, contributing to a more sustainable and enjoyable dietary journey. It’s also incredibly satisfying, helping to keep hunger at bay and preventing those notorious carb cravings. The simple ingredient list means you know exactly what you’re putting into your body, making it a clean and wholesome choice that supports your overall wellness goals. Trust me, once you try it, you’ll understand why it quickly becomes a regular in so many kitchens.
Serving Suggestions and Variations to Explore:
Now, let’s talk about how to truly make this Zero Carb Yogurt Bread shine on your plate. Its versatility is one of its greatest strengths. For a delightful breakfast, I love toasting a slice and topping it with a generous smear of cream cheese, a few fresh berries (if your carb limit allows, or simply a sugar-free berry compote), or even a sugar-free jam. It also makes an exceptional base for avocado toast, perhaps with a sprinkle of everything bagel seasoning for an extra kick. For lunch, this bread transforms into the perfect canvas for your favorite low-carb sandwiches. Think thinly sliced turkey, crisp lettuce, juicy tomatoes, and a dollop of mayo. It holds up beautifully, making it an excellent alternative to traditional sandwich bread. It’s also fantastic served alongside a hearty bowl of your favorite soup or chili, perfect for dipping. In the evenings, it can be a wonderful accompaniment to a grilled steak or chicken breast, or even a simple side for a fresh garden salad. Don’t forget about using it for mini pizzas! Spread a low-carb marinara sauce, add your favorite cheese and toppings, and bake until bubbly – a quick and satisfying meal that will impress everyone.
But the magic doesn’t stop there! This recipe is incredibly adaptable, inviting you to experiment and make it your own. If you’re feeling savory, consider folding in some dried herbs like rosemary or thyme into the dough for an aromatic twist. A pinch of garlic powder or onion powder can also add a wonderful savory depth. For cheese lovers, a sprinkle of shredded Parmesan or sharp cheddar mixed into the dough before baking can create a truly irresistible cheesy bread. Imagine warm slices with melted cheese – absolutely divine! You could also add a handful of seeds, such as sesame, poppy, or even sunflower seeds, for added texture and a nutritional boost. For those with a sweet tooth who are still watching their carbs, a touch of cinnamon and a sugar-free sweetener can turn this into a delightful cinnamon swirl bread, perfect with a cup of coffee. The possibilities are genuinely endless, limited only by your imagination and dietary preferences. Don’t be afraid to play around with the flavors and textures to discover your personal favorite variation – that’s part of the fun of cooking!
Your Turn to Bake and Share!
So, my friends, I truly urge you to give this recipe a try. I promise you won’t be disappointed. It’s more than just baking; it’s about reclaiming the joy of eating delicious, satisfying food while staying true to your health goals. Once you pull that beautiful, golden loaf of Zero Carb Yogurt Bread out of your oven, you’ll feel an incredible sense of accomplishment and satisfaction. And when you do, please don’t keep it to yourself! I would absolutely love to hear about your experience. Did you try a unique variation? What was your favorite way to serve it? Share your thoughts, your successes, and even your questions in the comments below. Your insights not only inspire me but also help others in our community on their low-carb journey. Let’s build a delicious, carb-conscious world together! Happy baking, and I can’t wait to hear all about your delicious Zero Carb Yogurt Bread!

Zero Carb Yogurt Bread
This innovative Zero Carb Yogurt Bread offers a melt-in-your-mouth, light, and airy texture, making it a perfect, guilt-free solution for anyone on a low-carb or keto diet. It satisfies the universal yearning for traditional bread without the carbohydrate load, proving deliciousness and dietary goals can coexist beautifully.
Ingredients
-
12 large egg whites, preferably at room temperature
-
⅓ cup plain Greek yogurt (or sour cream), unsweetened and very thick
-
1 ¼ cups blanched almond flour
-
1/2 cup (60g) psyllium husk powder (not whole psyllium husks)
-
2 tablespoons (30g) baking powder
-
1 teaspoon cream of tartar (optional)
-
1 teaspoon sea salt or kosher salt
-
1 tablespoon garlic powder (optional)
-
1 tablespoon onion powder (optional)
-
2 teaspoons dried Italian herbs (oregano, basil, thyme blend) (optional)
-
1/4 teaspoon freshly ground black pepper (optional)
Instructions
-
Step 1
Preheat your oven to 350°F (175°C). Line a standard 9×5 inch (23×13 cm) loaf pan with parchment paper, ensuring it extends over the sides to create a ‘sling’ for easy removal. -
Step 2
Gather and measure all your ingredients (mise en place). Crucially, ensure your egg whites are at room temperature for optimal whipping; if cold, place them in a bowl of warm water for 10-15 minutes. -
Step 3
In a medium-sized bowl, combine the psyllium husk powder, blanched almond flour, baking powder, and salt. If using, add any optional savory additions (garlic powder, onion powder, dried Italian herbs, black pepper) now. Sift these dry ingredients together using a fine-mesh sieve to ensure thorough combination and aeration, then whisk well and set aside. -
Step 4
In a large, impeccably clean bowl (or stand mixer bowl), add the 12 large egg whites. Ensure no trace of fat or yolk is present. Whisk on medium-low speed until frothy. Add the cream of tartar (if using) as a stabilizer. Gradually increase speed to medium-high and continue whisking until stiff, glossy peaks form – the peaks should stand upright and hold their shape firmly with a slight curl at the tip (5-10 minutes). -
Step 5
Once stiff peaks are achieved, with the mixer on its lowest speed or using a large rubber spatula, gently add the ⅓ cup of plain, full-fat Greek yogurt to the whipped egg whites. Mix or fold just until combined, being very gentle to preserve as much air as possible in the egg whites. -
Step 6
Add the sifted dry ingredients (psyllium husk powder, almond flour, baking powder, salt, and savory additions) to the egg white and yogurt mixture. Use a rubber spatula to gently fold the dry ingredients in. Add about a third of the dry mix, fold, then add the next third, and so on, until just combined. Use a cutting motion down the middle, sweeping from the bottom up and over, rotating the bowl. Stop immediately once no streaks of dry ingredients remain. The batter will be thick and sticky. -
Step 7
Carefully spoon the thick, airy batter into your prepared loaf pan. Gently spread it evenly from corner to corner, leveling the top with your spatula without pressing down too firmly. Place the pan into your preheated 350°F (175°C) oven and bake for an initial 45 minutes. -
Step 8
After the initial 45 minutes, without opening the oven door, reduce the oven temperature to 325°F (160°C). Continue to bake for an additional 20-30 minutes, or until the bread is deeply golden brown and sounds hollow when tapped. Insert a wooden skewer or thin knife into the center; it should come out clean. If the bread sinks significantly during the last 10-15 minutes, it may need an extra 5-10 minutes at the lower temperature. -
Step 9
Once baked, carefully remove the loaf pan from the oven. Let the bread cool in the loaf pan for about 10-15 minutes to allow its structure to stabilize and firm up slightly. -
Step 10
After initial cooling, carefully lift the bread out of the pan using the parchment paper sling and transfer it to a wire cooling rack. It is crucial for the bread to cool completely (1-2 hours or longer) on the rack before slicing. This allows steam to escape, prevents sogginess, and ensures a light, airy texture. -
Step 11
Once completely cooled, slice with a serrated knife. Enjoy as toast, sandwiches, with eggs, as garlic bread (brush with melted garlic butter and toast), or with soups and stews. Store in an airtight container at room temperature for 1-2 days, in the refrigerator for 5-7 days (toasting revives texture), or sliced and flash-frozen for up to 2-3 months (toast from frozen).
Important Information
Nutrition Facts (Per Serving)
It is important to consider this information as approximate and not to use it as definitive health advice.
Allergy Information
Please check ingredients for potential allergens and consult a health professional if in doubt.