
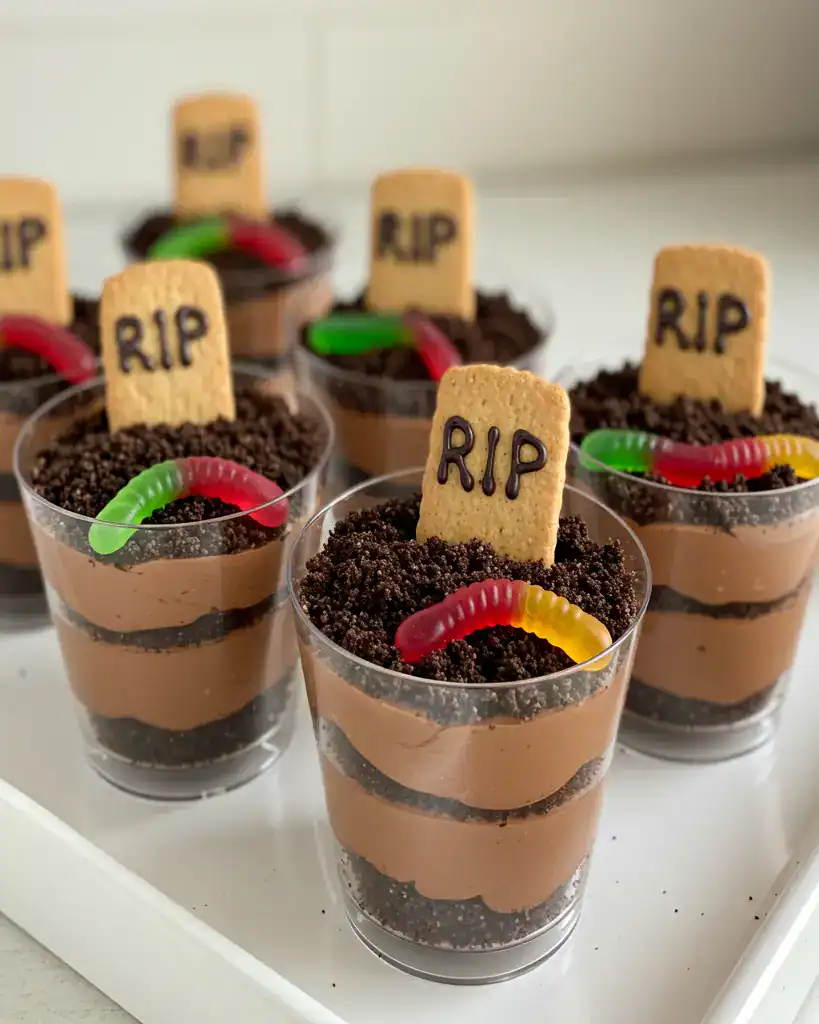
Halloween is the perfect time to unleash your inner creative ghoul in the kitchen. Whether you’re planning a haunted house party, a school event, or just want to delight your kids with a frightfully fun dessert, these Haunted Graveyard Pudding Cups are the ultimate no-bake treat. Layered with creamy chocolate pudding, crushed Oreo “dirt,” gummy worms, and graham cracker tombstones etched with “RIP,” these cups are as fun to make as they are to eat. They’re spooky, sweet, and guaranteed to bring smiles (and maybe a few mock-screams) to your table.
What Is a Haunted Graveyard Pudding Cup?
A Haunted Graveyard Pudding Cup is a whimsical Halloween-themed dessert made by layering chocolate pudding and crushed chocolate cookies in clear cups, then decorating the top with gummy worms and a cookie tombstone. Each cup resembles a mini graveyard plot, making it the ideal spooky centerpiece for Halloween festivities. These individual treats require no baking, making them kid-friendly and party-ready in under 30 minutes.

Why You’ll Fall in Love with This Recipe
There are countless reasons to adore these little edible graveyards. For starters, they’re ridiculously easy to make, which is a huge bonus during the chaos of Halloween prep. You can involve your kids in every step — from mixing the pudding to placing the worms and writing “RIP” on the tombstones. They’re also incredibly portable and mess-free, ideal for class parties or trick-or-treat gatherings. Best of all, they look impressive but require very little culinary skill. A win for busy moms, Halloween enthusiasts, and last-minute party planners alike.
How Does It Taste?
Imagine sinking your spoon into layers of rich, velvety chocolate pudding swirled with fluffy whipped topping, interspersed with crunchy crushed chocolate cookies that mimic fresh soil. The gummy worms offer a chewy surprise, while the graham cracker tombstone adds a sweet, crisp finish. Each bite delivers a combination of textures and chocolaty goodness that’s both nostalgic and satisfying. It’s like your childhood favorite dirt cup got a festive Halloween makeover and trust us, it tastes even better than it looks.
Health & Ingredient Benefits
While Haunted Graveyard Pudding Cups are a treat, there are some sneaky perks hiding beneath the surface:
- Calcium from the milk and pudding mix helps support strong bones.
- Portion control is built-in since the dessert is served in individual cups.
- Customization options allow for allergy-friendly or lighter ingredient swaps (such as sugar-free pudding or gluten-free cookies).
- Kid involvement can promote cooking confidence and healthy food relationships.
That said, these pudding cups are intended as a fun indulgence — and they definitely deliver on that front.
Ingredients You’ll Need
Here’s exactly what you need to recreate these Haunted Graveyard Pudding Cups as seen in your images:
- 1 package (3.9 oz) instant chocolate pudding mix
- 2 cups cold milk
- 1 container (8 oz) whipped topping, thawed (such as Cool Whip)
- 20 chocolate sandwich cookies (such as Oreos), crushed
- 6–8 graham crackers (cut into tombstone shapes)
- Black decorating gel or melted chocolate (to write “RIP”)
- Gummy worms (as many as you’d like!)
- Clear plastic cups (6–8 depending on size)
Tools You’ll Need
To bring this spooky dessert to life, you’ll need the following kitchen essentials:
- Mixing bowl
- Whisk or electric mixer
- Spatula
- Food processor or zip-top bag with rolling pin (for crushing cookies)
- Small spoon
- Piping bag or sandwich bag with corner cut (optional, for layering)
- Toothpick or piping tip (to write RIP on the crackers)
- Serving tray or platter (optional for presentation)
Optional Substitutions & Additions
Want to get creative or accommodate dietary needs? Try these swaps:
- Dairy-free option: Use almond or oat milk and a dairy-free whipped topping.
- Gluten-free: Opt for gluten-free chocolate cookies and graham-style crackers.
- Flavor twist: Use vanilla or butterscotch pudding instead of chocolate for a surprise.
- Add crunch: Layer in crushed pretzels or mini chocolate chips.
- Extra spooky toppings: Add candy bones, edible eyeballs, or marshmallow ghosts.
How to Make Haunted Graveyard Pudding Cups
- Prepare the pudding
In a large mixing bowl, whisk together the pudding mix and cold milk for about 2 minutes until thickened. Let it sit for 5 minutes to fully set. - Fold in whipped topping
Gently fold in the whipped topping until well combined and smooth. This creates a light, mousse-like texture. - Crush the cookies
Use a food processor or place cookies in a zip-top bag and crush them with a rolling pin until they resemble dirt. - Layer the cups
In each clear cup, start with a spoonful of crushed cookies, followed by a layer of pudding. Repeat until the cup is nearly full, ending with a generous layer of cookie “dirt” on top. - Make the tombstones
Break graham crackers into rectangles. Use black decorating gel or melted chocolate to write “RIP” on the top half. Let dry for a few minutes. - Assemble the graveyard
Press a tombstone into each cup near the back. Nestle in 1–2 gummy worms per cup to look like they’re wriggling out of the dirt. - Serve and enjoy
Place cups on a serving tray and keep chilled until ready to serve. They’re best enjoyed cold!
What to Serve With Your Graveyard Pudding Cups
These pudding cups make a perfect standalone treat, but they pair wonderfully with other Halloween party favorites like:
- Witch’s finger sugar cookies
- Spooky punch with dry ice
- Mini caramel apples
- Mummy hot dogs
- Halloween trail mix
Or set them on a themed dessert table with cobweb decorations, jack-o’-lanterns, and eerie lighting for the full haunted effect.
Tips for Success
- Make ahead: Prepare the pudding cups up to a day in advance and decorate just before serving.
- Keep it cold: Refrigerate until ready to eat so the pudding stays fresh and the tombstones stand upright.
- Get the kids involved: Let little ones help with layering, crushing cookies, or decorating with worms and RIP signs.
- Crush with care: For a realistic dirt texture, pulse the cookies in a food processor until fine but not powdery.
Common Mistakes to Avoid
- Using hot milk: Always use cold milk for instant pudding, or it won’t set properly.
- Over-mixing the pudding: Stop whisking once it thickens or it could become runny.
- Writing on warm crackers: Make sure your graham crackers are room temperature and dry before adding RIP letters.
- Skimping on layers: For that graveyard effect, alternate pudding and cookie layers at least twice.
How to Store & Reheat
These pudding cups are best kept chilled:
- Store: Cover each cup loosely with plastic wrap or store in an airtight container. Keep in the fridge for up to 3 days.
- Do not freeze: Pudding and whipped topping don’t freeze well and can separate when thawed.
- No reheating needed: These are meant to be enjoyed cold — just grab a spoon and dig in!
Frequently Asked Questions
Can I use homemade pudding instead of instant?
Yes! Homemade pudding works great, just ensure it’s fully cooled before layering.
Can I prepare these in advance?
Absolutely. Assemble the cups the day before and decorate with tombstones and worms just before serving.
How can I make these allergy-friendly?
Use gluten-free cookies and crackers, and choose dairy-free pudding and topping alternatives as needed.
Can I make these in a large dish instead of individual cups?
Definitely! Use a trifle dish or 9×13 pan for a family-style version.
Nutritional Info (approximate per serving)
Calories: 250
Fat: 10g
Carbohydrates: 38g
Sugar: 26g
Protein: 3g
Calcium: 8% DV
Fiber: 1g
(Note: Nutritional values will vary depending on brands used and portion sizes.)
Conclusion
Haunted Graveyard Pudding Cups are a spooky-sweet Halloween favorite that kids and adults alike will devour. They’re festive, fast, and fabulously fun perfect for parties, classrooms, or just a ghoulish night in. With layers of rich pudding, cookie “dirt,” and creepy-crawly gummy worms, these no-bake treats are bound to become a yearly tradition. So grab your mixing bowl and a pack of cookies, and get ready to make dessert memories that are hauntingly delicious!
Print
Haunted Graveyard Pudding Cups: A Spooktacular Halloween Treat
- Total Time: 15 minutes
- Yield: 6 to 8 pudding cups 1x
Description
No-bake Halloween pudding cups layered with chocolate pudding, crushed cookies, gummy worms, and graham cracker tombstones that look like spooky mini graveyards.
Ingredients
1 package (3.9 oz) instant chocolate pudding mix
2 cups cold milk
1 container (8 oz) whipped topping, thawed
20 chocolate sandwich cookies, crushed
6–8 graham crackers, broken into tombstone shapes
Black decorating gel or melted chocolate (for RIP)
Gummy worms
6–8 clear plastic cups
Instructions
In a mixing bowl, whisk together chocolate pudding mix and cold milk until thickened, about 2 minutes. Let it sit for 5 minutes.
Fold in the whipped topping until smooth and fully combined.
Crush chocolate sandwich cookies in a food processor or zip-top bag until they resemble soil.
Spoon a layer of crushed cookies into each cup, followed by a layer of pudding. Repeat layers, ending with a final layer of crushed cookies on top.
Use black decorating gel or melted chocolate to write “RIP” on graham cracker pieces. Let them set.
Insert a graham cracker tombstone into each pudding cup. Add 1–2 gummy worms to each.
Chill cups until ready to serve.
Notes
Make these up to a day in advance, but add tombstones and worms just before serving for best texture and presentation. Customize with other Halloween candies or sprinkles if desired.
- Prep Time: 15 minutes
- Cook Time: 0 minutes
- Category: dessert
Keywords: Halloween pudding cups, haunted graveyard dessert, dirt pudding cups, spooky no-bake treat, Halloween party recipe, gummy worm pudding, RIP pudding cups