
Greek Yogurt Banana Bread is not just another baked good; it’s a revelation for anyone who appreciates a perfect blend of comfort and culinary innovation. Have you ever wished for a banana bread that was so incredibly moist it practically melts in your mouth, with a subtle tang that elevates the classic sweetness? Well, your wish is about to come true! Banana bread itself has a charming history, often originating from resourceful home cooks in the early 20th century looking to utilize overripe fruit, a tradition of reducing waste that continues to resonate today. However, we’re taking that beloved classic to new heights.
People absolutely adore this dish, not just for its incredibly tender crumb and rich flavor, but also for its clever use of Greek yogurt. This simple addition is the secret weapon, imparting an unparalleled moistness, adding a delightful tang, and even boosting the protein content, making it a slightly healthier indulgence. It’s the perfect treat for breakfast, a satisfying snack, or a delightful dessert, fitting seamlessly into any part of your day.
Once you experience the sublime texture and vibrant taste of this Greek Yogurt Banana Bread, you’ll understand why it quickly becomes a cherished staple in kitchens everywhere.

Ingredients:
- Very Ripe Bananas: 3-4 medium-sized, ideally with plenty of brown spots and almost black skins. This is crucial for natural sweetness and intense banana flavor in your Greek Yogurt Banana Bread.
- All-Purpose Flour: 1 ½ cups (180g). Standard unbleached all-purpose flour works perfectly for a tender crumb.
- Granulated Sugar: ½ cup (100g). For sweetness and to help with browning.
- Light Brown Sugar (packed): ¼ cup (50g). Adds a deeper, caramel-like sweetness and contributes to the bread’s moistness.
- Large Eggs: 2, at room temperature. Room temperature eggs emulsify better with other ingredients, leading to a more uniform batter.
- Plain Greek Yogurt: ½ cup (120g), full-fat or low-fat. This is the star ingredient that makes our Greek Yogurt Banana Bread incredibly moist, tender, and gives it a slight tang. Full-fat will yield a richer texture, while low-fat is a great lighter option.
- Unsalted Butter (melted) or Vegetable Oil: ¼ cup (60ml). I personally love using melted unsalted butter for its rich flavor, but a neutral vegetable oil (like canola or sunflower) will also work beautifully, contributing to a very moist loaf.
- Baking Soda: 1 teaspoon. This is our leavening agent, activated by the acidity in the Greek yogurt and bananas, ensuring a good rise.
- Salt: ½ teaspoon. Essential for balancing the sweetness and enhancing all the other flavors. Don’t skip it!
- Pure Vanilla Extract: 1 teaspoon. A warm, aromatic addition that complements the banana and yogurt flavors wonderfully.
- Optional Mix-ins (choose one or a combination):
- ½ cup chocolate chips (milk, semi-sweet, or dark)
- ½ cup chopped walnuts or pecans
- ½ teaspoon ground cinnamon (can be added to dry ingredients)
These additions can elevate your Greek Yogurt Banana Bread to another level of deliciousness.
Preparation is Key: Setting the Stage for Perfect Greek Yogurt Banana Bread
- Preheat Your Oven and Prepare Your Pan: First things first, let’s get that oven ready. Preheat your oven to 350°F (175°C). This ensures that when your batter goes into the oven, it starts baking immediately and evenly, preventing a gummy texture. Next, prepare a 9×5-inch loaf pan. I usually grease it thoroughly with butter or non-stick spray, making sure to get into all the corners, and then dust it with a little flour. You can also line it with parchment paper, leaving an overhang on the longer sides. This creates “handles” that make lifting the baked loaf out of the pan incredibly easy, virtually eliminating any sticking worries. Lining with parchment is especially helpful for beautiful, intact slices of your finished Greek Yogurt Banana Bread.
- Mash Those Bananas: This is where the magic of banana bread truly begins. In a large mixing bowl, take your very ripe bananas and mash them thoroughly with a fork or a potato masher until they are mostly smooth with a few small lumps remaining. I personally prefer a slightly lumpy mash, as those small bits of banana become wonderfully soft and flavorful pockets in the baked bread. However, if you prefer a completely smooth texture, feel free to blend them quickly. The riper the bananas, the easier they are to mash and the more intense their flavor will be. Aim for about 1 to 1 ¼ cups of mashed banana. This high banana content is one of the secrets to an incredibly moist Greek Yogurt Banana Bread.
Crafting the Wet Ingredients: The Heart of Your Moist Banana Bread
- Combine Wet Ingredients: Into the bowl with your mashed bananas, add the granulated sugar, light brown sugar, melted butter (or oil), Greek yogurt, vanilla extract, and the two large eggs. If your butter was recently melted and is still quite warm, allow it to cool slightly before adding to prevent “scrambling” the eggs. Whisk all these wet ingredients together thoroughly. I use a balloon whisk and mix until everything is well combined and the mixture looks uniform. The Greek yogurt will visibly thicken the mixture and contribute a delightful creaminess. This step is crucial for incorporating air and ensuring all the liquid components are evenly distributed, laying the foundation for a perfectly textured Greek Yogurt Banana Bread. Make sure there are no visible streaks of egg or unincorporated sugar.
Mixing the Dry Ingredients: The Structural Foundation
- Whisk Dry Ingredients: In a separate medium-sized bowl, measure out your all-purpose flour, baking soda, and salt. Use a whisk to combine these dry ingredients. This step is often overlooked but is incredibly important. Whisking ensures that the baking soda and salt are evenly distributed throughout the flour. This even distribution means that your leavening agent will work uniformly, preventing dense spots and ensuring a consistent rise for your Greek Yogurt Banana Bread. It also helps to aerate the flour slightly, which contributes to a lighter crumb.
Bringing it All Together: The Art of Mixing the Batter
- Combine Wet and Dry Ingredients (The Gentle Mix): Now, it’s time to bring the two bowls together. Pour the dry ingredient mixture into the wet ingredient mixture. Using a rubber spatula or a wooden spoon, gently fold the dry into the wet until just combined. This is arguably the most critical step for tender banana bread. Overmixing develops the gluten in the flour, which can lead to a tough, dry, and chewy loaf. You want to mix only until you no longer see streaks of dry flour. A few small lumps are perfectly fine and even desirable; they will disappear during baking, and the bread will be more tender for it. Resist the urge to keep stirring! This gentle approach is key to achieving that signature moist and tender crumb of the best Greek Yogurt Banana Bread.
- Fold in Optional Mix-ins (if using): If you’re adding chocolate chips, nuts, or any other optional mix-ins, now is the time to incorporate them. Gently fold them into the batter until they are evenly distributed. Again, be careful not to overmix. A quick tip for preventing chocolate chips or nuts from sinking to the bottom of your loaf: toss them with a tablespoon of the measured flour from your dry ingredients before adding them to the batter. The thin coating of flour helps them suspend more evenly throughout the loaf. This thoughtful addition truly elevates the experience of enjoying your homemade Greek Yogurt Banana Bread.
- Transfer Batter to Loaf Pan: Carefully pour or spoon the prepared batter into your greased and floured (or parchment-lined) 9×5-inch loaf pan. Use your spatula to gently spread the top evenly. For a bakery-style top, you can optionally sprinkle a pinch of sugar or even a few extra chocolate chips or nuts on top of the batter before baking. This adds a lovely crunch and visual appeal to your finished Greek Yogurt Banana Bread.
The Baking Process: Transforming Batter into Golden Perfection
-
Bake Your Greek Yogurt Banana Bread: Place the loaf pan into your preheated 350°F (175°C) oven. The baking time will typically range from 50 to 65 minutes, but this can vary significantly depending on your oven and the exact moisture content of your bananas. I always recommend starting to check around the 50-minute mark.
What to Look For During Baking:
- Golden Brown Top: The top of your bread should be beautifully golden brown and appear set.
- Cracks and Peaks: Banana bread often develops a lovely crack down the center, which is a sign of good leavening.
- The Toothpick Test: To confirm doneness, insert a wooden skewer or toothpick into the center of the loaf. When it comes out clean or with only a few moist crumbs attached (no wet batter!), your bread is ready. If it comes out with wet batter, continue baking in 5-10 minute increments, checking each time.
Preventing Over-Browning:
If your banana bread is browning too quickly on top before it’s fully cooked through, you can loosely tent the pan with aluminum foil. This will protect the top from further browning while allowing the inside to continue baking to perfection. This little trick ensures your Greek Yogurt Banana Bread has a perfect crust without being overcooked.
Cooling and Serving: The Final Steps to Enjoyment
- Initial Cooling in the Pan: Once your Greek Yogurt Banana Bread is baked to golden perfection, remove the pan from the oven. Do not remove the bread from the pan immediately! Allow it to cool in the loaf pan on a wire rack for about 10-15 minutes. This crucial resting period allows the bread to firm up slightly and finish cooking internally, making it much easier to remove from the pan without breaking. It also helps to redistribute moisture, contributing to a wonderfully even texture.
-
Transfer to Wire Rack for Full Cooling: After the initial cooling period, carefully run a thin knife around the edges of the loaf if you didn’t use parchment paper. If you did use parchment, simply lift the bread out using the parchment overhang. Transfer the loaf to a wire rack to cool completely.
The Importance of Full Cooling:
I know it’s incredibly tempting to slice into a warm loaf of banana bread, and while a warm slice is heavenly, cooling completely allows the bread’s structure to set fully and its flavors to meld beautifully. Slicing too early can result in a gummy texture or the bread crumbling. For the absolute best texture and flavor, allow your Greek Yogurt Banana Bread to cool completely to room temperature, which can take 1-2 hours. If you’re using chocolate chips, full cooling also ensures they re-solidify properly.
- Slice and Enjoy: Once fully cooled, use a serrated knife to slice your Greek Yogurt Banana Bread into thick, generous slices. This bread is fantastic on its own, but you can also serve it with a smear of butter, cream cheese, or a drizzle of honey. It’s perfect for breakfast, a snack, or even a light dessert. The Greek yogurt truly makes it extra moist and flavorful, a delightful twist on a classic.
Tips for the Best Greek Yogurt Banana Bread Every Time
- Banana Ripeness is Paramount: I cannot stress this enough – use very ripe bananas. They should have extensive brown or black spots on their skins. Under-ripe bananas are not sweet enough, lack the intense banana flavor, and won’t mash as easily, resulting in a less flavorful and potentially drier loaf. If your bananas aren’t ripe enough, you can speed up the process by placing them in a paper bag with an apple or baking them unpeeled on a baking sheet at 300°F (150°C) for 15-30 minutes until their skins are black and shiny. Let them cool before mashing.
- Room Temperature Ingredients: Ensuring your eggs and Greek yogurt are at room temperature is a small step that makes a big difference. Room temperature ingredients emulsify more effectively, creating a smoother, more uniform batter. This leads to a more consistent texture and better rise in your Greek Yogurt Banana Bread. If you forget, you can quickly warm eggs by placing them in a bowl of warm (not hot) water for 5-10 minutes.
- Do Not Overmix!: This is a golden rule for most quick breads, including banana bread. Overmixing develops the gluten in the flour, making your bread tough and chewy instead of tender and moist. Mix only until the dry ingredients are just incorporated into the wet, and stop as soon as you no longer see streaks of dry flour. A few lumps are perfectly fine!
- Storage: Store your cooled Greek Yogurt Banana Bread tightly wrapped in plastic wrap or in an airtight container at room temperature for up to 3-4 days. For longer storage, you can refrigerate it for up to a week. For ultimate freshness, this banana bread also freezes beautifully! Wrap individual slices or the entire loaf tightly in plastic wrap, then again in aluminum foil. It can be frozen for up to 3 months. Thaw at room temperature or gently reheat slices in the microwave or toaster oven.
- Enhance with Spices: While the classic recipe is wonderful on its own, a touch of spice can elevate your Greek Yogurt Banana Bread. Consider adding ½ teaspoon of ground cinnamon, ¼ teaspoon of nutmeg, or a pinch of allspice to your dry ingredients for a warmer, more complex flavor profile. These spices pair incredibly well with the banana and tang of the Greek yogurt.
- Vary Your Mix-ins: Don’t be afraid to experiment with your optional additions! Besides chocolate chips and nuts, consider dried cranberries, chopped dried apricots, shredded coconut, or even a streusel topping for an extra layer of texture and flavor. Just remember not to overload the batter, sticking to about ½ to ¾ cup of total mix-ins.
- Achieving a Tall Loaf: For a taller, more domed loaf, some bakers increase the oven temperature slightly for the first 10-15 minutes (e.g., 375°F/190°C), then reduce it to 350°F (175°C) for the remainder of the baking time. The initial blast of heat helps to set the crust and create a good rise before the inside cooks through. Experiment to find what works best with your oven!
- The Beauty of Greek Yogurt: Remember that the Greek yogurt isn’t just a substitute; it’s an enhancement. It contributes a higher protein content, making the bread more satisfying, and its acidity interacts with the baking soda to give a wonderful lift. Most importantly, it’s a phenomenal humectant, locking in moisture and resulting in a supremely tender and moist Greek Yogurt Banana Bread that stays fresh longer.
Conclusion:
Well, we’ve reached the end of our journey, and I genuinely hope you’re feeling inspired to tie on an apron and get baking! This isn’t just another banana bread recipe; it’s truly a game-changer. I’ve shared countless recipes over the years, but this particular Greek Yogurt Banana Bread holds a special place in my heart, and I’m confident it will quickly become a cherished staple in your home too. What makes it so utterly irresistible, you ask? It’s the perfect storm of incredible flavor, an unbelievably moist texture, and the sheer simplicity of its creation. You’re not just baking a loaf; you’re crafting moments of pure, comforting joy with every slice.
The secret weapon, of course, is the Greek yogurt. It works wonders, infusing the bread with an unparalleled moisture that lasts for days, ensuring each bite is as tender and delightful as the first. This isn’t dry, crumbly banana bread; this is a luxurious, cloud-like experience that melts in your mouth. Beyond the texture, the Greek yogurt also lends a subtle tang that beautifully balances the sweetness of the ripe bananas, creating a depth of flavor that’s truly remarkable. It’s comforting, yet sophisticated. Plus, let’s be honest, it adds a lovely little protein boost, making you feel just a touch virtuous while indulging in something so incredibly delicious. The aroma alone, as it bakes to a gorgeous golden-brown, is enough to transform your kitchen into the coziest, most inviting space imaginable. Seriously, the smell of freshly baked Greek Yogurt Banana Bread is a sensory experience you won’t want to miss. It’s an invitation to warmth, happiness, and simple pleasures.
Now, let’s talk about how to enjoy this masterpiece! While a warm slice, fresh from the oven, is absolutely divine on its own, I encourage you to experiment. For breakfast, try toasting a slice lightly and spreading it with a dollop of creamy peanut butter or a smear of your favorite fruit jam. A sprinkle of chopped walnuts or pecans folded into the batter before baking adds a wonderful crunch and nutty depth. If you have a sweet tooth, a handful of chocolate chips – dark, milk, or white – will melt into pockets of pure bliss within the tender crumb. And for a truly decadent treat, especially if you’re serving it as a dessert, a dusting of powdered sugar or a drizzle of a simple cream cheese glaze takes it to an entirely new level. Don’t be afraid to get creative! Perhaps a touch of cinnamon or nutmeg for extra warmth, or even some orange zest to brighten up the flavors. The beauty of this Greek Yogurt Banana Bread is its versatility; it adapts beautifully to your cravings and whatever you have on hand.
So, what are you waiting for? This recipe is more than just ingredients and instructions; it’s an opportunity to create something truly special. I genuinely hope you’ll give this a try and discover for yourself why it’s become such a beloved recipe in my kitchen. Once you’ve baked your loaf, please don’t keep it a secret! Share your creations with me and our wonderful community. Snap a photo, leave a comment below, or tag me on social media. I absolutely adore seeing your baking successes and hearing about your experiences. Your feedback and stories inspire me endlessly. Go forth, bake some magic, and enjoy every single delightful bite!

Greek Yogurt Banana Bread
Discover an irresistibly moist and delicious Greek Yogurt Banana Bread. This recipe takes the classic comfort of banana bread to new heights with the addition of Greek yogurt, providing unparalleled moistness, a delightful tang, and a protein boost. Perfect for breakfast, snack, or dessert, it’s a tender and flavorful indulgence that melts in your mouth.
Ingredients
-
3 medium ripe bananas, mashed (about 1 1/4 cups)
-
1 1/2 cups all-purpose flour
-
1/2 cup brown sugar (light or dark)
-
1/3 cup neutral oil (or melted unsalted butter)
-
2 large eggs, at room temperature
-
1/2 cup plain Greek yogurt (full-fat or low-fat)
-
1 tsp baking soda
-
1/4 tsp salt
-
1 tsp pure vanilla extract
-
1/2 tsp ground cinnamon (optional)
-
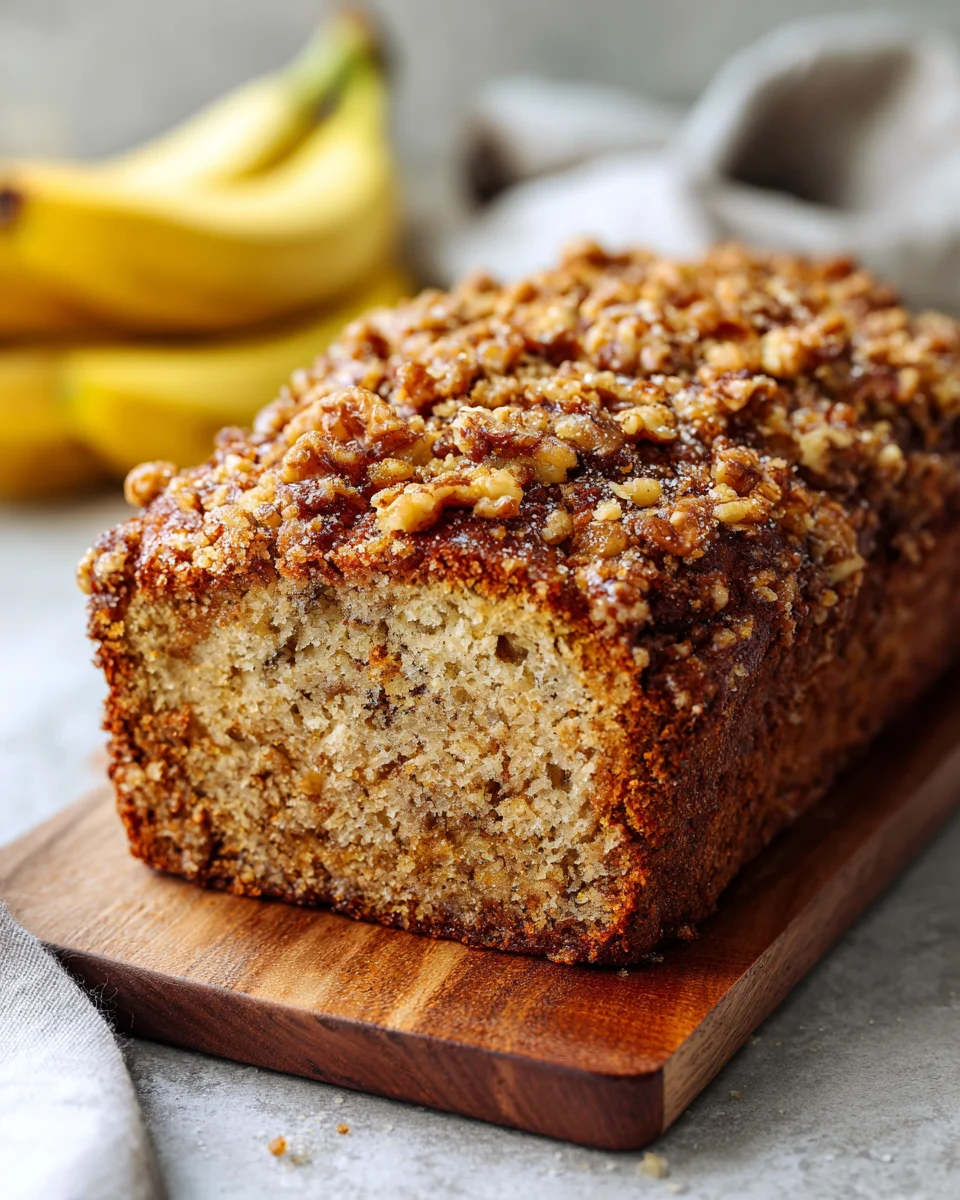
1/2 cup chopped pecans (optional mix-in)
-
2 tbsp butter (for optional topping/serving)
-
2 tbsp brown sugar (for optional topping/serving)
-
1 tbsp milk or cream (for optional topping/serving)
-
1/2 tsp vanilla extract (for optional topping/serving)
Instructions
-
Step 1
Preheat your oven to 350°F (175°C). Grease thoroughly and flour a 9×5-inch loaf pan, or line it with parchment paper leaving an overhang on the longer sides for easy removal. -
Step 2
In a large mixing bowl, mash the very ripe bananas thoroughly with a fork or potato masher until mostly smooth with a few small lumps. Aim for about 1 to 1 ¼ cups of mashed banana. -
Step 3
Into the bowl with your mashed bananas, add the brown sugar, melted butter (or oil), Greek yogurt, vanilla extract, and the two large eggs. Whisk all these wet ingredients together thoroughly until well combined and uniform. Ensure no visible streaks of egg or unincorporated sugar remain. -
Step 4
In a separate medium-sized bowl, measure out your all-purpose flour, baking soda, salt, and optional cinnamon. Use a whisk to combine these dry ingredients, ensuring even distribution of leavening and spices. -
Step 5
Pour the dry ingredient mixture into the wet ingredient mixture. Using a rubber spatula or a wooden spoon, gently fold the dry into the wet until just combined. Be careful not to overmix; a few small lumps are perfectly fine and desirable for a tender loaf. -
Step 6
If using, gently fold in the chopped pecans or any other optional mix-ins until evenly distributed. To prevent them from sinking, you can toss them with a tablespoon of the measured flour before adding to the batter. Again, avoid overmixing. -
Step 7
Carefully pour or spoon the prepared batter into your greased and floured (or parchment-lined) 9×5-inch loaf pan. Gently spread the top evenly with your spatula. Optionally, sprinkle a pinch of sugar or extra pecans on top for a bakery-style finish. -
Step 8
Place the loaf pan into your preheated 350°F (175°C) oven. Bake for 50 to 65 minutes. The bread is done when the top is golden brown, appears set, and a wooden skewer or toothpick inserted into the center comes out clean or with only a few moist crumbs attached (no wet batter). If browning too quickly, loosely tent with aluminum foil. -
Step 9
Once baked, remove the pan from the oven and allow the bread to cool in the loaf pan on a wire rack for about 10-15 minutes. This resting period helps the bread firm up and makes it easier to remove. -
Step 10
After initial cooling, carefully transfer the loaf to a wire rack to cool completely to room temperature (1-2 hours) for the best texture and flavor. Slice with a serrated knife and enjoy on its own, or with a smear of butter, cream cheese, or a drizzle of honey. (Note: Additional butter, brown sugar, milk/cream, and vanilla extract are provided as optional serving components and are not part of the core bread-making instructions.)
Important Information
Nutrition Facts (Per Serving)
It is important to consider this information as approximate and not to use it as definitive health advice.
Allergy Information
Please check ingredients for potential allergens and consult a health professional if in doubt.