
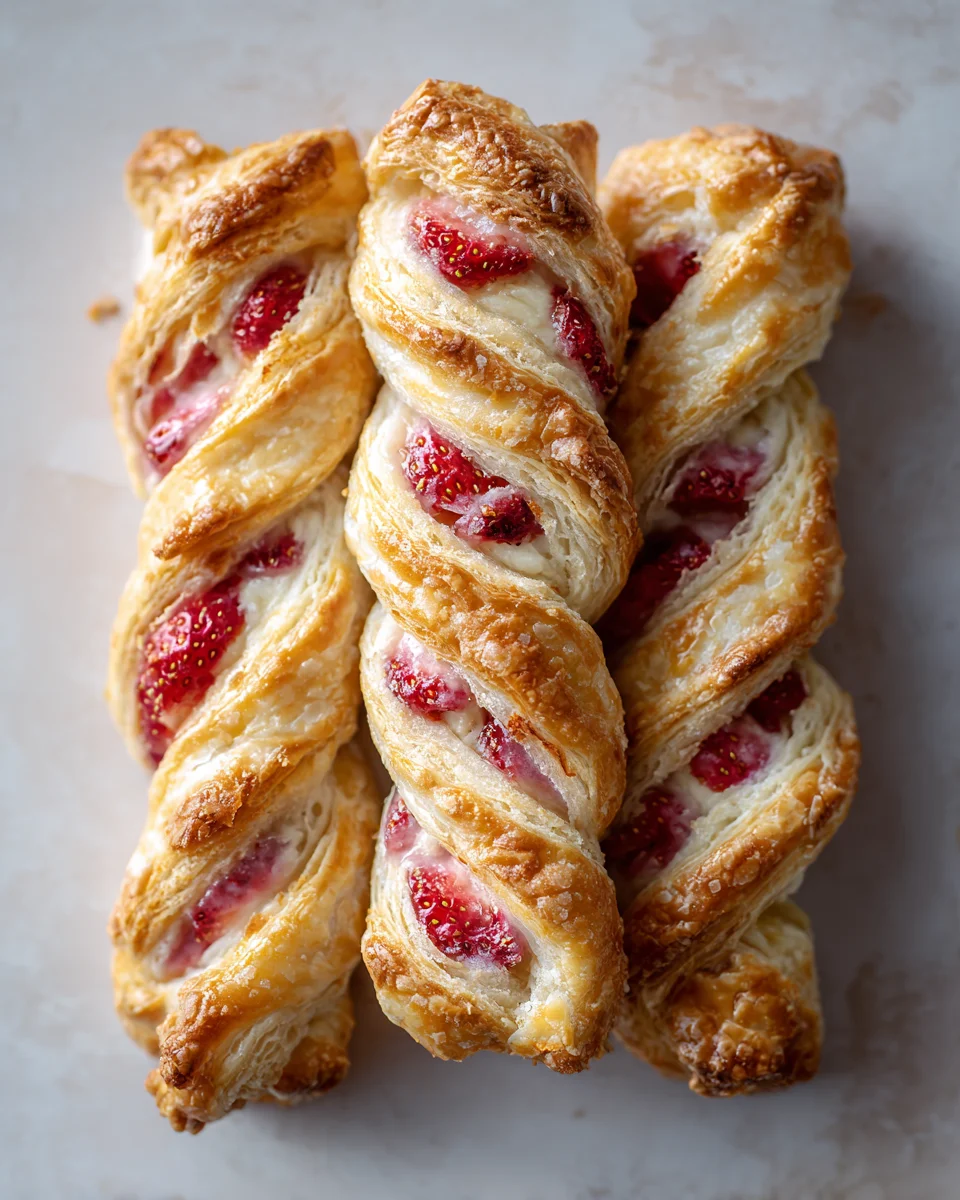
Strawberry Braided Pastry – just the name evokes images of golden-brown perfection, bursting with the vibrant sweetness of fresh summer berries. If you’re searching for a bake that looks incredibly impressive but is surprisingly approachable, you’ve found your next kitchen adventure! This delightful treat, with its intricate woven appearance, traces its lineage back to European baking traditions where braided doughs have long signified celebration and artistry, from festive challahs to elegant Danish pastries. While the specific combination of strawberries in a braided pastry might be a modern twist, it beautifully embodies that same spirit of transforming simple ingredients into something truly special.
Why This Strawberry Braided Pastry Will Be Your New Favorite
People absolutely adore this pastry for countless reasons. The contrast of the flaky, buttery dough with the juicy, slightly tart strawberries is simply irresistible. Each bite offers a satisfying crunch followed by a soft, sweet filling, creating a symphony of textures and flavors that dance on your palate. It’s perfect for a leisurely brunch, an elegant dessert, or a delightful afternoon tea, making any occasion feel a little more gourmet. Plus, the visual appeal of the beautifully woven dough, gently revealing its ruby-red fruit filling, makes it a true showstopper. Get ready to impress your friends and family with this unforgettable Strawberry Braided Pastry that’s as delightful to look at as it is to eat!

Ingredients:
-
For the Enriched Pastry Dough:
- 3 ½ cups (420g) all-purpose flour, plus more for dusting
- ¼ cup (50g) granulated sugar
- 2 ¼ teaspoons (1 packet or 7g) active dry yeast
- 1 teaspoon salt
- ½ cup (120ml) whole milk, warmed to 105-115°F (40-46°C)
- ½ cup (113g) unsalted butter, melted and slightly cooled
- 1 large egg, at room temperature, lightly beaten
- 1 teaspoon pure vanilla extract
-
For the Sweet Strawberry Filling:
- 4 cups (about 1.5 lbs or 680g) fresh strawberries, hulled and finely diced
- ½ cup (100g) granulated sugar (adjust to your strawberries’ sweetness)
- 3 tablespoons cornstarch (or arrowroot powder for a gluten-free option)
- 1 tablespoon fresh lemon juice
- ½ teaspoon pure vanilla extract
-
For the Egg Wash:
- 1 large egg
- 1 tablespoon water or milk
-
For the Simple Vanilla Glaze:
- 1 cup (120g) powdered sugar (confectioners’ sugar), sifted
- 2-3 tablespoons whole milk or heavy cream
- ¼ teaspoon pure vanilla extract
Preparing the Enriched Pastry Dough
- Activate the Yeast: In a small bowl, combine the warmed milk with 1 teaspoon of the granulated sugar. Sprinkle the active dry yeast over the top. Stir gently once and then let it sit undisturbed for 5-10 minutes. You’ll know your yeast is active and ready when it becomes foamy and bubbly on the surface. This step is crucial; if your yeast doesn’t foam, it’s likely dead, and your dough won’t rise. I always make sure my milk isn’t too hot (which can kill the yeast) or too cold (which won’t activate it).
- Combine Dry Ingredients: In a large mixing bowl, or the bowl of a stand mixer fitted with the dough hook attachment, combine the all-purpose flour, remaining granulated sugar, and salt. Whisk these dry ingredients together thoroughly to ensure even distribution. This helps prevent pockets of salt or sugar in your final Strawberry Braided Pastry.
- Add Wet Ingredients: Once your yeast mixture is foamy, pour it into the dry ingredients. Add the slightly cooled melted butter, the lightly beaten room temperature egg, and the vanilla extract.
-
Mix and Knead the Dough: If using a stand mixer, mix on low speed until the ingredients come together to form a shaggy dough. Increase the speed to medium-low and knead for 8-10 minutes. If kneading by hand, turn the dough out onto a lightly floured surface and knead vigorously for 10-15 minutes.
You’re aiming for a dough that is smooth, elastic, and no longer sticky. A good test is the “windowpane test”: tear off a small piece of dough and gently stretch it. If you can stretch it thin enough to see light through it without it tearing, your dough is perfectly kneaded. This rich dough, destined for our delightful Strawberry Braided Pastry, requires thorough kneading to develop the gluten, which gives the pastry its structure and tender crumb.
-
First Rise (Bulk Fermentation): Lightly grease a clean large bowl with a little oil or non-stick spray. Place the kneaded dough into the bowl, turning it once to coat the entire surface. Cover the bowl tightly with plastic wrap or a clean kitchen towel. Place it in a warm, draft-free place to rise for 1 to 1.5 hours, or until it has doubled in size.
I often use my oven with just the light on (not preheated!) as a perfect warm spot. The duration of the rise can vary depending on the ambient temperature. Patience here is key for a light and airy Strawberry Braided Pastry.
Preparing the Sweet Strawberry Filling
- Prepare the Strawberries: Wash your fresh strawberries thoroughly under cool running water. Hull them (remove the green leafy tops and the small core) and then finely dice them. Aim for pieces about ¼-inch in size. Smaller pieces will create a smoother, more spreadable filling that holds together well within the braided pastry.
- Combine Ingredients: In a medium saucepan, combine the diced strawberries, granulated sugar, cornstarch, and fresh lemon juice. Stir everything together gently until the cornstarch is fully dissolved and coats the strawberries. The lemon juice brightens the strawberry flavor and also helps prevent the filling from being overly sweet.
-
Cook the Filling: Place the saucepan over medium heat. Bring the mixture to a gentle simmer, stirring frequently to prevent sticking and burning. Continue to cook for 5-8 minutes, or until the strawberries have softened, released their juices, and the mixture has thickened considerably. It should resemble a jam-like consistency.
As it cooks, the cornstarch will thicken the juices, ensuring that your Strawberry Braided Pastry doesn’t have a runny filling that leaks out during baking.
- Add Vanilla and Cool: Remove the saucepan from the heat. Stir in the pure vanilla extract. Transfer the strawberry filling to a shallow bowl or plate to help it cool down quickly. It is absolutely crucial that the filling is completely cool before you use it to assemble the pastry. Warm filling will melt the butter in your dough, making it sticky and very difficult to work with, potentially ruining the structure of your beautiful Strawberry Braided Pastry. You can speed up cooling by placing it in the refrigerator.
Shaping the Strawberry Braided Pastry
- Punch Down and Roll Out Dough: Once the dough has doubled in size, gently punch it down to release the air. Turn the dough out onto a lightly floured surface. Using a rolling pin, roll the dough into a large rectangle, approximately 16×12 inches (40×30 cm). Aim for an even thickness across the entire rectangle, about ¼-inch thick. This uniform thickness is important for even baking.
- Prepare for Braiding: Position the rolled-out dough rectangle so that one of the longer sides is facing you. With a sharp knife or a pizza cutter, make two shallow parallel cuts lengthwise down the dough, marking out a central strip about 4 inches wide. This central section is where your delicious strawberry filling will go.
- Cut the Strips: On both of the outer 4-inch sections of the dough, make diagonal cuts (at about a 45-degree angle) from the edges of the central strip outwards. Each strip should be approximately 1 inch wide. Make sure you have an equal number of strips on both sides, typically 8-10 on each side. These strips will form the “braid” of your Strawberry Braided Pastry. I like to make sure my cuts are clean and even for a professional-looking finish.
- Spread the Filling: Spoon the completely cooled strawberry filling evenly down the center 4-inch strip of the dough. Leave about a ½-inch border at the top and bottom of the central strip clear of filling, as this will help you seal the ends of the pastry.
-
Begin Braiding: Start at one end of the pastry (either top or bottom). Fold the top border of the dough (the ½-inch strip without filling) over the filling to enclose it. Then, take the first strip from the left side and fold it diagonally over the filling towards the right. Press down gently to adhere it to the opposite edge of the central filling. Immediately take the first strip from the right side and fold it diagonally over the filling towards the left, overlapping the first strip. Continue this alternating pattern, left over right, then right over left, all the way down the pastry.
As you work, gently stretch the strips slightly if needed to ensure they meet and overlap neatly in the center, fully encasing the strawberry filling. When you reach the end, fold the bottom border of the dough over the filling, just like you did at the top, and then tuck the last two strips underneath to neatly seal the end of your beautiful Strawberry Braided Pastry.
- Transfer to Baking Sheet: Carefully lift the braided pastry and transfer it to a large baking sheet lined with parchment paper. Parchment paper is a non-negotiable for me, as it prevents sticking and makes cleanup a breeze.
- Second Rise (Proofing): Cover the braided pastry loosely with plastic wrap or a clean kitchen towel. Let it rise in a warm, draft-free place for another 30-45 minutes, or until it looks visibly puffy and slightly larger. This second rise, or proofing, helps create a light and tender crumb for your final Strawberry Braided Pastry.
Baking the Strawberry Braided Pastry
- Preheat Oven: While your pastry is proofing for its second rise, preheat your oven to 375°F (190°C). Make sure to place an oven rack in the center position.
- Prepare Egg Wash: In a small bowl, whisk together the large egg and 1 tablespoon of water or milk until well combined. This egg wash will give your Strawberry Braided Pastry a beautiful golden-brown, shiny crust.
- Apply Egg Wash: Gently brush the entire surface of the proofed braided pastry with the egg wash. Be careful not to deflate the risen dough. Ensure an even coating for uniform color.
-
Bake: Carefully place the baking sheet with the egg-washed pastry into the preheated oven. Bake for 25-35 minutes, or until the pastry is deeply golden brown and sounds hollow when tapped on the bottom. The internal temperature of the dough (not the filling) should reach around 200-210°F (93-99°C) if you use an instant-read thermometer.
Keep an eye on it during the last 10 minutes; if it starts to brown too quickly, you can loosely tent it with aluminum foil. Every oven is different, so baking times can vary slightly. I love watching it puff up and turn golden, the aroma of a freshly baked Strawberry Braided Pastry filling my kitchen!
- Cool: Once baked, remove the Strawberry Braided Pastry from the oven. Let it cool on the baking sheet for about 5-10 minutes before carefully transferring it to a wire rack to cool completely. Allowing it to cool on a wire rack ensures air circulation around the entire pastry, preventing the bottom from becoming soggy.
Finishing Touches: The Glaze
-
Prepare the Glaze: In a small bowl, combine the sifted powdered sugar, 2 tablespoons of milk or cream, and the vanilla extract. Whisk thoroughly until smooth and lump-free.
If the glaze is too thick, add the remaining tablespoon of milk or cream, a tiny bit at a time, until you reach your desired drizzling consistency. It should be thick enough to cling to the pastry but thin enough to drip attractively. Sifting the powdered sugar beforehand is a small but mighty step that prevents any annoying lumps in your glaze.
-
Glaze the Pastry: Once the Strawberry Braided Pastry has cooled sufficiently (it can be slightly warm, but not hot, otherwise the glaze will melt right off), drizzle the vanilla glaze generously over the top. You can use a spoon, a whisk, or even a piping bag with a very small tip for more precise lines.
I find that drizzling it while the pastry is still just a little warm allows the glaze to set beautifully, creating a slightly melty, yet firm finish. This final touch adds an extra layer of sweetness and visual appeal to your homemade Strawberry Braided Pastry.
- Serve and Enjoy: Allow the glaze to set for a few minutes before slicing and serving. This Strawberry Braided Pastry is best enjoyed fresh on the day it’s made, perhaps with a cup of coffee or tea. Store any leftovers at room temperature in an airtight container for up to 2 days, or in the refrigerator for longer freshness.

Conclusion:
And so, we arrive at the sweet finish of our journey together! I truly hope you’ve enjoyed exploring the delightful process of creating this incredible pastry. If there’s one recipe I could implore you to try, it’s this one. It’s more than just a dessert; it’s an experience, a small triumph of flaky goodness and vibrant fruit that brings pure joy to anyone who takes a bite. The aroma alone as it bakes will fill your home with an irresistible warmth, promising a treat that lives up to every expectation.
Why This Recipe is an Absolute Must-Try
What makes this particular pastry so special, you ask? Well, it’s a harmonious symphony of textures and flavors. Imagine golden-brown, buttery pastry, crisp and tender at the same time, giving way to a luscious, bright strawberry filling that bursts with natural sweetness and a hint of tartness. The beauty of the braid isn’t just for show; it creates pockets of jammy fruit and crispy dough, ensuring every mouthful is perfectly balanced. This isn’t just any fruit pastry; it’s a showstopper, a crowd-pleaser, and surprisingly achievable even for those who might shy away from more complex baking projects. There’s an immense satisfaction in pulling a perfectly golden, fragrant Strawberry Braided Pastry from the oven, knowing you’ve created something truly magical with your own hands. It’s that perfect balance of rustic charm and elegant presentation that makes it suitable for any occasion, from a casual weekend brunch to a festive holiday gathering. The simplicity of good ingredients, skillfully combined, yields extraordinary results every single time, making it a reliable favorite you’ll return to again and again.
Elevate Your Experience: Serving Suggestions and Creative Variations
Once your masterpiece has cooled slightly and is ready to be devoured, there are countless ways to enjoy it. My absolute favorite is simply dusting it with a generous amount of powdered sugar – it adds a touch of sweetness and an elegant finish that perfectly complements the rich pastry and vibrant strawberries. For an extra special treat, imagine a warm slice served à la mode with a scoop of vanilla bean ice cream, allowing the cold creaminess to contrast with the warm, flaky pastry. A dollop of freshly whipped cream or a drizzle of a simple lemon glaze would also be utterly divine, adding another layer of flavor and decadence. Think about serving it alongside your morning coffee or afternoon tea; it transforms a simple break into a moment of pure indulgence. If you’re feeling adventurous with future batches, consider exploring variations: while the strawberry filling is undeniably classic and utterly delicious, you could experiment with other seasonal berries like raspberries or blueberries, or even a mix of fruits. A sprinkle of toasted almonds or pecans folded into the filling could add a lovely nutty crunch, or perhaps a touch of orange zest to brighten the strawberry flavor even further. The beauty of this recipe lies in its adaptability; once you’ve mastered the technique, the possibilities are endless for making it uniquely your own.
Your Turn to Create and Share!
Now that you’re armed with all the knowledge and inspiration, I wholeheartedly encourage you to roll up your sleeves and give this incredible recipe a try. Don’t be intimidated by the braiding; it’s much easier than it looks, and the reward is immeasurable. There’s a special kind of joy that comes from baking, from transforming simple ingredients into something truly spectacular. I’m so excited for you to experience the flaky texture and the juicy strawberry explosion that awaits! Please, once you’ve baked your masterpiece, don’t hesitate to share your experience. I’d love to hear about your creations, see your beautiful braids, and know what you thought of this delightful journey. Happy baking, my friends!
Strawberry Braided Pastry
A delightful braided pastry featuring a rich, creamy cheese filling and sweet strawberry jam, encased in flaky puff pastry. This recipe offers an impressive presentation with surprisingly simple preparation, perfect for brunch or dessert.
Ingredients
-
½ cup (113.5g) Cream cheese (25% or more fat)
-
2 tbsp Sugar
-
1 large Egg yolk
-
1 tbsp All-purpose flour
-
1 tsp Vanilla extract
-
½ tsp Lemon zest
-
1 sheet (245g) Puff pastry, chilled (not frozen)
-
½ cup (170g) Strawberry jam
-
1 Beaten egg, for egg wash
Instructions
-
Step 1
In a small bowl, whisk together the cream cheese, sugar, egg yolk, all-purpose flour, vanilla extract, and lemon zest until the mixture is smooth and well combined. -
Step 2
Unroll the chilled puff pastry sheet onto a lightly floured surface or directly onto a piece of parchment paper. Gently roll it into a rectangle approximately 10×14 inches (25×35 cm) if needed. -
Step 3
Spoon the prepared cream cheese filling evenly down the center third of the pastry rectangle. Then, carefully spread the strawberry jam over the cream cheese layer, leaving a small border at the top and bottom of the central filling area. -
Step 4
Using a sharp knife or pizza cutter, make diagonal strips (approximately 1 inch wide) from the outer thirds of the pastry towards the central filling, ensuring not to cut into the filling itself. Fold the top and bottom edges of the pastry over the filling to seal the ends. Then, starting from one end, alternate folding the strips from left to right, overlapping them to create a braided pattern over the filling, fully encasing it. -
Step 5
Carefully transfer the braided pastry (if not already on it) to a baking sheet lined with parchment paper. Brush the entire surface of the pastry with the beaten egg wash for a golden, shiny finish. Bake in a preheated oven at 400°F (200°C) for 20-25 minutes, or until the pastry is puffed, golden brown, and cooked through. -
Step 6
Once baked, remove the pastry from the oven and let it cool on the baking sheet for 5-10 minutes before carefully transferring it to a wire rack to cool further. This pastry is best enjoyed warm or at room temperature. Slice and serve.
Important Information
Nutrition Facts (Per Serving)
It is important to consider this information as approximate and not to use it as definitive health advice.
Allergy Information
Please check ingredients for potential allergens and consult a health professional if in doubt.