
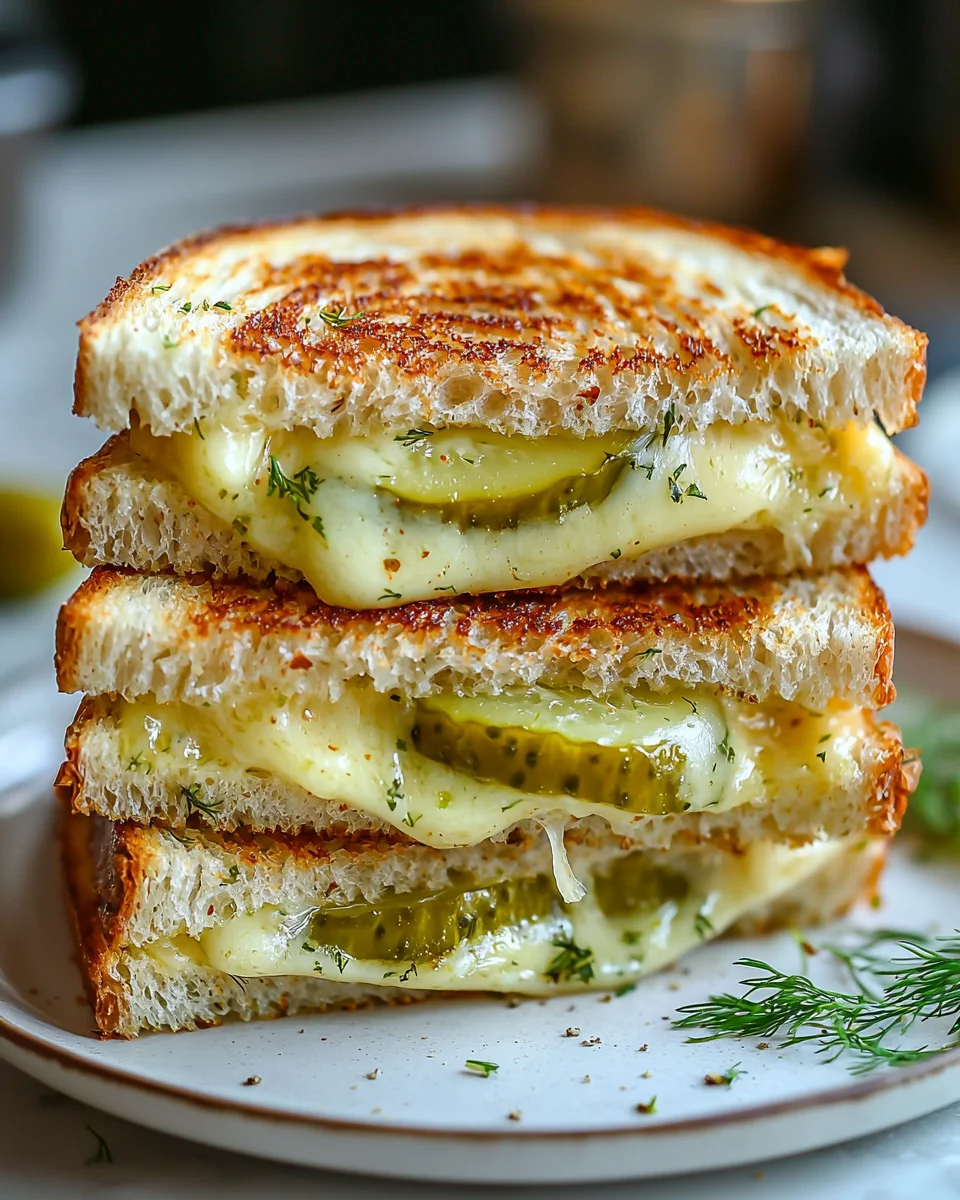
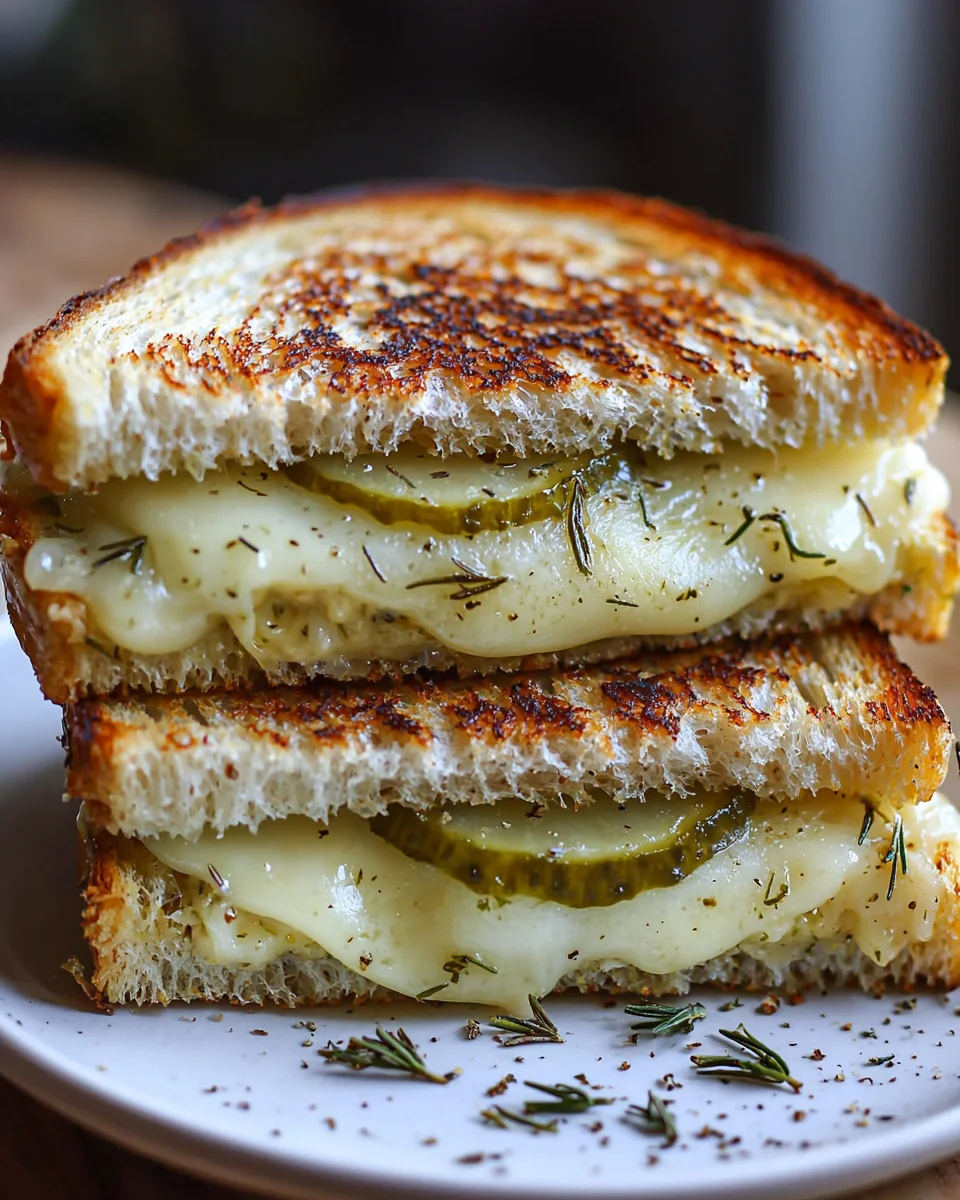
Crispy Dill Pickle Grilled Cheese Sandwich – does that sound like the ultimate comfort food upgrade to you? Because it certainly does to me, and I am thrilled to share this incredible recipe with you! We all cherish the classic grilled cheese, a timeless emblem of simple, satisfying meals that harks back to childhood memories and cozy afternoons. It’s a dish rooted deeply in American culinary culture, known for its unassuming charm and universal appeal. However, prepare to have your expectations delightfully surpassed. This innovative twist elevates the humble sandwich into something truly extraordinary. The magic lies in the masterful combination of golden, buttery, and incredibly crispy bread, generously filled with luscious, gooey melted cheese, perfectly complemented by the bright, tangy crunch of dill pickles. It’s a symphony of textures and flavors that dance on your palate – the rich savory cheese, the satisfying crispness of the bread, and that unexpected, zesty burst from the pickles that cuts through the richness beautifully. Creating a Crispy Dill Pickle Grilled Cheese Sandwich isn’t just about making a meal; it’s about crafting an unforgettable culinary experience that transforms an everyday staple into a gourmet delight, proving that even the simplest ingredients can achieve pure brilliance.

Ingredients:
- Bread: 8 slices of sturdy, good-quality bread. I personally love using a rustic sourdough or a hearty challah for its incredible crust, but a good brioche or even a classic white sandwich bread will work beautifully. Just make sure it’s not too thin, as we want it to hold up to all that cheesy goodness and crispy texture.
- Cheese: 12 ounces of your favorite melting cheeses. I recommend a blend for the best flavor and texture. My go-to is 6 ounces of sharp cheddar, grated, for its robust flavor and excellent melt, combined with 6 ounces of a creamy, melty cheese like Monterey Jack, Gruyere, or even a mild provolone, also grated. Grating the cheese yourself is a game-changer; pre-shredded cheese often contains anti-caking agents that can hinder that perfect, gooey melt we’re after.
- Dill Pickles: About 1/2 cup to 3/4 cup of good-quality dill pickle slices or chips. For the ultimate Crispy Dill Pickle Grilled Cheese Sandwich experience, I prefer using crinkle-cut dill pickle chips because their undulating surface allows for more nooks and crannies to trap the melted cheese and bread, providing a fantastic texture. Make sure they are well-drained and patted very, very dry. This step is crucial!
- Unsalted Butter: 4-6 tablespoons, softened to room temperature. This is our secret weapon for achieving that golden-brown, irresistibly crispy exterior. Using unsalted butter allows us to control the overall sodium content of the sandwich, which is important when dealing with salty pickles and cheese.
- Mayonnaise (Optional, for exterior): 2 tablespoons. While butter is classic, a thin layer of mayonnaise spread on the outside of the bread before grilling can achieve an even more consistently golden-brown and crispy crust. It’s a trick many professional chefs swear by, and I highly recommend trying it for an extra level of crispiness.
- Garlic Powder (Optional): 1/2 teaspoon, for adding a subtle savory depth to the butter.
- Freshly Ground Black Pepper (Optional): A few generous grinds, to taste.
Preparing Your Ultimate Crispy Dill Pickle Grilled Cheese Sandwich
Creating the perfect Crispy Dill Pickle Grilled Cheese Sandwich is an art form, really, and it all starts with thoughtful preparation. The key to success lies in meticulous attention to detail, from how you prepare your ingredients to how you manage the heat. Trust me, these steps make all the difference in achieving that glorious golden crust and gooey, flavorful interior.
- First things first, let’s get those pickles ready. Take your dill pickle slices and spread them out on a few layers of paper towels. Then, place another layer of paper towels on top and gently press down to absorb as much moisture as possible. Repeat this process a few times with fresh paper towels until the pickles are significantly dry to the touch. This step is absolutely critical because excess moisture from the pickles can make your bread soggy and prevent it from getting that desired crispiness. We’re aiming for a crispy, not a soggy, dill pickle experience!
- Next, let’s talk cheese. If you haven’t already, grate your sharp cheddar and your chosen creamy cheese (Monterey Jack, Gruyere, etc.). Combining these cheeses ensures a complex flavor profile and that enviable, stretchy, molten texture when melted. I like to mix them together in a small bowl, so they’re ready to be layered evenly.
- Now, let’s prepare the butter. In a small bowl, combine your softened unsalted butter with the optional garlic powder and a few generous grinds of fresh black pepper. Stir until well combined. This infused butter will add a wonderful savory note to our bread and contribute significantly to that crispy crust. If you’re opting for the mayonnaise trick, have it ready in a separate small dish.
Assembling the Layers of Flavor for Your Crispy Dill Pickle Grilled Cheese Sandwich
This is where the magic begins to take shape! Assembling the sandwich correctly is vital for even melting and distribution of flavors. We want every bite of this Crispy Dill Pickle Grilled Cheese Sandwich to be an absolute delight, brimming with gooey cheese and tangy pickle crunch.
- Lay out your eight slices of bread on a clean surface. Decide which side of each slice will be the “outside” (the side that touches the pan) and which will be the “inside.”
- For the outside of the bread: Generously butter one side of each of the eight slices with your flavored softened butter, spreading it all the way to the edges. If you’re using mayonnaise, spread a thin, even layer of mayo on one side of each of the eight slices instead of butter. This mayo-butter dilemma is a personal preference, but both yield fantastic results. I often use butter on one side of the sandwich and mayo on the other for a unique textural contrast.
- Now, for the inside: Take four of the bread slices (with the buttered/mayo-ed side down, facing your work surface) and sprinkle a generous layer of your mixed grated cheese over each. Aim for an even distribution, extending almost to the edges so the cheese melts and creates a wonderful “skirt” if it oozes out slightly during cooking.
- Arrange your thoroughly dried dill pickle slices on top of the cheese layers on these four bread slices. I like to create a single, even layer of pickles, making sure there’s enough pickle in every bite without overwhelming the cheese. Don’t be shy, but don’t stack them too high, or your sandwich might become unstable.
- Top the pickles with another generous layer of your mixed grated cheese. This second layer of cheese acts as a delicious glue, holding the pickles in place and ensuring a truly decadent, cheesy experience in our Crispy Dill Pickle Grilled Cheese Sandwich.
- Finally, place the remaining four buttered/mayo-ed bread slices on top of the cheese and pickle stack, ensuring the buttered/mayo-ed side is facing up – this will be the side that hits the pan first when you flip. Gently press down on each sandwich to consolidate the layers.
The Art of Achieving That Golden, Crispy Exterior
This is the moment of truth for our Crispy Dill Pickle Grilled Cheese Sandwich. The cooking process is where we transform simple ingredients into a masterpiece of texture and flavor. Patience and proper heat management are paramount for achieving that coveted golden-brown, crunchy crust and perfectly melted interior.
- Heat a large, heavy-bottomed skillet or a griddle over medium-low heat. I find that a cast-iron skillet provides the best heat retention and yields an incredibly even crisp. It’s important to start with medium-low heat. If the heat is too high, the bread will burn before the cheese has a chance to melt through, and we definitely don’t want that! Allow the pan to preheat for a good 3-5 minutes until it’s evenly hot.
- Carefully place one or two of your assembled sandwiches into the preheated pan, making sure not to overcrowd it. You want enough space for each sandwich to cook evenly without steaming.
- Cook for about 4-6 minutes on the first side. During this time, resist the urge to constantly lift and peek! Allow the heat to work its magic. You’re looking for a deep golden-brown color on the bread and for the cheese on the bottom layer to start visibly melting and oozing slightly. My secret here is to sometimes place a heavy, heat-proof plate or another skillet on top of the sandwiches while they cook. This gentle pressing helps create a more compact sandwich and ensures maximum contact with the hot pan, leading to a flatter, more consistently crispy crust.
- Once the first side is beautifully golden, carefully flip each sandwich using a wide spatula. If you notice the bread is browning too quickly, slightly reduce the heat.
- Cook for another 4-6 minutes on the second side, or until that side is also deeply golden-brown and crispy, and all the cheese inside is completely melted and gooey. You might even see a little cheese escaping the sides, forming those delicious crispy cheese edges. That’s a sign of success!
- Repeat the process with any remaining sandwiches, adjusting the heat as necessary between batches.
The Secret to Extra Crispiness and Flavor
While the basic steps will give you a fantastic sandwich, there are a few extra techniques I love to employ to elevate my Crispy Dill Pickle Grilled Cheese Sandwich to truly legendary status. These small touches can make a big difference in both texture and taste.
- The Lid Trick: About halfway through cooking the second side, sometimes I’ll place a lid over the skillet for a minute or two. This traps some of the heat and steam, which helps the cheese melt even faster and more thoroughly without burning the exterior of the bread. Just be sure to remove the lid for the last minute of cooking to ensure the bread gets re-crisped.
- Butter Boost: If your pan seems a little dry after flipping, don’t hesitate to add another small pat of butter to the pan before cooking the second side. The bread will absorb it, resulting in an even richer flavor and a more pronounced crispiness.
- Edge Toasting: For an all-around crispy experience, once both flat sides are golden, you can carefully use tongs to hold the sandwich on its edges in the hot pan for about 30 seconds per edge. This ensures every part of the bread gets kissed by the heat, adding another layer of texture.
Serving Your Irresistible Crispy Dill Pickle Grilled Cheese Sandwich
You’ve put in the effort, and now it’s time to enjoy the fruits of your labor! The serving stage is quick but crucial to ensure you get the absolute best experience from your freshly made Crispy Dill Pickle Grilled Cheese Sandwich.
- Once cooked to perfection, transfer your golden-brown grilled cheese sandwiches from the skillet to a cutting board.
- Resist the urge to cut immediately! Let the sandwiches rest for about 1-2 minutes. This brief resting period allows the molten cheese to set up just slightly, preventing it from oozing out excessively when you cut into it and ensuring a perfect, gooey pull.
- With a sharp, serrated knife, cut each sandwich in half, either diagonally (my preferred method for maximum visual appeal and easier handling) or straight across.
- Serve your incredible Crispy Dill Pickle Grilled Cheese Sandwich immediately, while it’s still warm, crispy, and the cheese is wonderfully melty. It’s fantastic on its own, but also pairs wonderfully with a simple bowl of tomato soup or a fresh green salad for a complete meal.
Tips for Customizing Your Crispy Dill Pickle Grilled Cheese Sandwich
One of the beautiful things about a grilled cheese sandwich is its versatility. Once you’ve mastered the basic Crispy Dill Pickle Grilled Cheese Sandwich, feel free to experiment and make it your own! Here are some ideas:
- Cheese Variations: Don’t limit yourself to cheddar and Monterey Jack! Try adding a touch of smoked gouda for depth, pepper jack for a kick, or even a dollop of cream cheese for extra creaminess. A slice of muenster or fontina would also melt beautifully.
- Bread Exploration: While sourdough and challah are great, experiment with rye bread for a deli-inspired twist, pumpernickel, or even a hearty whole wheat for a nuttier flavor. The key is a sturdy bread that can handle the fillings and crisp up nicely.
- Pickle Power: If you’re a true pickle enthusiast, consider using different types of dill pickles. Spicy dill pickles can add a fantastic zing, or even a slightly sweeter bread and butter pickle could work if you like a sweet and savory contrast. Just remember to always pat them dry!
- Herbaceous Touches: Mix finely chopped fresh dill, chives, or parsley into your butter or even directly with the cheese for an extra layer of fresh flavor. A pinch of onion powder alongside the garlic powder can also be delightful.
- Adding Heat: For those who love a bit of a kick, consider adding a few dashes of your favorite hot sauce to the inside of the sandwich before grilling, or sprinkle in some red pepper flakes with the cheese.
- Protein Boost: While it deviates slightly from a classic grilled cheese, a thin slice of crispy bacon or some finely shredded leftover chicken could be a delicious addition if you want to make it a more substantial meal.
Troubleshooting Common Grilled Cheese Challenges
Even seasoned home cooks can sometimes face hurdles when making grilled cheese. Here are a few common issues and how to solve them to ensure your Crispy Dill Pickle Grilled Cheese Sandwich turns out perfect every time:
- Bread Burning Before Cheese Melts: This is the most common culprit! Your heat is too high. Reduce the heat to medium-low. A good grilled cheese needs patience. It’s a slow and steady process that allows the bread to gradually toast while the cheese inside slowly reaches that perfect gooey state.
- Cheese Not Melting Completely: This can be due to a few reasons. Again, heat too high (burning the bread before the cheese melts) or not cooking long enough. Ensure your cheese is grated for optimal melt, as larger chunks take longer. Using a lid for part of the cooking time (as mentioned in our “Secret to Extra Crispiness” section) can also help trap heat and ensure a thorough melt.
- Sandwich Is Soggy, Not Crispy: This is often a result of too much moisture. Make sure you are thoroughly patting your pickles dry. Also, if you overcrowd the pan, the steam released from the ingredients can get trapped, leading to a steamy, rather than crispy, exterior. Cook in batches if your pan isn’t large enough.
- Edges Aren’t Crispy: Make sure you’re buttering or mayo-ing all the way to the edges of the bread. For extra crispy edges, briefly hold the sandwich on its sides with tongs in the hot pan after the main cooking, as described in the “Edge Toasting” tip.
- Too Salty: Dill pickles and many cheeses are inherently salty. If you find your sandwich too salty, consider using unsalted butter exclusively and a low-sodium version of your chosen cheeses if available. You might also want to choose a bread that isn’t particularly salty.
Conclusion:
I truly believe that once you experience the symphony of textures and flavors in this particular sandwich, your grilled cheese game will be forever changed. It’s not just about melting cheese between two slices of bread; it’s about crafting an experience, a moment of pure culinary delight that is both comforting and exhilarating. The crisp exterior, the gooey, savory interior, and then that unexpected, delightful tang from the dill pickles – it’s a revelation. This isn’t just a snack; it’s a statement, a bold declaration that comfort food can also be innovative and exciting. I’ve spent countless hours perfecting this recipe, ensuring every bite delivers that perfect balance of salty, savory, and wonderfully tart notes, all wrapped in a golden-brown, buttery embrace. It’s the kind of sandwich that makes you close your eyes and savor every single mouthful, a true testament to how simple ingredients, when combined with a little love and a clever twist, can create something truly extraordinary.
For anyone seeking a simple yet profoundly satisfying meal, the Crispy Dill Pickle Grilled Cheese Sandwich is, without a doubt, a must-try. It takes a beloved comfort food and elevates it to new, exciting heights, proving that sometimes the most extraordinary flavors come from the most unexpected pairings. I promise you, this isn’t just hype; it’s a genuinely unique culinary adventure that will surprise and delight your taste buds, quickly becoming a cherished favorite in your comfort food repertoire. The ease of preparation combined with the unforgettable taste makes it an ideal choice for a quick weeknight dinner, a fun weekend lunch, or even a nostalgic, cozy treat on a rainy afternoon.
What to Serve With Your Masterpiece:
While this sandwich is absolutely stellar on its own, pairing it with the right accompaniment can turn it into a complete, incredibly satisfying meal. My personal favorite is a classic, creamy tomato soup; the slightly acidic and warm soup perfectly complements the rich, savory sandwich. A simple green salad with a light vinaigrette can also cut through the richness and add a refreshing contrast. For those who love an extra layer of crunch, a side of your favorite potato chips is always a fantastic choice. And if you’re feeling adventurous, a crisp, tangy coleslaw would provide a wonderful textural and flavor counterpoint, making for an unforgettable lunch or dinner experience. Don’t underestimate the power of a perfectly paired side dish to enhance an already perfect main.
Exciting Variations to Explore:
This recipe is a fantastic canvas for your culinary creativity. While I’ve provided my absolute favorite rendition, I encourage you to experiment and make it truly your own:
-
Cheese Choices:
While I adore the classic sharp cheddar for its robust flavor and excellent melt, don’t hesitate to branch out. Provolone offers a milder, stretchier melt that kids often adore. Gruyere can introduce a wonderful nutty sophistication, adding an elegant touch. A blend of mozzarella and Monterey Jack can create the ultimate gooey, stretchy interior. Even a smoked gouda could add an incredible depth of flavor and a hint of smokiness that pairs surprisingly well with the dill.
-
Bread Matters:
Sourdough bread offers a wonderful tang and a fantastic, sturdy crisp when griddled, adding another layer of complex flavor. Rye bread brings its unique, earthy flavor that pairs surprisingly well with dill, creating a more robust sandwich. A rustic Italian bread or even a hearty multi-grain can also provide a sturdy, flavorful base, each offering a slightly different texture and taste profile to your grilled masterpiece.
-
Pickle Power:
If you’re feeling particularly adventurous, try different types of pickles! Bread and butter pickles, for instance, would introduce a subtle sweetness, creating a fascinating sweet and savory sensation. Spicy dill pickles could add an exciting, fiery kick for those who love a bit of heat. You could even finely chop some pickled jalapeños and mix them into the cheese for an extra layer of heat and acidity if that’s your thing, transforming the sandwich into something even more dynamic.
-
Protein Boost:
For a heartier meal, consider adding a thin slice of deli ham or some crispy, crumbled bacon. The salty, savory notes of these proteins would beautifully complement the cheese and pickles, turning your sandwich into an even more substantial and satisfying experience. A dollop of caramelized onions could also add a sweet, savory depth that is truly irresistible, offering a gourmet touch.
-
Herbaceous Touch:
A sprinkle of fresh dill or chives, either mixed into the cheese before grilling or sprinkled on top after, could enhance the fresh, herby notes beautifully, adding a vibrant aroma and an extra layer of flavor complexity to each bite.
-
Spicy Twist:
A small pinch of red pepper flakes mixed in with the cheese, or a thin layer of sriracha mayo spread on one of the bread slices, can give your sandwich a lovely, subtle fiery kick, awakening your taste buds and adding an unexpected warmth.
This recipe is more than just instructions; it’s an invitation. I urge you to clear some space in your schedule, gather your ingredients, and dive into the delicious world of this extraordinary grilled cheese. Don’t be shy about making it your own – these suggestions are just a starting point for your culinary creativity. This isn’t just about following a recipe; it’s about finding joy in the kitchen and creating something truly special for yourself and your loved ones.
Once you’ve experienced the magic, I would absolutely love to hear about it! What cheese did you choose? Did you add bacon or switch up your pickles? How did your family react? Please share your triumphs, your variations, and your overall experience. Your feedback and personal touches inspire me and other home cooks in our vibrant community. Seeing your creations truly brings me joy, and I can’t wait to see how you make this spectacular Crispy Dill Pickle Grilled Cheese Sandwich your own. It’s simple, it’s satisfying, and it’s unbelievably delicious. Go forth and grill, and don’t forget to savor every last bite!
Mouthwatering Crispy Dill Pickle Grilled Cheese Sandwich
Elevate your comfort food with this Mouthwatering Crispy Dill Pickle Grilled Cheese Sandwich! This recipe combines golden, buttery, and incredibly crispy bread with luscious, gooey melted cheese and the bright, tangy crunch of dill pickles. It’s a symphony of textures and flavors that transforms a classic into a gourmet delight, proving simple ingredients can achieve pure brilliance.
Ingredients
-
8 slices sturdy bread (e.g., sourdough, challah, brioche)
-
12 oz melting cheese blend, grated (e.g., 6 oz sharp cheddar, 6 oz Monterey Jack/Gruyere)
-
1/2 to 3/4 cup dill pickle slices or chips, well-drained and patted dry
-
4-6 tbsp unsalted butter, softened
-
2 tbsp mayonnaise (optional, for exterior)
-
1/2 tsp garlic powder (optional)
-
Freshly ground black pepper, to taste (optional)
Instructions
-
Step 1
Pat dill pickle slices very dry with paper towels; set aside. This step is crucial to prevent soggy bread. -
Step 2
Grate your sharp cheddar and chosen creamy cheese, then mix them together in a bowl. -
Step 3
In a small bowl, combine softened unsalted butter with optional garlic powder and a few grinds of black pepper. Have mayonnaise ready in a separate dish if you choose to use it for the exterior. -
Step 4
Lay out the eight slices of bread. Generously spread one side of each slice with the flavored butter (or a thin, even layer of mayonnaise) for the exterior. -
Step 5
Take four of the bread slices (with the buttered/mayo-ed side down, facing your work surface) and sprinkle a generous, even layer of half of your mixed grated cheese over each, extending almost to the edges. -
Step 6
Arrange the thoroughly dried dill pickle slices in a single, even layer on top of the cheese on these four bread slices. -
Step 7
Top the pickles with the remaining generous layer of mixed grated cheese, which will act as a delicious glue. -
Step 8
Finally, place the remaining four buttered/mayo-ed bread slices on top of the cheese and pickle stack, ensuring the buttered/mayo-ed side is facing up. Gently press down on each sandwich to consolidate the layers. -
Step 9
Preheat a large, heavy-bottomed skillet or griddle over medium-low heat for 3-5 minutes until evenly hot. -
Step 10
Carefully place one or two of your assembled sandwiches into the preheated pan, ensuring not to overcrowd. -
Step 11
Cook for about 4-6 minutes on the first side. Look for a deep golden-brown color and for the cheese on the bottom layer to start visibly melting. (Optional: place a heavy, heat-proof plate or another skillet on top to gently press the sandwiches for a more compact and consistently crispy crust). -
Step 12
Carefully flip each sandwich using a wide spatula. If the pan seems dry, add a small pat of butter. Cook for another 4-6 minutes, or until the second side is also deeply golden-brown and crispy, and all the cheese inside is completely melted and gooey. (Optional: About halfway through cooking the second side, you can place a lid over the skillet for 1-2 minutes to help the cheese melt faster, then remove to re-crisp the bread). -
Step 13
Repeat the cooking process with any remaining sandwiches, adjusting the heat as necessary between batches. -
Step 14
Transfer the cooked sandwiches from the skillet to a cutting board. Let them rest for about 1-2 minutes; this allows the molten cheese to set slightly, preventing excessive oozing when cut. -
Step 15
With a sharp, serrated knife, cut each sandwich in half, either diagonally (for visual appeal) or straight across. -
Step 16
For an all-around crispy experience, you can carefully use tongs to hold the sandwich on its edges in the hot pan for about 30 seconds per edge after the main cooking. -
Step 17
Serve your incredible Crispy Dill Pickle Grilled Cheese Sandwich immediately while still warm, crispy, and wonderfully melty. It pairs perfectly with tomato soup or a fresh green salad.
Important Information
Nutrition Facts (Per Serving)
It is important to consider this information as approximate and not to use it as definitive health advice.
Allergy Information
Please check ingredients for potential allergens and consult a health professional if in doubt.