
Cauldron Cookies are not just a dessert; they are an invitation to a world where culinary artistry meets a touch of enchantment. Imagine a treat so deep in flavor and mystique, it feels as though it has been simmered over an ancient fire, brewing pure delight in every bite. While these cookies may not possess actual magical properties, their evocative name harks back to an era of whimsical storytelling and festive gatherings, where special, often secret, recipes were brought forth to dazzle and delight. I believe their enduring appeal lies in this very spirit—a promise of something extraordinary.
Why We Are Charmed by These Magical Morsels
People absolutely adore these unique morsels for a multitude of reasons. Beyond the intriguing name, the typical Cauldron Cookie offers a rich, robust flavor profile—often a luxurious dark chocolate base, sometimes infused with exotic spices or a hint of coffee, creating a depth that is truly unparalleled. Their texture is frequently a perfect symphony: a slightly crisp edge giving way to a wonderfully chewy, soft center that melts in your mouth. They are remarkably versatile, perfect for Halloween parties, cozy winter evenings, or simply whenever you crave a comforting yet distinctive sweet. The experience of baking and sharing Cauldron Cookies transcends the ordinary, transforming a simple snack into a memorable occasion, brimming with warmth and wonder.

Ingredients:
- 2 ½ cups (300g) All-Purpose Flour: For the perfect structure and chewiness in our Cauldron Cookies. Make sure to spoon and level your flour, as packing it can lead to dense, dry cookies. I always use unbleached all-purpose flour for consistent results.
- 1 teaspoon Baking Soda: This is our leavening agent, giving our Cauldron Cookies a lovely lift and contributing to their signature chew. Ensure your baking soda is fresh for maximum effectiveness.
- ½ teaspoon Salt: A crucial ingredient! It balances the sweetness and enhances all the other flavors, making our Cauldron Cookies truly pop. Don’t skip it.
- 1 cup (226g) Unsalted Butter: I prefer unsalted butter because it gives me control over the total salt content. Make sure it’s softened to room temperature – not melted, not cold, but perfectly pliable. This is key for creating that creamy base for our Cauldron Cookies dough.
- 1 cup (200g) Granulated Sugar: Provides sweetness and helps with the spread and crisp edges of our Cauldron Cookies.
- ¾ cup (150g) Packed Light Brown Sugar: This adds a wonderful molasses flavor, moisture, and chewiness, contributing significantly to the signature texture of our Cauldron Cookies. Always make sure to firmly pack it into your measuring cup.
- 2 Large Eggs: Room temperature eggs bind our ingredients together, add richness, and help with the overall texture. If you forget to take them out, a quick soak in warm water for 5-10 minutes does the trick!
- 2 teaspoons Pure Vanilla Extract: Use the best quality you can find! Vanilla truly elevates the flavor of any cookie, especially these magical Cauldron Cookies.
- Optional: 1 cup Chocolate Chips (Dark, Milk, or White) or Other Mix-ins: While not strictly traditional for “Cauldron” cookies, adding chocolate chips, chopped nuts, or even themed sprinkles into the dough itself can be a fantastic way to personalize your Cauldron Cookies. I often find a mix of dark and milk chocolate chips gives the best balance.
- For the Enchanted Glaze:
- 2 cups (240g) Powdered Sugar (Confectioners’ Sugar): For a smooth, sweet glaze that dries to a lovely finish. Sifting is highly recommended to avoid lumps.
- 3-4 tablespoons Milk (or Water): I use whole milk for a richer glaze, but any milk or even water will work. Adjust quantity to achieve your desired consistency – thick enough to coat but thin enough to dip.
- ½ teaspoon Pure Vanilla Extract: To flavor our glaze, complementing the cookies perfectly.
- Green, Purple, or Black Gel Food Coloring: For that truly mystical “cauldron” effect! Gel colors give vibrant results without adding too much liquid.
- Optional: A tiny pinch of Black Cocoa Powder: For an extra deep, mysterious color if aiming for black Cauldron Cookies.
- For the Cauldron Toppings (Decoration):
- Assorted Halloween Sprinkles: Think bat, ghost, or even simple black, orange, and purple jimmies.
- Small Candy Eyeballs: A fun and spooky addition to make your Cauldron Cookies look like they’re bubbling with life.
- Gummy Worms or Spiders: For an extra creepy-crawly touch emerging from your “cauldron.”
- Edible Glitter or Luster Dust (optional): To add a magical shimmer to your finished Cauldron Cookies!
Gathering Your Ingredients and Preparing for Magical Cauldron Cookies
Before we even think about mixing, setting ourselves up for success is paramount. This initial preparation phase is where the magic truly begins for your Cauldron Cookies.
- Preheat Your Oven: Preheat your oven to 375°F (190°C). An accurately preheated oven is crucial for even baking. I always give my oven at least 15-20 minutes to come to temperature and stabilize, even after it indicates it’s ready. This ensures your Cauldron Cookies bake perfectly and consistently.
- Prepare Baking Sheets: Line two large baking sheets with parchment paper or silicone baking mats. This prevents sticking and makes cleanup a breeze. Plus, it helps your Cauldron Cookies bake more evenly on the bottom. I never skip this step!
- Whisk Dry Ingredients: In a medium bowl, whisk together the all-purpose flour, baking soda, and salt. Whisking thoroughly ensures these ingredients are evenly distributed, which is vital for the structure and rise of your Cauldron Cookies. Set this aside for now.
- Ensure Room Temperature Butter and Eggs: This step cannot be stressed enough! Softened butter (not melted!) creams with the sugars beautifully, incorporating air that gives your Cauldron Cookies their light texture. Room temperature eggs emulsify better with the butter mixture, preventing a curdled appearance and contributing to a smoother, more uniform dough. If your butter isn’t soft enough, cut it into smaller pieces and let it sit for a bit, or gently microwave it in 5-second bursts until pliable. For eggs, as mentioned, a warm water bath works wonders.
Crafting the Enchanted Cauldron Cookie Dough
Now that our mise en place is complete, we delve into the heart of our Cauldron Cookies – the dough! This is where the flavors truly meld and develop.
- Cream Butter and Sugars: In a large mixing bowl (or the bowl of a stand mixer fitted with the paddle attachment), add the softened unsalted butter, granulated sugar, and packed light brown sugar. Beat on medium speed for 2-3 minutes, or until the mixture is light, fluffy, and pale in color. This is called creaming, and it’s a critical step for incorporating air into the dough, which makes your Cauldron Cookies tender. Scrape down the sides of the bowl occasionally to ensure everything is well combined. You’re looking for a beautiful, airy base.
- Add Eggs and Vanilla: Reduce the mixer speed to low. Add the room temperature eggs one at a time, beating well after each addition until just combined. Then, stir in the pure vanilla extract. Be careful not to overmix at this stage; we just want everything incorporated. The mixture should look cohesive and glossy. If it looks a little separated, don’t worry, the flour will bring it all together. This liquid foundation is what will give our Cauldron Cookies their rich flavor.
- Gradually Add Dry Ingredients: With the mixer on low speed, gradually add the whisked dry ingredients (flour, baking soda, salt) to the wet mixture. Mix only until just combined and no streaks of flour remain. Overmixing the flour will develop the gluten too much, leading to tough, dry Cauldron Cookies. As soon as the flour disappears, stop the mixer. I often finish the last few stirs by hand with a spatula to ensure I don’t overmix.
- Fold in Optional Mix-ins: If you’re adding chocolate chips or other mix-ins, now is the time! Gently fold them into the dough using a spatula until evenly distributed. This ensures every bite of your Cauldron Cookies is filled with delightful surprises.
- Chill the Dough (Optional but Recommended): For the best results and to prevent excessive spreading, I highly recommend chilling your Cauldron Cookie dough for at least 30 minutes to an hour in the refrigerator. This allows the butter to firm up and the flavors to meld. If you skip this, your Cauldron Cookies might spread a bit more, but they’ll still be delicious! Chilled dough is also easier to scoop and handle.
Baking Your Magical Cauldron Cookies
The moment of truth! Baking these Cauldron Cookies to perfection is all about timing and observation.
- Scoop the Dough: Using a 1.5-2 tablespoon cookie scoop (or just two spoons), drop rounded balls of cookie dough onto the prepared baking sheets, leaving about 2 inches between each cookie. They will spread! I usually get about 12 cookies per standard baking sheet. This uniform size ensures all your Cauldron Cookies bake at the same rate.
- Bake to Perfection: Bake in your preheated 375°F (190°C) oven for 9-12 minutes. Baking times can vary depending on your oven, so keep an eye on them. You’re looking for edges that are lightly golden brown, but the centers should still look slightly soft and puffed. They will continue to set as they cool. For a chewier Cauldron Cookie, err on the side of underbaking slightly.
- Cool on Baking Sheets: Once baked, remove the Cauldron Cookies from the oven. Allow them to cool on the baking sheets for about 5 minutes before transferring them to a wire rack to cool completely. This initial cooling period on the hot sheet allows them to firm up without breaking, and you’ll achieve that perfect texture. Transferring them too soon can cause them to fall apart.
- Repeat for Remaining Dough: Continue baking the remaining cookie dough, making sure your baking sheets are cool before adding new dough (or use fresh, cool sheets) to ensure consistent results for all your Cauldron Cookies.
Creating the Enchanted Glaze for Cauldron Cookies
This is where our Cauldron Cookies truly come to life with their mystical, bubbling appearance. The glaze is crucial for the theme!
- Prepare the Glaze Base: In a medium bowl, whisk together the powdered sugar, 3 tablespoons of milk (or water), and ½ teaspoon vanilla extract. Start with 3 tablespoons of liquid and add more in tiny increments (half a teaspoon at a time) if needed.
- Achieve Perfect Consistency: You want a glaze that is thick enough to coat the back of a spoon and adhere to the cookies without running off completely, but thin enough to dip smoothly. If it’s too thick, add a tiny bit more milk; if too thin, whisk in a little more powdered sugar. This is a delicate balance, and getting it right is key for the look of your Cauldron Cookies.
- Color Your Cauldron Glaze: Now for the fun part! Add your chosen gel food coloring – green, purple, or black – a little at a time, stirring well after each addition, until you achieve your desired intense “cauldron brew” color. Gel colors are best as they don’t thin the glaze. If you’re going for a really deep, dark color, a tiny pinch of black cocoa powder can also help achieve that depth without adding too much food coloring. I love a vibrant green for a classic bubbling cauldron look!
- Ensure Cookies Are Completely Cool: It is absolutely essential that your Cauldron Cookies are completely cool before glazing. If they are even slightly warm, the glaze will melt and run off, making a sticky mess and ruining the magical effect. Patience is a virtue here!
Assembling and Decorating Your Cauldron Cookies
This final stage is where you truly unleash your creativity and transform simple cookies into captivating Cauldron Cookies, ready for any enchanted gathering!
- Glaze the Cauldron Cookies: Hold a completely cooled cookie by its edges and dip the top surface into the prepared colored glaze. You can dip the entire top or just part of it, leaving a small border to represent the cookie peeking out from under the “brew.” Alternatively, if you prefer less glaze, you can use a small offset spatula or butter knife to spread the glaze evenly over the top. Allow any excess glaze to drip off back into the bowl.
- Place on a Wire Rack: Carefully place the glazed Cauldron Cookie onto a wire rack set over a piece of parchment paper or foil. This catches any drips and allows air to circulate, helping the glaze to set properly. Work quickly, especially if you plan to add sprinkles or other decorations, as the glaze will start to set.
- Decorate Immediately: While the glaze is still wet, sprinkle your chosen Halloween sprinkles over the top. Add small candy eyeballs to look like they’re bubbling up from the “brew.” You can also strategically place gummy worms or spiders so they appear to be crawling out of the Cauldron Cookies. This is your chance to be truly whimsical and make each Cauldron Cookie unique!
- Allow Glaze to Set: Let the decorated Cauldron Cookies sit undisturbed on the wire rack for at least 1-2 hours, or until the glaze is completely set and firm to the touch. This waiting period is important to prevent smudging and ensures your beautiful decorations stay put. For faster setting, you can place them in a cool room or even the refrigerator for about 30 minutes.
- Final Touches (Optional): Once the glaze is set, if you wish to add extra sparkle, you can lightly brush edible glitter or luster dust over your Cauldron Cookies. This adds a truly magical, shimmering effect that will make them stand out.
- Serving and Storage: Once fully set, your enchanting Cauldron Cookies are ready to be served! They are best enjoyed fresh but can be stored in an airtight container at room temperature for up to 3-5 days. For longer storage, you can freeze them unglazed or even with the glaze (once fully set) for up to 2 months. Just thaw at room temperature before serving. These Cauldron Cookies are sure to be a showstopper at any gathering!

Conclusion:
Well, my friends, we’ve come to the end of our little culinary journey, but the real adventure is just beginning for you! I truly believe that this recipe isn’t just another item to tick off your baking list; it’s a gateway to something special, a delightful secret weapon in your dessert arsenal. What makes these particular treats an absolute must-try? It’s the perfect symphony of their wonderfully crispy edges giving way to a lusciously chewy center, the deep, comforting aroma that will effortlessly fill every corner of your kitchen, and that utterly delightful flavor profile that manages to be both wonderfully familiar and wonderfully unique. They’re the kind of bake that possesses an almost magical ability to bring people together, sparking genuine conversations and widespread smiles with every single, heavenly bite. This isn’t just a dessert you’re creating; it’s an experience, a little piece of homemade culinary magic that you can easily and joyfully recreate time and time again.
The Irresistible Allure of These Treats:
The true beauty of these Cauldron Cookies extends far beyond their initial bake. While they are, without a shadow of a doubt, absolutely divine straight out of the oven – still wonderfully warm and delightfully gooey – please don’t stop your culinary exploration there! Imagine the sheer indulgence of serving them alongside a generous scoop of rich, creamy vanilla bean ice cream, allowing the gentle warmth of the cookie to delicately melt the surrounding cream, creating an absolutely perfect spoonful of pure, unadulterated bliss. Or, for those moments when you desire a touch more sophistication, a delicate drizzle of homemade salted caramel sauce or a subtle sprinkle of flaky sea salt can instantly elevate their status, making them worthy of the most elegant dessert menu. For those wonderfully cozy, chilly evenings, pairing them with a steaming mug of artisanal hot cocoa or a robust, freshly brewed coffee creates the ultimate comforting moment, a perfect pause in a busy day. They also make an incredibly thoughtful and much-appreciated gift, whether wrapped simply in parchment paper and twine or presented in a charming cookie tin.
Endless Serving Suggestions & Creative Variations:
Thinking about how to truly make them your own with variations? Oh, my dears, the possibilities are genuinely endless, limited only by your imagination! For a delightful seasonal twist, you could effortlessly swap out some of the standard spices for more autumnal notes like extra cinnamon, a touch of warming nutmeg, or even a hint of ground ginger, making them absolutely perfect for holiday gatherings. For a burst of delightful freshness during the warmer summer months, consider adding a tiny, bright dollop of tangy raspberry compote or a few fresh berries on top. You can also enthusiastically experiment with different varieties of chocolate – think rich dark chocolate, creamy milk chocolate, or even sweet white chocolate chips – or joyfully incorporate chopped nuts like toasted pecans or walnuts for an extra layer of delightful crunch and satisfying depth. Imagine them with a sprinkle of toasted coconut, or perhaps even a dash of fragrant orange zest mixed into the dough for a bright, citrusy counterpoint that truly awakens the palate. And for those feeling truly adventurous and wanting to add a touch of elegance, a simple dusting of powdered sugar or a delicate lemon glaze can add a beautiful, polished finish, making them even more perfect for gifting or special occasions. Don’t forget, these incredible cookies store beautifully in an airtight container for several days, meaning you can enjoy that comforting, magical taste whenever the craving strikes, or perhaps even warm them ever so gently in the microwave for that irresistible just-baked feel all over again!
Your Turn to Create & Share!
So, now, my wonderful baking enthusiasts, it’s truly your turn! I genuinely hope you’re feeling incredibly inspired and ready to roll up your sleeves, don your apron, and bring these incredible treats to life in your very own kitchen. Trust me, the profound joy of creating something so utterly delicious and deeply satisfying from scratch is an unparalleled feeling that every home baker cherishes. Don’t be shy, embrace this delightful baking adventure with open arms and a warm heart! Once you’ve pulled your glorious batch of these delightful cookies from the oven and savored that first magical bite, I would absolutely love, love, love to hear all about your experience. Did you add any unique twists that made them extra special? What was your absolute favorite part of the entire baking process? Did they bring immense smiles to the faces of your beloved family and cherished friends? Please, I eagerly encourage you to share your photos, your heartwarming stories, and your triumphant baking moments in the comments section below, or feel free to tag me on your favorite social media platforms. Your invaluable feedback, your brilliant ideas, and your boundless creativity inspire not just me, but our entire vibrant community of enthusiastic home bakers. This recipe is so much more than just a set of instructions; it’s a heartfelt invitation to create lasting memories, to share comforting warmth, and to indulge in a truly magical sweet escape that will leave everyone craving more. Go forth and bake, my friends, and let the utterly delicious aroma fill your home and your hearts! I cannot wait to see what wonderful, scrumptious things you create.
Spooky Cauldron Cookies: Easy Recipe for Halloween Fun!
Cauldron Cookies are not just a dessert; they are an invitation to a world where culinary artistry meets a touch of enchantment. Imagine a treat so deep in flavor and mystique, it feels as though it has been simmered over an ancient fire, brewing pure delight in every bite. While these cookies may not possess actual magical properties, their evocative name harks back to an era of whimsical storytelling and festive gatherings, where special, often secret, recipes were brought forth to dazzle and delight. I believe their enduring appeal lies in this very spirit—a promise of something extraordinary.
Ingredients
-
1 (15.25 ounce) box Devil’s Food cake mix
-
2 large eggs
-
1/2 cup canola or vegetable oil
-
Black food coloring (optional)
-
1 cup unsalted butter, softened
-
3 cups powdered sugar
-
1 teaspoon vanilla extract
-
1/2 teaspoon salt
-
1-3 tablespoons milk
-
Green food coloring
-
Round green sprinkles
-
Halloween sprinkles
-
Candy eyeballs
-
Pretzel sticks
Instructions
-
Step 1
Preheat oven to 375°F (190°C). Line two large baking sheets with parchment paper or silicone baking mats. -
Step 2
In a large mixing bowl, combine the Devil’s Food cake mix, 2 large eggs, and 1/2 cup canola or vegetable oil. Mix on medium speed until a stiff, cohesive dough forms. If desired for a deeper color, mix in a few drops of black food coloring until evenly distributed. -
Step 3
For easier handling and to prevent excessive spreading, chill the cookie dough in the refrigerator for at least 30 minutes. -
Step 4
Using a 1.5-2 tablespoon cookie scoop, drop rounded balls of dough onto the prepared baking sheets, leaving about 2 inches between each. Bake in the preheated oven for 9-12 minutes, or until the edges are lightly golden brown and the centers still look slightly soft. They will set more as they cool. -
Step 5
Remove cookies from the oven and let them cool on the baking sheets for 5 minutes before transferring them to a wire rack to cool completely. Ensure cookies are entirely cool before glazing. -
Step 6
In a medium bowl, whisk together the softened unsalted butter, powdered sugar, vanilla extract, and salt. Gradually add 1-3 tablespoons of milk until a smooth, thick glaze consistency is achieved (thick enough to coat, but thin enough to dip). Stir in green food coloring a little at a time until you reach a vibrant ‘cauldron brew’ color. -
Step 7
Hold a completely cooled cookie by its edges and dip the top surface into the prepared green glaze. Allow any excess glaze to drip off back into the bowl, then place the glazed cookie onto a wire rack set over parchment paper or foil to catch drips. -
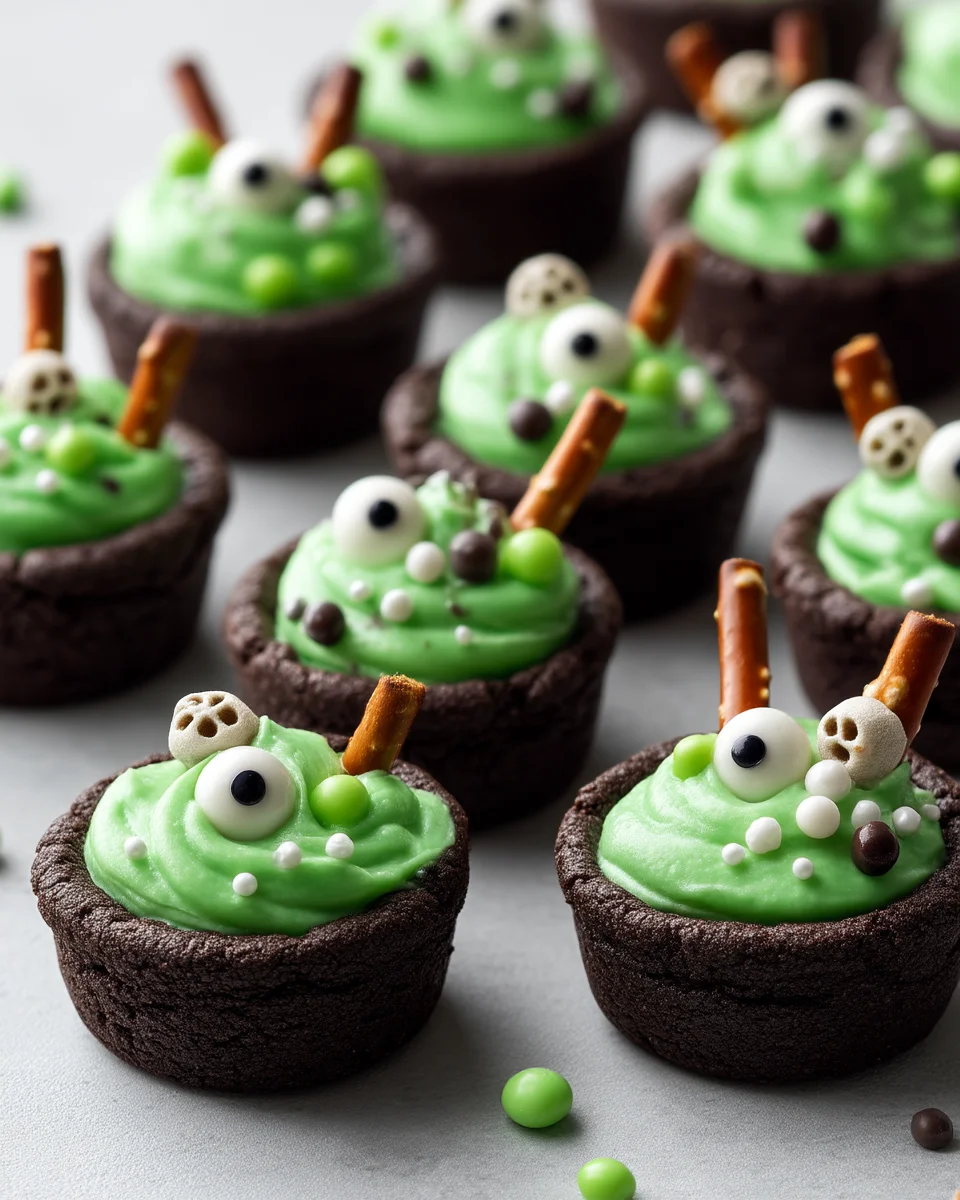
Step 8
While the glaze is still wet, immediately sprinkle with round green sprinkles and Halloween sprinkles. Add small candy eyeballs to create a bubbling effect. Break pretzel sticks into small pieces and insert two small pieces at the top sides of each cookie to resemble cauldron handles. -
Step 9
Allow the decorated Cauldron Cookies to sit undisturbed on the wire rack for at least 1-2 hours, or until the glaze is completely set and firm to the touch. -
Step 10
Once fully set, your enchanting Cauldron Cookies are ready to be served! Store them in an airtight container at room temperature for up to 3-5 days.
Important Information
Nutrition Facts (Per Serving)
It is important to consider this information as approximate and not to use it as definitive health advice.
Allergy Information
Please check ingredients for potential allergens and consult a health professional if in doubt.