
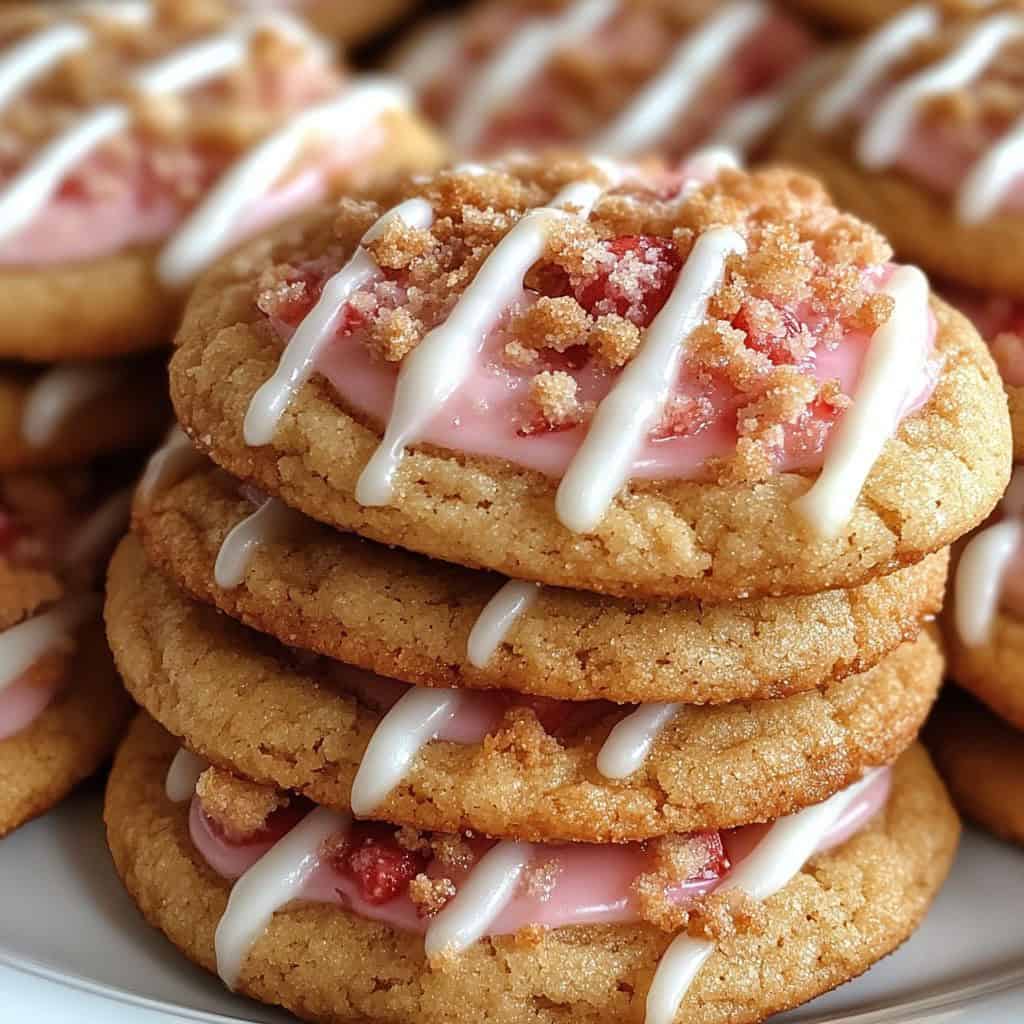
Strawberry crunch cookies, a delightful twist on a classic treat, are about to become your new favorite obsession. Imagine sinking your teeth into a soft, chewy cookie, bursting with the sweet and tangy flavor of fresh strawberries, and then encountering that irresistible, crunchy crumble topping. It’s a symphony of textures and tastes that will leave you craving more!
While not steeped in centuries of tradition, the strawberry crunch flavor profile draws inspiration from the beloved strawberry shortcake ice cream bars of our childhoods. That iconic combination of creamy strawberry and crunchy coating has been reimagined in cookie form, offering a nostalgic yet modern dessert experience.
What makes these strawberry crunch cookies so irresistible? It’s the perfect balance of sweet and slightly tart, the satisfying chewiness of the cookie itself, and that addictive crunch that elevates the entire experience. They’re also incredibly easy to make, requiring minimal effort for maximum flavor payoff. Whether you’re baking for a special occasion or simply want to treat yourself, these cookies are guaranteed to bring a smile to your face. Get ready to bake up a batch of pure happiness!

Ingredients:
- For the Cookies:
- 1 cup (2 sticks) unsalted butter, softened
- ¾ cup granulated sugar
- ¾ cup packed light brown sugar
- 2 large eggs
- 1 teaspoon vanilla extract
- 2 ¼ cups all-purpose flour
- 1 teaspoon baking soda
- 1 teaspoon salt
- 1 cup freeze-dried strawberries, finely crushed (about 1.5 oz)
- For the Strawberry Crunch Coating:
- 1 cup Golden Oreo cookies, finely crushed (about 36 cookies)
- ½ cup freeze-dried strawberries, finely crushed (about 0.75 oz)
- ¼ cup unsalted butter, melted
- 2 tablespoons powdered sugar
- Pinch of salt
- Optional Glaze (for extra sweetness and shine):
- 1 cup powdered sugar
- 2-3 tablespoons milk (or strawberry juice for extra flavor)
- ¼ teaspoon vanilla extract
Preparing the Strawberry Crunch Coating:
- Crush the Golden Oreos: Place the Golden Oreo cookies in a food processor and pulse until they are finely crushed into crumbs. Alternatively, you can place them in a large zip-top bag and crush them with a rolling pin. You want a fine crumb consistency.
- Crush the Freeze-Dried Strawberries: If you haven’t already, crush the freeze-dried strawberries for the coating. A food processor works best for this, but you can also use a zip-top bag and a rolling pin. Make sure they are finely crushed; larger pieces won’t adhere as well to the cookies.
- Combine Dry Ingredients: In a medium bowl, combine the crushed Golden Oreo crumbs, crushed freeze-dried strawberries, powdered sugar, and a pinch of salt. Whisk together until evenly distributed. This ensures that the strawberry flavor is consistent throughout the coating.
- Add Melted Butter: Pour the melted butter over the dry ingredients. Use a fork or your fingers to mix the butter into the crumbs until the mixture resembles wet sand. It should clump together slightly when pressed. This is what will help the coating stick to the cookies.
- Set Aside: Set the strawberry crunch coating aside while you prepare the cookie dough. This allows the flavors to meld together and the butter to slightly solidify, making the coating easier to handle.
Making the Strawberry Cookie Dough:
- Cream Butter and Sugars: In a large bowl (or the bowl of a stand mixer), cream together the softened butter, granulated sugar, and brown sugar until light and fluffy. This usually takes about 3-5 minutes. Make sure your butter is properly softened, but not melted, for the best results. The creaming process incorporates air into the butter and sugar, which contributes to the cookies’ soft texture.
- Add Eggs and Vanilla: Beat in the eggs one at a time, mixing well after each addition. Then, stir in the vanilla extract. Ensure the eggs are fully incorporated before adding the next one to prevent the mixture from curdling. The vanilla extract enhances the overall flavor of the cookies.
- Combine Dry Ingredients: In a separate medium bowl, whisk together the all-purpose flour, baking soda, and salt. Whisking ensures that the baking soda and salt are evenly distributed throughout the flour, which is crucial for proper leavening and flavor.
- Gradually Add Dry Ingredients to Wet Ingredients: Gradually add the dry ingredients to the wet ingredients, mixing on low speed until just combined. Be careful not to overmix the dough, as this can result in tough cookies. Overmixing develops the gluten in the flour, leading to a chewier, less tender cookie.
- Incorporate Crushed Freeze-Dried Strawberries: Gently fold in the crushed freeze-dried strawberries until they are evenly distributed throughout the dough. Again, be careful not to overmix. The freeze-dried strawberries add a burst of strawberry flavor and a beautiful pink hue to the cookies.
- Chill the Dough: Cover the bowl with plastic wrap and chill the dough in the refrigerator for at least 30 minutes. Chilling the dough helps to prevent the cookies from spreading too much during baking and also allows the flavors to meld together. You can chill the dough for up to 24 hours if needed.
Assembling and Baking the Cookies:
- Preheat Oven: Preheat your oven to 350°F (175°C). Line baking sheets with parchment paper or silicone baking mats. This prevents the cookies from sticking and makes cleanup easier.
- Scoop and Shape the Dough: Use a cookie scoop or spoon to scoop out portions of the chilled dough. Roll each portion into a ball. I usually aim for about 1.5-2 tablespoons of dough per cookie.
- Coat with Strawberry Crunch: Gently press each cookie dough ball into the strawberry crunch coating, ensuring that it is evenly coated on all sides. You can gently press the coating onto the dough to help it adhere.
- Place on Baking Sheets: Place the coated cookie dough balls onto the prepared baking sheets, leaving about 2 inches of space between each cookie. This allows for proper air circulation and prevents the cookies from sticking together as they bake.
- Bake: Bake for 10-12 minutes, or until the edges are lightly golden brown and the centers are set. Keep a close eye on the cookies, as baking times may vary depending on your oven.
- Cool: Remove the baking sheets from the oven and let the cookies cool on the baking sheets for a few minutes before transferring them to a wire rack to cool completely. This prevents the cookies from breaking apart while they are still warm and soft.
Optional Glaze (for extra sweetness):
- Prepare the Glaze: While the cookies are cooling, prepare the optional glaze. In a small bowl, whisk together the powdered sugar, milk (or strawberry juice), and vanilla extract until smooth. Add more milk, one teaspoon at a time, until you reach your desired consistency. The glaze should be thin enough to drizzle but thick enough to coat the cookies.
- Drizzle the Glaze: Once the cookies are completely cool, drizzle the glaze over the tops of the cookies. You can use a spoon or a piping bag to drizzle the glaze.
- Let the Glaze Set: Allow the glaze to set completely before serving or storing the cookies. This usually takes about 15-20 minutes.
Tips for Perfect Strawberry Crunch Cookies:
- Use High-Quality Ingredients: The quality of your ingredients will directly impact the flavor and texture of your cookies. Use good-quality butter, vanilla extract, and freeze-dried strawberries for the best results.
- Don’t Overmix the Dough: Overmixing the dough can result in tough cookies. Mix the dry ingredients into the wet ingredients until just combined, and be gentle when folding in the crushed freeze-dried strawberries.
- Chill the Dough: Chilling the dough is crucial for preventing the cookies from spreading too much during baking. It also allows the flavors to meld together and develop.
- Don’t Overbake: Overbaking the cookies will result in dry, crumbly cookies. Bake them until the edges are lightly golden brown and the centers are set. They will continue to firm up as they cool.
- Store Properly: Store the cooled cookies in an airtight container at room temperature for up to 3-4 days. If you glaze the cookies, store them in a single layer to prevent the glaze from sticking together.
Variations:
- Chocolate Chips: Add ½ cup of chocolate chips (milk, dark, or white) to the cookie dough for a chocolatey twist.
- Strawberry Extract: Add ½ teaspoon of strawberry extract to the cookie dough for an even more intense strawberry flavor.
- Different Oreo Flavors: Experiment with different Oreo flavors in the crunch coating, such as strawberry shortcake Oreos or birthday cake Oreos.
- Nuts: Add ¼ cup of chopped nuts (such as pecans or walnuts) to the cookie dough or the crunch coating for added texture and flavor.
Conclusion:
And there you have it! These Strawberry Crunch Cookies are more than just a sweet treat; they’re a nostalgic trip down memory lane with a modern, delicious twist. I truly believe this recipe is a must-try for anyone who loves the iconic strawberry shortcake ice cream bar or simply appreciates a perfectly balanced cookie. The combination of the soft, chewy cookie base, the creamy white chocolate chips, and that irresistible, crunchy strawberry topping is simply divine.
But why is this recipe a must-try, you ask? Well, beyond the incredible flavor and texture, it’s surprisingly easy to make. You don’t need to be a seasoned baker to whip up a batch of these beauties. The ingredients are readily available, and the steps are straightforward. Plus, the “wow” factor is off the charts! Imagine the look on your friends’ and family’s faces when you present them with these delightful cookies. They’ll be begging for the recipe, trust me!
Now, let’s talk serving suggestions and variations. While these cookies are absolutely perfect on their own, warm from the oven with a glass of cold milk, there are plenty of ways to elevate the experience. Consider crumbling them over vanilla ice cream for an extra layer of strawberry crunch goodness. Or, use them as the base for mini ice cream sandwiches – simply sandwich a scoop of strawberry or vanilla ice cream between two cookies. For a more sophisticated presentation, drizzle them with melted white chocolate and sprinkle with extra freeze-dried strawberries.
If you’re feeling adventurous, you can experiment with different variations of the recipe. Try using a different type of extract in the cookie dough, such as almond or vanilla bean paste, to add a subtle depth of flavor. You could also swap out the white chocolate chips for milk chocolate or dark chocolate chips, depending on your preference. For a vegan version, use plant-based butter, egg replacer, and vegan white chocolate chips. The possibilities are endless!
Another fun variation is to incorporate the strawberry crunch topping directly into the cookie dough. Simply crumble some of the topping and gently fold it into the dough before baking. This will create a more intensely flavored and textured cookie. You could also add a swirl of strawberry jam to the top of each cookie before baking for an extra burst of strawberry flavor.
I’m so excited for you to try this recipe and experience the joy of these Strawberry Crunch Cookies for yourself. I’ve poured my heart and soul into perfecting this recipe, and I’m confident that you’ll love it as much as I do. Don’t be afraid to get creative and experiment with different variations to make it your own.
So, what are you waiting for? Gather your ingredients, preheat your oven, and get ready to bake up a batch of these irresistible cookies. And most importantly, don’t forget to share your experience with me! I’d love to hear your feedback, see your photos, and learn about any variations you’ve tried. You can tag me on social media using [Your Social Media Handle] and use the hashtag #StrawberryCrunchCookies. Happy baking! I can’t wait to see your creations! Let me know if you have any questions, and I’ll be happy to help. Enjoy!
Strawberry Crunch Cookies: The Ultimate Recipe & Baking Guide
Soft, chewy strawberry cookies with a sweet, crunchy strawberry Oreo topping. Packed with strawberry flavor, perfect for any occasion!
Ingredients
- 1 cup (2 sticks) unsalted butter, softened
- ¾ cup granulated sugar
- ¾ cup packed light brown sugar
- 2 large eggs
- 1 teaspoon vanilla extract
- 2 ¼ cups all-purpose flour
- 1 teaspoon baking soda
- 1 teaspoon salt
- 1 cup freeze-dried strawberries, finely crushed (about 1.5 oz)
- 1 cup Golden Oreo cookies, finely crushed (about 36 cookies)
- ½ cup freeze-dried strawberries, finely crushed (about 0.75 oz)
- ¼ cup unsalted butter, melted
- 2 tablespoons powdered sugar
- Pinch of salt
- 1 cup powdered sugar
- 2-3 tablespoons milk (or strawberry juice for extra flavor)
- ¼ teaspoon vanilla extract
Instructions
- Crush the Golden Oreos: Place the Golden Oreo cookies in a food processor and pulse until they are finely crushed into crumbs. Alternatively, you can place them in a large zip-top bag and crush them with a rolling pin. You want a fine crumb consistency.
- Crush the Freeze-Dried Strawberries: If you haven’t already, crush the freeze-dried strawberries for the coating. A food processor works best for this, but you can also use a zip-top bag and a rolling pin. Make sure they are finely crushed; larger pieces won’t adhere as well to the cookies.
- Combine Dry Ingredients: In a medium bowl, combine the crushed Golden Oreo crumbs, crushed freeze-dried strawberries, powdered sugar, and a pinch of salt. Whisk together until evenly distributed. This ensures that the strawberry flavor is consistent throughout the coating.
- Add Melted Butter: Pour the melted butter over the dry ingredients. Use a fork or your fingers to mix the butter into the crumbs until the mixture resembles wet sand. It should clump together slightly when pressed. This is what will help the coating stick to the cookies.
- Set Aside: Set the strawberry crunch coating aside while you prepare the cookie dough. This allows the flavors to meld together and the butter to slightly solidify, making the coating easier to handle.
- Cream Butter and Sugars: In a large bowl (or the bowl of a stand mixer), cream together the softened butter, granulated sugar, and brown sugar until light and fluffy. This usually takes about 3-5 minutes. Make sure your butter is properly softened, but not melted, for the best results. The creaming process incorporates air into the butter and sugar, which contributes to the cookies’ soft texture.
- Add Eggs and Vanilla: Beat in the eggs one at a time, mixing well after each addition. Then, stir in the vanilla extract. Ensure the eggs are fully incorporated before adding the next one to prevent the mixture from curdling. The vanilla extract enhances the overall flavor of the cookies.
- Combine Dry Ingredients: In a separate medium bowl, whisk together the all-purpose flour, baking soda, and salt. Whisking ensures that the baking soda and salt are evenly distributed throughout the flour, which is crucial for proper leavening and flavor.
- Gradually Add Dry Ingredients to Wet Ingredients: Gradually add the dry ingredients to the wet ingredients, mixing on low speed until just combined. Be careful not to overmix the dough, as this can result in tough cookies. Overmixing develops the gluten in the flour, leading to a chewier, less tender cookie.
- Incorporate Crushed Freeze-Dried Strawberries: Gently fold in the crushed freeze-dried strawberries until they are evenly distributed throughout the dough. Again, be careful not to overmix. The freeze-dried strawberries add a burst of strawberry flavor and a beautiful pink hue to the cookies.
- Chill the Dough: Cover the bowl with plastic wrap and chill the dough in the refrigerator for at least 30 minutes. Chilling the dough helps to prevent the cookies from spreading too much during baking and also allows the flavors to meld together. You can chill the dough for up to 24 hours if needed.
- Preheat Oven: Preheat your oven to 350°F (175°C). Line baking sheets with parchment paper or silicone baking mats. This prevents the cookies from sticking and makes cleanup easier.
- Scoop and Shape the Dough: Use a cookie scoop or spoon to scoop out portions of the chilled dough. Roll each portion into a ball. I usually aim for about 1.5-2 tablespoons of dough per cookie.
- Coat with Strawberry Crunch: Gently press each cookie dough ball into the strawberry crunch coating, ensuring that it is evenly coated on all sides. You can gently press the coating onto the dough to help it adhere.
- Place on Baking Sheets: Place the coated cookie dough balls onto the prepared baking sheets, leaving about 2 inches of space between each cookie. This allows for proper air circulation and prevents the cookies from sticking together as they bake.
- Bake: Bake for 10-12 minutes, or until the edges are lightly golden brown and the centers are set. Keep a close eye on the cookies, as baking times may vary depending on your oven.
- Cool: Remove the baking sheets from the oven and let the cookies cool on the baking sheets for a few minutes before transferring them to a wire rack to cool completely. This prevents the cookies from breaking apart while they are still warm and soft.
- Prepare the Glaze: While the cookies are cooling, prepare the optional glaze. In a small bowl, whisk together the powdered sugar, milk (or strawberry juice), and vanilla extract until smooth. Add more milk, one teaspoon at a time, until you reach your desired consistency. The glaze should be thin enough to drizzle but thick enough to coat the cookies.
- Drizzle the Glaze: Once the cookies are completely cool, drizzle the glaze over the tops of the cookies. You can use a spoon or a piping bag to drizzle the glaze.
- Let the Glaze Set: Allow the glaze to set completely before serving or storing the cookies. This usually takes about 15-20 minutes.
Notes
- Use high-quality ingredients for the best flavor.
- Don’t overmix the dough, or the cookies will be tough.
- Chilling the dough is essential to prevent spreading.
- Don’t overbake the cookies; they should be lightly golden brown.
- Store cooled cookies in an airtight container at room temperature.